
Every spring, when I plant seeds in my garden, I buy unique (often expensive) plant markers to identify my herbs and vegetables. It’s not that I can’t identify my plants without the markers…its just that I like the way the markers look in my garden.
Well, it never fails…by late August, the markers have faded, rusted, or have gone missing. I usually end up throwing the silly things out in November and buying a whole new batch for the next growing season. This year, visiting the paint department at our local hardware store, I got the idea of using paint stirring sticks (that are free) to make my own plant markers. While they may only last one or two seasons, at least they are reasonably priced! The girls and I had fun making them together. This is also a great gift idea for Mother’s or Father’s Day.
DIY – Plant Markers
Visit your local hardware store and ask for a few paint stirring sticks. ( We are painting our bathroom and laundry room so they gave us plenty of sticks with our paint purchase).
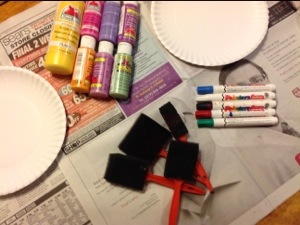
Supplies
Paint Stirring Sticks
Craft Paint
Permanent Black Sharpie Marker or Paint Markers
Satin Clear Spray Paint or Spray Sealer


Paint both sides of the sticks with craft paint; letting them dry thoroughly between coats. Use the permanent marker to write various plant names on the paint sticks. Spray several coats of clear spray paint or sealer over entire stick. Let dry completely before putting them outdoors.


What a clever and colourful idea! Thanks for sharing!
LikeLike
You are welcome… A great and inexpensive project that the whole family can enjoy making.
LikeLike
What a fantastic idea! I want to do this next year when we plant our garden. Thanks for sharing it.
LikeLike
You are welcome, Shari…We have had some wet and windy weather lately and they seem to be holding up very well in the garden.
LikeLike
I love the paint stirrer stick idea for garden tags! Next year, providing I once again have a garden spot!
Your blog is very fun.
Thanks for stopping by my blog.
LikeLike
Thanks, Suzette! Collect the stirrers throughout the fall and winter so that you have them in the spring. Good luck with your next year’s garden and thanks for your comment!
LikeLike
I just showed this to my hubby – we can’t wait to use this idea come Spring!
LikeLike
Yes, we really enjoyed making these markers, Shanna. They really held up well through the changing weather this past season…extreme heat, rain, wind, early morning frost…they did quite well. I have pulled them up and wiped them down for another appearance next spring. So glad you liked the post, Shanna…Have a great day!
LikeLike
How delightful! My husband and I just planted our garden, and while he’s a pro and can tell the sprouts from another, they all look the same to me! This looks like a lovely and simple solution to help me keep them straight.
Oh, and thanks for sharing love on my post about the baby calf. 🙂 Isn’t she precious?!
LikeLike
Oh, they are so easy to make and they’re quite inexpensive. If you put them out of the ground early in the fall and clean them up, they will last a long time. Cheers!
LikeLiked by 1 person