Posted in Baked goods, Baking, breakfast, Desserts, Food

Apricot and Oatmeal Fruit Bars

IMG_4748
I sent another care package to campus this week. Inside, I carefully tucked some dried fruit, a couple of containers of soup, a bag of granola, and a few homemade Apricot and Oatmeal Fruit Bars.
While I’ve had this recipe for a while, I have never really made this particular bar before. It’s adapted from the original that is printed on the inside of the Solo fruit filling label. When I recently stumbled across the recipe in my kitchen file, I realized that it was a much simpler version as compared to my traditional fruit bar recipe that I make with my homemade Concord Grape Jam.
Talking with my daughter this week, she thanked me for the package and disclosed that she had shared the bars with two of her good friends. I was given a big “thumbs up” as they both thought the bars were delicious. I was thrilled to hear that one of M’s friends requested the recipe and that’s exactly why I am posting it today. I originally started this blog to be used to share cherished recipes with family and friends and this is the perfect way to do just that.

Apricot and Oatmeal Fruit Bars

1 package yellow cake mix
2 1/2 cups old fashioned oats
3/4 cups butter or margarine, softened
1 egg, slightly beaten
1 (12 oz) can Solo Cake & Pastry Filling, apricot or your favorite flavor
Topping: 2 tablespoons cinnamon and brown sugar instant oatmeal mix.

Preheat the oven to 375 degrees. Grease a 13×9″ pan. Combine cake mix, and oats. Add margarine and egg. Mix until moist and crumbly. With damp fingers, evenly press half of the mixture into the baking pan. Carefully top this layer with the apricot filling; spreading over entire surface. Finally, top with remaining oat mixture. Sprinkle with instant oatmeal topping. Bake 22-26 minutes. Cool and cut into squares.

Posted in Baked goods, Baking, Bread, breakfast, lunch box

Whole Grain Blueberry and Banana Bites

IMG_4723
For the past several weeks, the market has been filled with a great selection of berries at reasonably low prices. The produce section displays an assortment of strawberries, blueberries, blackberries, and raspberries. It’s hard for me to walk by the berry aisle without filling my cart with several containers of the tasty little gems. The perfectly packed, sweet treats sit conveniently on the fridge shelf for a grab and go snack. Every morning, just before work, I slip open a container and grab a handful before heading out the door. Occasionally, I have a few berries left over at the end of the week, so I often take inventory to see what fruits I have available to throw into a muffin recipe. This week, I found two sad, overly-ripened bananas and a layer of blueberries left for my Saturday morning baking. This is the recipe I chose to assemble…

Whole Grain Blueberry and Banana Bites

1 cup whole-wheat flour
3/4 cup all-purpose flour
1 teaspoon baking soda
1/2 teaspoon salt
1/4 cup wheat germ
1/2 cup margarine, softened
1/3 cup sugar
1/3 cup brown sugar
2 eggs, slightly beaten
2 bananas, mashed
1/3 cup unsweetened almond milk
1 teaspoon almond extract
1 teaspoon vanilla extract
1 cup blueberries, fresh or frozen
Instant oatmeal topping, brown sugar and cinnamon flavor (optional)

Preheat oven to 375 degrees. Line muffin pan with paper liners or silicone cups. In a bowl, combine flours, baking soda, salt and wheat germ. In a large bowl, beat margarine and sugars with a mixer until light and fluffy. Add eggs, almond milk and extracts; beat well. Mix in the bananas.
Add flour mixture to butter mixture, mix just until combined. Fold in blueberries. Divide batter among muffin cups. Sprinkle the muffins with a handful of instant oatmeal, any flavor. (Optional)
Bake for 20-25 minutes (12-15 minutes for mini muffins) or until a toothpick inserted in the center of a muffin comes out clean.

Posted in Baked goods, Baking, Cake, Desserts, Food, holiday, holidays

Pineapple Sheet Cake

IMG_4722
I had high hopes for baking one of my husband’s favorite cakes for Valentine’s Day. Pineapple Upside Down Cake is rumored to be at the top of his list. But, as fate would have it, the weather outside today is horrible and we are currently under a blizzard warning. Getting out to the grocery store to pick up maraschino cherries and pineapple rings just wasn’t going to happen today.
So, I searched through the pantry for the can of crushed pineapple that I had purchased last week and remembered my recipe for Pineapple Sheet Cake that would surely act as a close second to the highly favored upside down cake. While this cake is delightfully simple to assemble, over-mixing can make the cake a bit rubbery, so take care to use a spatula to combine all ingredients completely without over doing it. A light, homemade cream cheese frosting usually completes this cake. Today’s bake is topped with a canned version of the original. Once again, the weather conditions would hold me back and I had to settle for ingredients that I had on hand.
I nibbled a sliver of the cake just before plating it, and to my delight, it turned out wonderful. Not too bland, not too sweet…just wonderful. Happy Valentine’s Day to you and yours!

Pineapple Sheet Cake

2 cups flour
2 cups sugar
2 teaspoons baking soda
1/2 teaspoon salt
2 eggs, slightly beaten
1 (20 ounce) can crushed pineapple, undrained
1 cup walnuts, chopped
1 teaspoon almond extract

Preheat oven to 350 degrees. Grease a 13×9″ baking pan. In a large mixing bowl, combine all ingredients, mix until smooth. Pour batter into prepared pan, spread evenly. Bake for 25-30 minutes, or until center springs back to the touch. Cool completely. Frost cake with cream cheese frosting. Sprinkle chopped or ground walnuts over the frosting. Optional: Omit the frosting and lightly sprinkle with powdered sugar.

Posted in Baked goods, Baking, Bread, Cake, cookies, Desserts, Food, lunch box

Plain Jane Blondies

IMG_4673
My daughter called last week and asked if I still had this simple blondie recipe in my kitchen library. It had been so long since I had made them, I had to search through some of my old magazine clippings to find the recipe she was referring to. It’s modeled after the recipe used in the Nancy Drew Movie about the teenage detective in the series of mystery novels that we often read as a child. In the movie, Nancy used these treats as a tool of bribery to gain information and solve her latest mystery. When the Nancy Drew movie came out, my youngest daughter became so enamored with the young mystery sleuth that she asked me to make the popular Nancy Drew shoulder bag with lots of room for gadgets and note taking materials specifically selected for her make believe adventures. She took the bag everywhere. She especially enjoyed showing off all of the clever gadgets tucked neatly inside the mystery solving bag. A couple of years ago, I donated it to Good Will Industries, but now I am wishing that I would have kept it for future generations of mystery sleuths.
The original “Nancy Drew Blondies” were much thicker so I’m assuming her recipe was baked in a 9X9″ pan. In the movie, Nancy entices others when she opens a cute, round, stainless steel tin and inside sits a perfectly shaped, moist and scrumptious looking blondie. Well, my recipe isn’t quite as famous, but we sure enjoy the taste. That’s why I have named my recipe…Plain Jane Blondies.

Plain Jane Blondies

2 /14 cups flour
2 1/2 teaspoon baking powder
1/2 teaspoon salt
1 1/4 cup packed brown sugar
1 1/4 cup sugar
3/4 cup butter, softened
3 eggs
1 teaspoon vanilla extract
1/2 cup finely chopped walnuts (optional)

Preheat oven to 350 degrees. Lightly grease a 9 x 13″ pan.
Sift together flour, baking powder and salt and set aside. In large bowl, beat together butter, sugars, egg and vanilla until smooth.
Stir in the flour mixture and the nuts until well blended. Spread evenly in prepared pan. Bake 35-45 minutes. Cool completely and cut into bars with a sharp knife.

Posted in Crafts, Gifts, holiday, holidays, Sewing

Hand Made Friendship Hearts

2015/02/img_4651.jpg
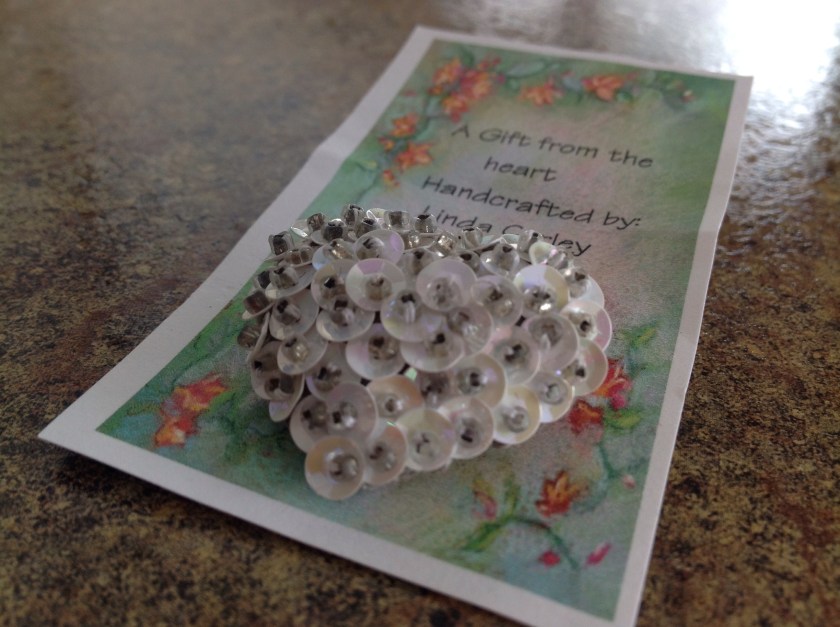
Years ago, as I was rummaging through the craft section of a local area garage sale, I stumbled upon a box of beads, sequins, golden threads, and patterns. I scooped it up and asked the owner how much was needed for the treasure. To my delight, she said $1.00 would fit the bill. I gathered up a few more crafting trinkets (some sewing and embroidery supplies) along with the box of sequined treasures, paid the kind lady, and I was on my way.
Shortly after arriving home, I took out a heart shaped cookie cutter and traced several small hearts on a light gray felt square. I carefully cut the heart shapes out and stitched on enough sequins and beads to cover the entire surface of one heart shape. On another heart shaped felt piece, I secured a pin back so that eventually, my project would become a pin. I then used a tiny blanket stitch (gray thread or monofilament) to sew the two felt heart shapes, wrong sides together, leaving a small opening to stuff in a bit of batting. After closing up the opening, I would plump up the heart shape by using my fingers to evenly distribute the batting tucked inside. Voila, the pin is complete!
I then used printable business cards to create a message, printed a sheet and punched two holes in each card to secure the pin back. I used small cellophane bags to envelope the pin/card and tied a bow for a sweet finish.
I have given these pins out at weddings, for Valentine’s Day, and for Mother’s Day. They are quick and simple and require very few supplies. Happy Valentine’s Day!

2015/02/img_4640.jpg

2015/02/img_4631.jpg

2015/02/img_4651.jpg

2015/02/img_4647.jpg