This week I had the opportunity to attend a series of Master Home Food Preservation classes in central Indiana. I can’t even express my excitement over the valuable information that was shared during the week long certification class. We learned of techniques for freezing, water bath canning, drying, pickling, and pressure canning through PowerPoint slides and hands-on lab time.
It was a long, sometimes exhausting, week where I spent time with other classmates testing various techniques for preserving the best of the season. One important point that I would like to make about home food preservation is one that focuses on food safety…Never use a recipe that has not been tested by a reputable entity such as the USDA or Ball Canning. Use recipes that have been developed no earlier than 1995 as food science and technology specialists have shared new information that focuses on current food safety practices. The USDA is one of the only sources I use for my canning recipes. Here is the link for the National Center for Home Food Preservation/USDA canning recipe book.
You can download the whole book for free. The recipe for apple slices is on page 7. I can’t stress how important it is to use a laboratory tested recipe. It’s a matter of life and death! Botulism is no laughing matter so it’s important that you follow tested recipes exactly as they are written. Do not alter ingredients or quantities. Process as directed. I recommend using recipes as advised and then after you have opened a jar to serve the contents, make your adjustments to spice things up to favor your preference. Then, refrigerate and use up the quantity as directed.
For more information about home food preservation, visit the National Center’s website at http://nchfp.uga.edu.
Month: August 2014
Garden Fresh Focaccia Bread with Tomatoes and Basil

Last week, M called my cell phone to ask if I had a quick pizza crust recipe. She and K had gathered lots of fresh basil and a few ripe Roma tomatoes from the garden and wanted to make a crusty bread base for the garden fresh toppings.
I asked her to search the pantry shelves for a pouch of Betty Crocker pre-mixed pizza crust ingredients that I often buy when I see the pouches on sale. Both girls looked though the pantry shelves and came up empty. I suggested they find my recipe for focaccia bread in the kitchen file. It’s a great recipe as it always turns out perfect and the mix, rise and bake time is pretty reasonable for a quick meal. When I returned home from work, the smell of Italian bread filled the air and the half eaten focaccia sat on the counter. It seems no one could resist the incredible aroma and tummies were filled straight away. The girls had chopped tomatoes and basil while the bread was baking and sprinkled the chopped toppings on the bread as soon as it was removed from the oven. A pinch of course kosher salt added to the flavor.
I usually serve this crispy, flavorful crust with a lite salad and we are never disappointed.
Garden Fresh Focaccia Bread
2 3/4 cups flour
1 teaspoon salt
1 teaspoon sugar
1 tablespoon active dry yeast
1 teaspoon garlic powder
1 teaspoon dried oregano
1/2 teaspoon dried thyme
1teaspoon dried basil
1 pinch ground black pepper
1 tablespoon vegetable oil
1 cup water
2 tablespoons olive oil
1 tablespoon grated Parmesan cheese
1 cup mozzarella
In a large mixing bowl, combine the first nine (dry) ingredients. Mix in the vegetable oil and water.
Pull dough together and turn out onto a lightly floured surface; knead until smooth. Lightly oil a large bowl, place the dough in the bowl, and turn to coat with oil. Cover with a damp cloth, and let rise in a warm place for 20 minutes.
Preheat oven to 450 degrees. Punch down dough and place on greased baking/cookie sheet. Pat into a 1/4 to 1/2″ thick rectangle. Brush top with olive oil.
Bake in preheated oven for 10 minutes, top with Parmesan and mozzarella cheese. Continue to bake for more 5 minutes until cheese is melted and bread is golden brown. Optional: After removing from the oven, top with sliced tomatoes and basil.
Perfect Peach Freezer Jam

While I have always been a traditional jam and jelly maker, I’m thrilled to find so many new products on the market that are meant to make jelly making so much easier and less time consuming. One such product is the instant pectin that Ball has developed specifically for freezer jam. I’ve made several jars in as little as 30 minutes. Those of you with young children can let them take a bigger role in the jelly making as there is no cooking involved. And the process is quick and simple. I don’t know about you, but I am always looking for home made goodness that is quick and simple.
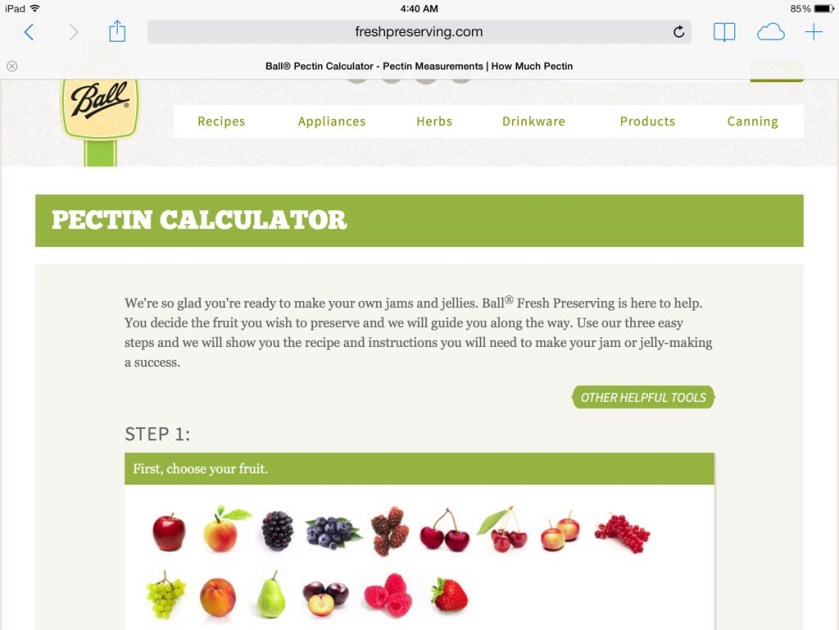
I have included several screen shots of the peach freezer jam recipe calculator from the Ball/Fresh Preserving website so that you can see just how easy this is.
First, go to the Fresh Preserving website…
Here you will find a pectin calculator for your chosen jam or jelly flavor.
Now, find the fruit that you wish to use for your jam or jelly.
Once you have chosen a fruit, choose whether you would like to make jam or jelly.
Next, choose the type of pectin you will be using.
The calculator will then calculate a recipe for you to follow. Super simple!
Remember, you’ll want to use Instant Pectin…

Also, this process is only meant for freezer jam. Store these jars in the freezer until you are ready to use them. Store them in the fridge after opening.
Summer Harvest Zucchini Quick Bread

This week my cell phone chirped as I sat in my office finishing up some paperwork. It was M. She called to report that we were nearly out of all-purpose flour and she wanted to make zucchini bread. A co-worker had brought in a few beautiful zucchini and laid them on the lunch table announcing she had harvested way too many zucchini and we should take whatever we might use. Naturally, I snatched up the largest I could find as I love to bake zucchini bread and freeze it through the winter months.
Reporting back to M, I asked her to look through my file of old recipes kept in the kitchen desk, to find a quick bread recipe that would use only the ingredients she had on hand. To my delight, when I returned home from work, M had made oodles of muffins and quick breads to share with the family. She had used up most of the overly ripe fruit and veggies that she found on the counter top and in the crisper drawer. M’s a resourceful child and it makes her happy to turn to baking to relax and enjoy time on her hands for the summer. It won’t be long before the school bell rings and the race begins all over again. I’m glad she has found a relaxing hobby as she follows in her mother’s footsteps.
Summer Harvest Zucchini Quick Bread
3 eggs
1 cup vegetable oil
1/2 cup sugar
1 cup packed brown sugar
2 cups grated zucchini
2 teaspoons vanilla extract
1 cup all-purpose flour
1 cup whole wheat flour
1/4 teaspoon baking powder
2 teaspoons baking soda
1 teaspoon salt
3 teaspoons ground cinnamon
1 cup chopped walnuts or pecans
1/4 cup wheat germ ( with extra for topping)
Preheat oven to 350 degrees and grease a (9x5x2 3/4″) loaf pan. In a large bowl, combine eggs, oil, sugars, zucchini, and vanilla. Mix well. Add flours, baking powder, soda, salt, wheat germ, and cinnamon; stir to combine. Stir in nuts. Pour batter into prepared pan. Sprinkle a teaspoon of wheat germ over the batter.
Bake for 55-60 minutes, or until a tester inserted in the center comes out clean.
Oh My Goodness Oat-n-Nut Blueberry Scones
 After a busy week of meetings, county fair obligations, car pools, and laundry, I finally found time for a little early morning baking. Yesterday, while the house was quiet and the family was still sound asleep, I brewed a cup of coffee and popped a few batches of scones into the oven for a light and fancy breakfast. As the children woke and entered the kitchen, I could see their eyes widen as they caught a whiff of the delicious scones while they finished baking. The almond extract, pecans, and blueberries all lent a hand as their enticing aromas danced through the house. Gosh, I miss the days when I could find time to bake nearly every day. Times change and busy schedules prevail. Still, it was wonderful to find time this week to enjoy the pleasures of early morning baking and cherished time spent with the family over breakfast.
 Oh My Goodness Oat-n-Nut Blueberry Scones
1 1/2 cups whole oats
1/2 cup whole wheat flour
1/2 cup all-purpose flour
1/3 cup white sugar
1/2 teaspoon salt
3/4 teaspoon baking soda
3/4 teaspoon baking powder
6 tablespoons butter, cubed
1/2 cup milk
1 teaspoon almond extract
1 cup fresh blueberries
1/2 cup pecans, chopped
Preheat oven to 375 degrees. Lightly grease a baking sheet. Combine oatmeal, flours, sugar, baking soda, baking powder, and salt together in a medium sized bowl. Use a pastry cutter or two forks and cut in the butter with the flour mixture until crumbly and well blended. Stir milk and extract into the flour mixture until just combined. Lightly fold in the pecans and blueberries. On a lightly floured surface, collect the dough into a ball and pat into a large circle about 1″ thick. Cut into 8 wedges, and place on prepared baking sheet. Bake in preheated oven until lightly browned, 20 to 25 minutes.


