Posted in Brunch, Food, Gardening, Kids in the Kitchen, lunch box, No-Bake

Cucumber Finger Sandwiches

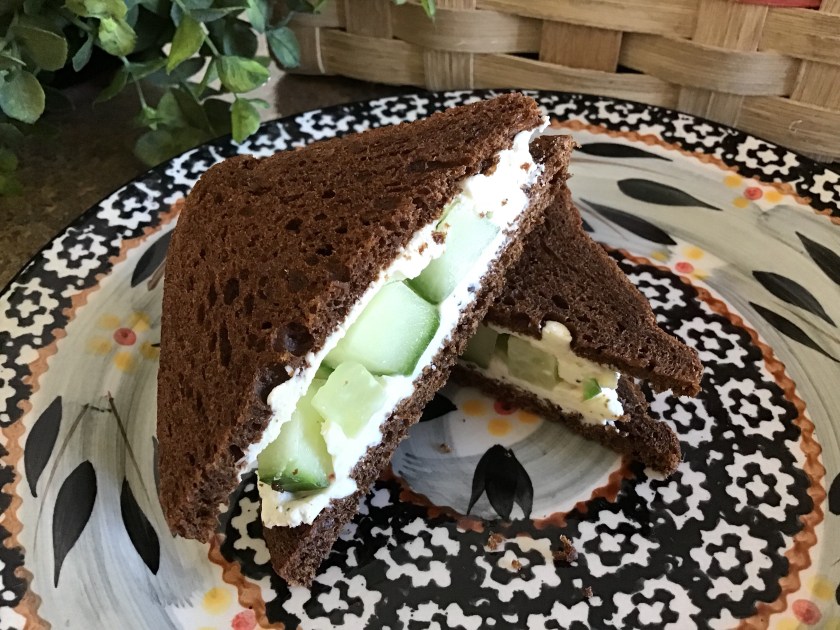
My daughter recently called to ask if I could share an easy appetizer recipe as she needed to assemble a quick item for a coworker’s going-away party. She had already looked through the recipes on my blog and couldn’t find one that she could easily make ahead of time and store in the fridge. My mind quickly turned to a simple recipe that I used to make when our children were young. I made this recipe for our annual St. Patrick’s Day Party when we lived in the southwest Chicago area. The yearly parade (and party) was always a fun event for all of the Irish families living in the neighborhood. Slices of pumpernickel cocktail bread are loaded up with a spiced cream cheese mixture and a thick slice of fresh cucumber. A quick sprinkle of dill adds a layer of flavor. Drawing the tines of a fork down the side of the cucumber before slicing, adds a unique design to the appetizer.

Cucumber Finger Sandwiches

1 (8 ounce) package cream cheese, softened

1 (.7 ounce) package dry Italian-style salad dressing mix

1 (1 pound) loaf sliced pumpernickel party bread

2 English cucumbers

2 teaspoons dill weed or dill seed

Mix cream cheese and Italian salad dressing mix in a bowl until well blended. Draw the tines of a fork down the sides of the cucumber before slicing (Make sure to pierce the skin of each cucumber.) Spread cream cheese mixture atop pumpernickel party bread and top each slice with a cucumber slice. Sprinkle with a light dose of dill weed or dill seed.

Posted in Cake, Chocolate, Desserts, Food, holiday, No-Bake

Oreo Ice Cream Cake

  
This weekend, we had the pleasure of visiting my sister and her family for the July 4th holiday. One of the activities that we enjoy most is remaking recipes that have become a tradition in our family. This no-bake cake is a winner. The July 4th weather is usually warm and breezy so the ice cream cake is a refreshing treat after a long day of grilling, baseball, and fireworks. Just pop the finished cake into the freezer at the start of the day and it will be waiting for you when you want to sit down and enjoy time with family and friends. What a great, no fuss, dessert!

Oreo Ice Cream Cake

1 package (20 oz.) Oreo cookies

1/4 cup margarine, melted

1 1/2 gallon vanilla ice cream, slightly softened

1 package (8 oz.) Cool Whip (thawed)

1 jar (16 oz.) hershey’s hot fudge or chocolate syrup

1/2 cup chopped nuts

1/2 cup mini Reese’s peanut butter cups or your favorite chocolate candy, optional

Lightly spray, with cooking spray, a 9×13″ pan. Crush cookies in the food processor or put them in a plastic bag and crush them with a rolling pin. Add melted butter and mix thoroughly. Press evenly into the bottom of the pan. Carefully spread the softened ice cream over the cookies. Evenly layer on the Cool Whip. Warm the fudge or chocolate until pourable in the microwave and drizzle over the Cool Whip. Sprinkle nuts over the entire cake. (Add the mini candies, optional.) Freeze for at least two hours or until firm. Enjoy!

Posted in appetizers/snacks, breakfast, Kids in the Kitchen, lunch box, No-Bake

Everyday Granola Bars

20140125-064005.jpg
During the course of a week, I make several batches of granola bars for my family. There are a few recipes that I use quite frequently and for varying purpose. Take for instance, the Grunt Bars I make when I am looking to boost protein levels, I make Curley Power Bars when I am wanting to provide a recovery bar after a long meet or practice. This recipe for Everyday Granola Bars is one that I usually pack into lunch boxes or have waiting on the counter when kids arrive home from school hungry and looking for something to eat.
I’m a firm believer that providing the family with healthy choices will encourage children to make better food choices for life. I try to stock the fridge and pantry with lots of whole grains, fruits, vegetables, and yogurt so that when kids come home famished, they can quickly grab something healthy to tide them over until supper time.
This recipe is easy to adapt to satisfy your family’s preference. Add dried cranberries or raisins, almonds, pecans or sunflower seeds. We just adore dried apricots in this recipe as well. Change things up as you like. Enjoy!

Everyday Granola Bars

3 cups old fashioned oats
1 1/2 cups walnuts, chopped
1 cup dates, chopped
1/2 cup honey
1/2 cup natural peanut butter
1 teaspoon vanilla extract

Coat an 11X7″ baking pan with cooking spray, set aside. Place oats, almonds and dates in a medium bowl; mix thoroughly, set aside. In a small saucepan, over medium-low heat, warm honey and peanut butter; stir until smooth, creamy and pourable. Remove from heat and stir in vanilla. Pour mixture over oats, dates, and nuts, stir to coat completely.
Transfer mixture to prepared baking dish. Evenly pat down mixture to completely fill the pan. Cover and let stand until set; about 30 minutes. Cut into bars. For added freshness, wrap each bar individually in plastic wrap and store in air-tight container.

20140125-064243.jpg

Posted in appetizers/snacks, breakfast, Desserts, Kids in the Kitchen, lunch box, No-Bake

No-Bake Oat and Honey Snack Bites

20131020-134944.jpg
If you like peanut butter, you will love this no-bake treat. I’ve made several variations of this recipe over the years but this one is so simple and produces about 36 rounds of goodness. After parking these in the fridge for about 30 minutes, I pack them in a Tupperware container so I can tuck them into lunch boxes all week long.

No-Bake Oat and Honey Snack Bites

2 1/4 cups old fashioned oats
1 cup natural peanut butter
1/3 cup honey
1/3 cup maple syrup
1/2 cup chocolate chips

Combine peanut butter, honey, and maple syrup; mix thoroughly. Sprinkle in the oats and chocolate chips. Use a small ice cream scoop to shape dough into individual 1″ balls. Place on a cookie sheet and chill for 30 minutes. Pack into air-tight container. Store in the fridge until ready to serve.

Posted in appetizers/snacks, breakfast, Brunch, Desserts, Food, Kids in the Kitchen, lunch box, No-Bake

Easy No-Bake Granola Bites

20130830-080303.jpg
Making your own granola bars at home can certainly be more nutritious for your family and is definitely a money saving idea. A box of granola bars can range in price from a moderate $2 up to as much as $7, which is really quite expensive. Often, one can only guess at the ingredients that are included in the nutrition facts label. Ingredient names that I can’t recognize or pronounce are always a red flag for me.
While this recipe isn’t the most nutritious of the bunch in my recipe box, it certainly is easy to make and I like the fact that it’s a no-bake recipe that can be made during the late summer months when the air conditioner shouldn’t have to compete with a hot oven. I often add nuts, seeds and dried berries for added texture, nutrition, and flavor. I wrap the cooled and cut bars in plastic wrap so that they stay fresh and are easily packed for travel. This is a great “kids in the kitchen” recipe.

Easy No- Bake Granola Bites

2 1/2 cups crispy rice cereal
2 cups old fashioned oats
1/2 cup raisins (optional)
1/2 cup firmly packed brown sugar
1/2 cup light (reduced sugar) corn syrup or honey
1/2 cup peanut butter
1 teaspoon vanilla extract
1/2 cup milk chocolate chips

Spray a 13×9″ baking dish with non-stick cooking spray. Combine the first 3 ingredients in a large bowl; set aside. Bring the brown sugar and syrup (or honey) to a boil in a small saucepan over medium-high heat, stirring constantly; remove from heat. Stir in peanut butter and vanilla until blended. Pour peanut butter mixture over cereal mixture, stirring until coated; let stand 10 minutes to cool slightly. Stir in the chocolate chips. Press mixture into prepared pan; cool completely. Cut into bars. Wrap individually in plastic wrap to preserve freshness.

Posted in appetizers/snacks, Desserts, Food, Kids in the Kitchen, No-Bake

Bananas and Berries Frozen Graham Bars

20130727-082829.jpg
As some of you might know, I am a coupon girl! I never leave the house without a fist full of carefully selected coupons when I am headed to the grocery store. I have the “SnipSnap” App on my phone so I can get a deal nearly everywhere I go. Well, last week there was a sale on graham crackers and I had coupons to reduce the price to 75 cents per box. I bought 6 boxes. We were headed out of town for a week and I thought they would be a great car snack to pack for the trip. When I arrived home with my groceries, M spied a cool recipe on the back of one of the graham cracker boxes and she asked if she could make the recipe for dessert. She said that it was a no-bake recipe. I was delighted because it was too hot to turn on the oven to compete with the air conditioner.
The next day, I headed to work and M made the frozen graham cracker recipe. We have an agreement that while Dad and I aren’t home, no ovens or blenders are to be used without permission. The original recipe called for pulsing the fruit in the blender. Instead, M chopped the fruit and added it to the yogurt mixture. When I arrived home from work, I was thrilled to see her creation and ohhhh, they were so yummy and refreshing. They were gone in no time at all!
Below, I have listed our adapted recipe but have included the website for the original recipe as well.

Bananas and Berries Frozen Graham Bars

10-1/2 cinnamon topped graham crackers, broken into quarters to make 42 rectangles
1/2 cup fresh strawberries, sliced
1/2 cup bananas, mashed
1/4 cup blueberries, sliced
1 cup vanilla nonfat Greek-style yogurt
1 cup frozen whipped topping, thawed

Line a 9-inch square pan with waxed paper, placed so paper extends over the sides of the pan . Arrange half the graham cracker pieces, in 3 rows on bottom of pan.
In a medium bowl, combine strawberries, bananas, and blueberries. Add the yogurt and whipped topping; mix well. Spread fruit and yogurt mixture over graham cracker pieces. Top with remaining graham crackers aligning to match the graham cracker pieces on bottom layer.
Place in the freezer for 4 hours. Use waxed paper handles to remove dessert from pan; cut between graham crackers to form bars.

Original website:
http://www.snackworks.com/recipe/banana-berry-frozen-yogurt-bars-155123.aspx

Posted in appetizers/snacks, Food, Gardening, Homemade Mixes, Kids in the Kitchen, No-Bake

Fresh Garden Vegetable Dip

20130707-212749.jpg
Lately, the local farmer ‘s market is filled with a bounty of fresh fruits and vegetables. Broccoli, carrots, and celery, are all quite inexpensive and take little effort to prepare for a quick summer snack. My own garden is coming along well but not quite ready to harvest. Looking over my plants, I see that the cucumbers, squash, celery, and tomatoes are all doing well but have a long way to go before they will be ready for picking. Thanks to soft, plentiful rain showers and lots of sunshine, this year’s garden looks strong and healthy. Although, last year’s garden was a complete flop. The drought in my area caused many gardeners to give up on the garden all together. I pulled out this recipe today as I am sure we will be reaping the benefits of our labor soon. I really enjoy the taste of this dip compared to that of the store bought powdered mix. All of the ingredients are common pantry items and the dip can be thrown together with little effort. It’s smooth, creamy, and flavorful and can be used on salads, for chips, or as a vegetable dip.

Garden Fresh Vegetable Dip

1 cup mayonnaise
1/2 cup sour cream
1/2 teaspoon dried chives
1/2 teaspoon dried parsley
1/2 teaspoon dried dill weed
1/2teaspoon garlic powder
1/2 teaspoon onion powder
1/8 teaspoon salt
1/8 teaspoon freshly ground black pepper

Whisk all ingredients together in a medium bowl. Cover and chill for 1 hour before serving. Great for chips and vegetables.

Posted in Desserts, Food, Kids in the Kitchen, No-Bake

Tutti Fruiti Frozen Popsicles

20130615-151232.jpg
Well, I can’t take credit for this recipe but it happened by accident! M was in the mood for some homemade fruit pops and I had recently cleaned out my cabinet, donating the popsicle molds to the resale shop. Low and behold, while looking for a few great deals at JoAnn’s 70% off sale this week, I found some pink popsicle molds. These looked much better than our old ones and they were less than $3.00…so I bought them. 🙂
Looking around the kitchen, M decided to make up her own recipe for these refreshing frozen treats…

Throw all of your overly ripe fruit and a can of Dole tropical fruit (with juice) in the blender. Purée well. Pour the fruit purée into individual popsicle molds. Freeze overnight. (These can also be made in Dixie cups with popsicle sticks. Fill cups 3/4 full with purée. Freeze for 30 minutes. Then, slip the popsicle stick into the partially frozen popsicle and continue to freeze overnight.) Yummy and refreshing!

Posted in appetizers/snacks, Brunch, Desserts, Food, Kids in the Kitchen, No-Bake

Grandma’s Creamy Pistachio And Pineapple Dessert Salad

20130606-082549.jpg
This is a great recipe for those that enjoy cooking with young children. Use three simple ingredients, a plastic bowl, and a mixing spoon to make this summertime favorite. Children can dump and mix ingredients with very little difficulty.
This is a recipe that my mother-in-law usually prepares as part of the Easter Brunch spread. The mint green color of the pudding mix adds a refreshing flair to any spring or summer table. This flavorful dessert would be a great addition to a wedding or baby shower luncheon menu. For additional flavor and texture, try adding a 1/2 cup of finely chopped walnuts or some flaked coconut.

Grandma’s Creamy Pistachio And Pineapple Dessert Salad

1 (3 1/2 oz.) package pistachio instant pudding mix
1 (12 oz.) container Cool Whip topping
1 (20oz.) can crushed pineapple

In a mixing bowl, combine instant pudding mix and the container of Cool Whip topping; mix well. Next, add the entire can of crushed pineapple to the pudding mixture, thoroughly combine. Refrigerate for several hours and serve chilled.

Posted in appetizers/snacks, Food, Main Dish, No-Bake

Tender Homemade Tortillas

20130506-122351.jpg

Just last week, I posted a recipe for Favorite Taco Seasoning Mix so I thought I would share my recipe for Tender Homemade Tortillas as well. I use a tortilla press when making these little gems. Cut a plastic bag down the side seams but leave the bottom of the bag intact. Use the plastic bag to line the tortilla press. This makes clean up super easy and will help remove the flattened dough from the press without breaking the tortilla.
Making tortillas from scratch is fun, quick, easy and economical. Keep a bag of Maseca or masa harina in your pantry so that you can easily make a dozen or so in a very short period of time. Once you try the tasty and tender texture of these tortillas, you’ll be so satisfied, you won’t want to go back to the store bought brands.

Tender Homemade Tortillas

1 3/4 cup of masa harina
1 1/8 cup of hot water

In a medium bowl, mix together the masa harina and hot water. Kneed until pliable and smooth. If the dough is too dry, add more hot water, until dough is easy to kneed but not sticky. Let dough sit for 30 minutes, wrapped in plastic wrap.
Preheat a skillet or griddle pan set to medium-high heat. Divide dough into golf-sized balls. Press each in the tortilla press lined with plastic wrap or prepared plastic bag. Carefully remove the tortilla from the press and place on the hot griddle for 30-40 seconds per side. Transfer to a plate and cover with a towel to keep them warm and moist before serving.