Posted in appetizers/snacks, breakfast, Brunch, Desserts, Food, Kids in the Kitchen, lunch box, No-Bake

Easy No-Bake Granola Bites

20130830-080303.jpg
Making your own granola bars at home can certainly be more nutritious for your family and is definitely a money saving idea. A box of granola bars can range in price from a moderate $2 up to as much as $7, which is really quite expensive. Often, one can only guess at the ingredients that are included in the nutrition facts label. Ingredient names that I can’t recognize or pronounce are always a red flag for me.
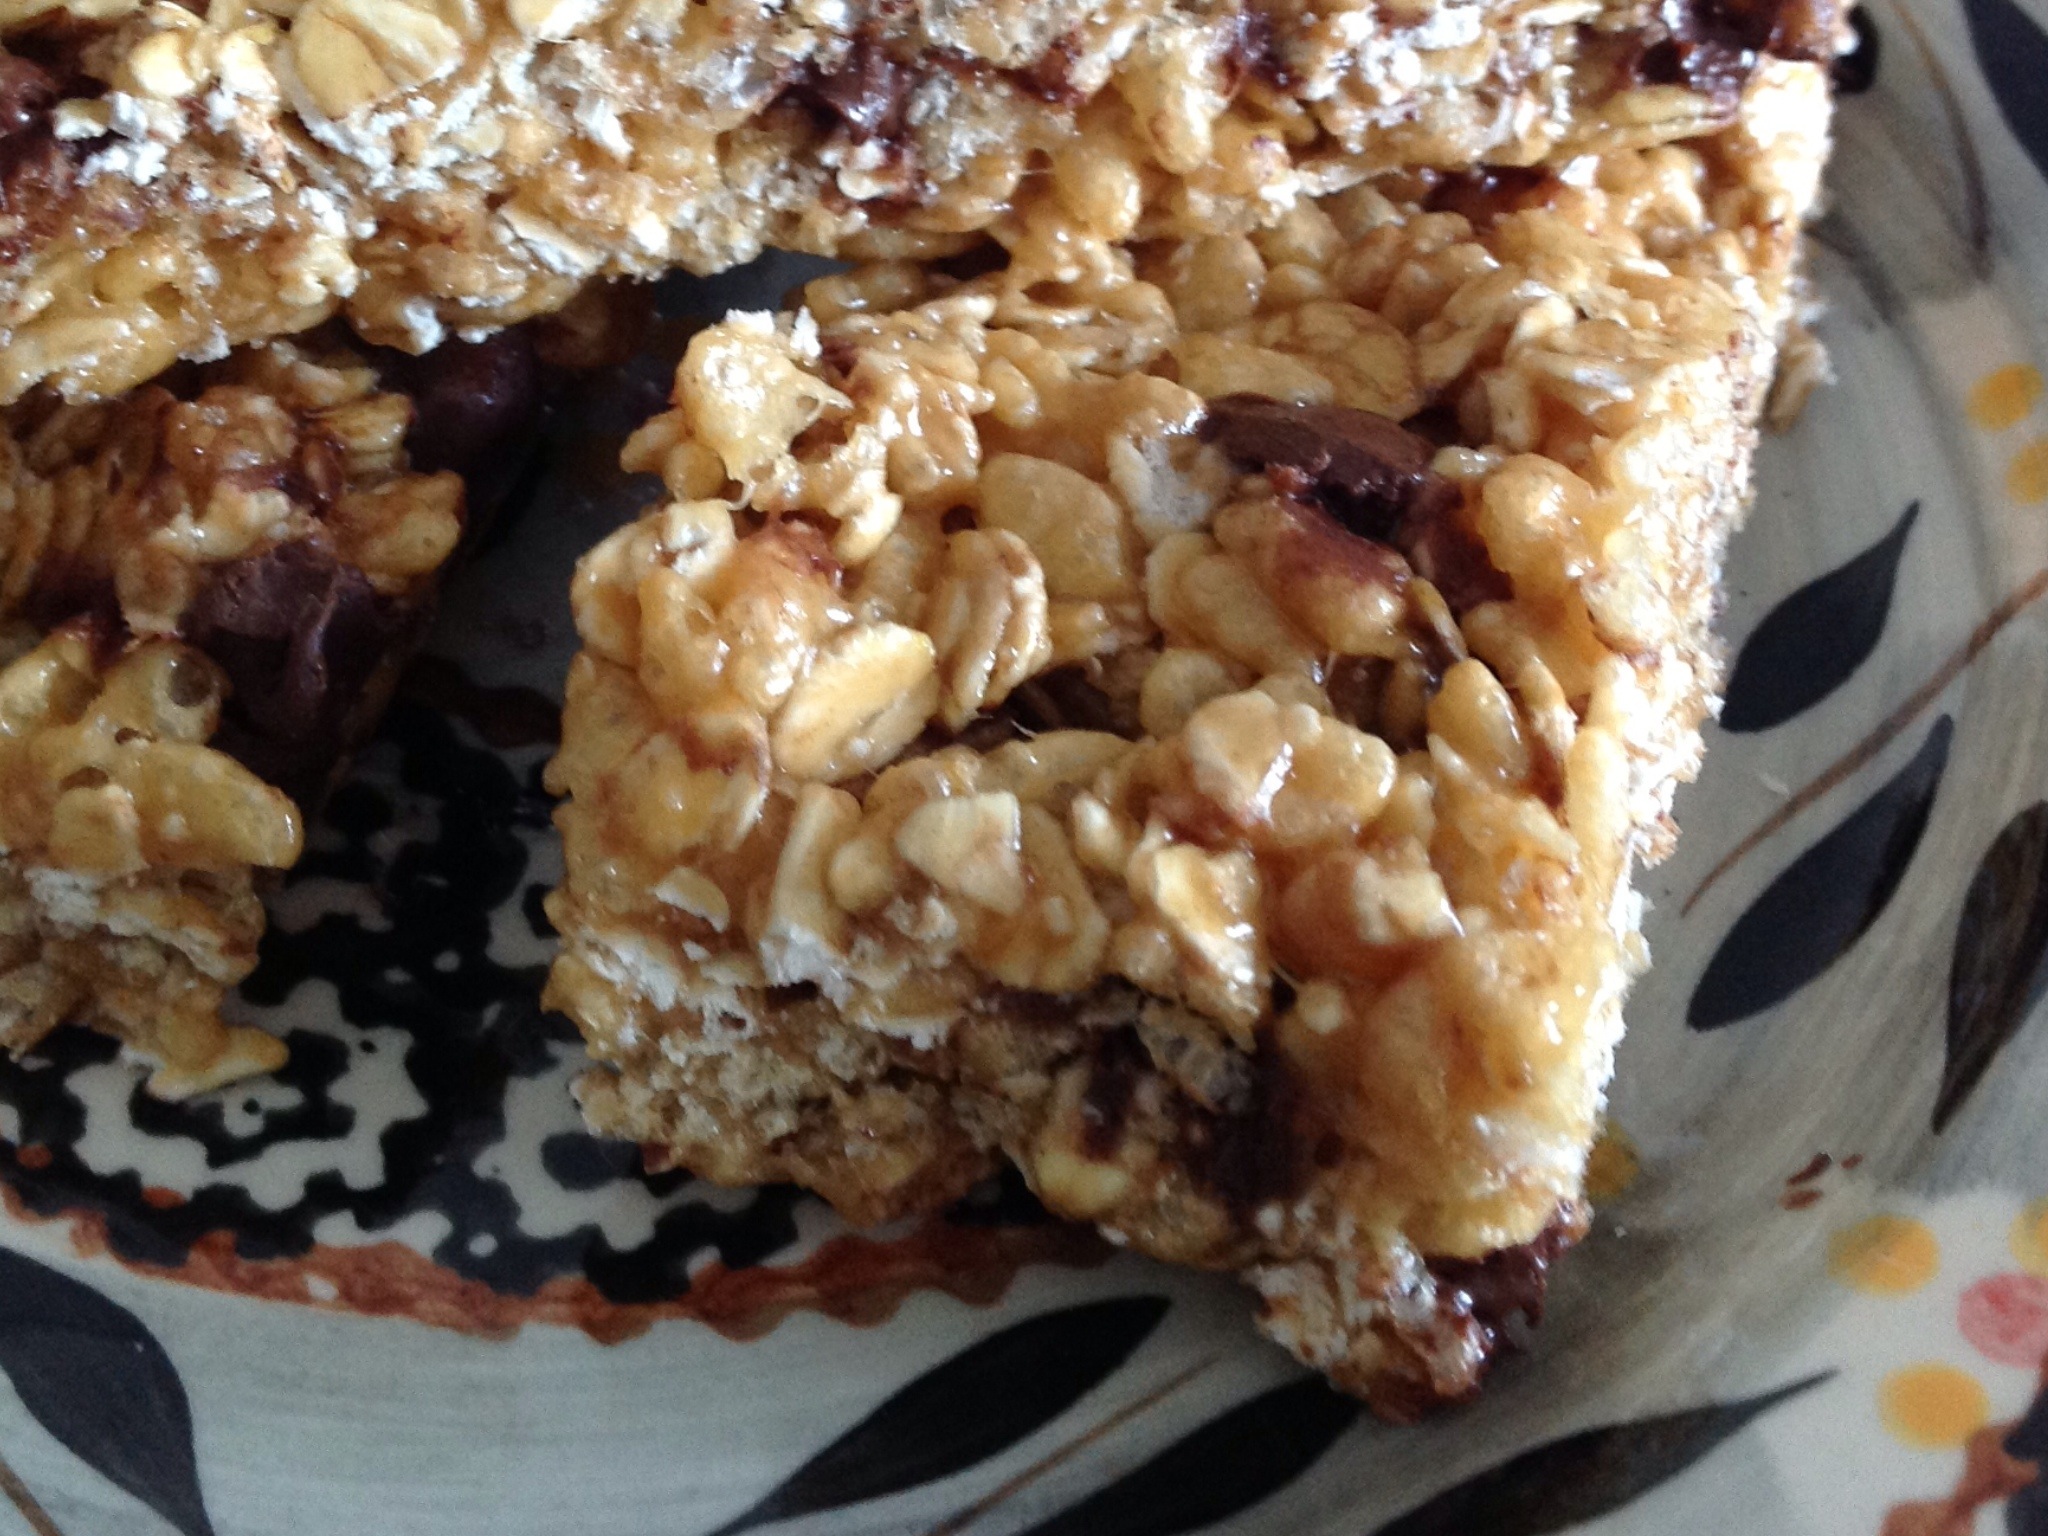
While this recipe isn’t the most nutritious of the bunch in my recipe box, it certainly is easy to make and I like the fact that it’s a no-bake recipe that can be made during the late summer months when the air conditioner shouldn’t have to compete with a hot oven. I often add nuts, seeds and dried berries for added texture, nutrition, and flavor. I wrap the cooled and cut bars in plastic wrap so that they stay fresh and are easily packed for travel. This is a great “kids in the kitchen” recipe.

Easy No- Bake Granola Bites

2 1/2 cups crispy rice cereal
2 cups old fashioned oats
1/2 cup raisins (optional)
1/2 cup firmly packed brown sugar
1/2 cup light (reduced sugar) corn syrup or honey
1/2 cup peanut butter
1 teaspoon vanilla extract
1/2 cup milk chocolate chips

Spray a 13×9″ baking dish with non-stick cooking spray. Combine the first 3 ingredients in a large bowl; set aside. Bring the brown sugar and syrup (or honey) to a boil in a small saucepan over medium-high heat, stirring constantly; remove from heat. Stir in peanut butter and vanilla until blended. Pour peanut butter mixture over cereal mixture, stirring until coated; let stand 10 minutes to cool slightly. Stir in the chocolate chips. Press mixture into prepared pan; cool completely. Cut into bars. Wrap individually in plastic wrap to preserve freshness.

Posted in Canning, Food, Gardening

It’s Pickin’ Time

20130829-074323.jpg
It’s Pickin’ Time!
Several years ago, we planted a few grape plants on a fence that divides our property from our neighbors. This is actually the first year that we have had success in growing a sizable crop of Concord grapes. In the past, as the late summer heat would coax the grapes to ripen, the deer would wait for the opportune time to mosey over to the vines and demolish the crop in one short evening. M and I would get giddy over the dark purple grapes that were just about ready to be picked and the very next day, they would be completely gone…ripped from the vines by the much more experienced deer.
As my husband was out mowing the lawn this weekend, he noticed that the majority of our grapes were just about ready to be harvested. M and I grabbed all of the available baskets and headed outdoors to pick our crop. We were delighted with the over abundance of fruit. My hubby even joined in knowing that we only had a small window of time to pick the fruit before the deer would come along and swallow up the lot.
This long holiday weekend will bring lots of late summer heat but I am anxious to get my grapes prepared to make batches of Concord grape jelly. While I have been canning for years, I have never tried processing seeded grapes to make jelly. I always rely on the Ball Blue Book to carefully and safely process canned goods. Since this is the first year that we have had a sizable crop, I have searched for recipes all over the Internet. I think I have settled on one or two that I will try. If any of you have a great grape jelly recipe or a few tips that you would like to share…please do so in the comments section of this post. I am hoping to successfully report back in a future post, news about the products of my labor.

20130829-074456.jpg

20130829-074543.jpg

Posted in appetizers/snacks, Baked goods, breakfast, Brunch, Desserts, Food, lunch box

Apple and Spice Muffins

20130825-153950.jpg
It’s Sunday and time to bake for the coming school week. Muffins seem to pack perfectly into lunch boxes along with fresh fruit, carrots, yogurt, a sandwich and some trail mix. It really saves time in the morning when things are prepared ahead and packable lunch items are set out on the counter so the kids can choose their favorites. The swim season will begin next week and more food will be needed to fuel their young bodies through a day of school and endless yards of swimming.
This muffin recipe is a new one. I looked through a few of the local community cookbooks yesterday and this recipe looked easy enough to combine and pop in the oven. I added some apples to add depth and flavor. I will slather icing on a few of the muffins for an after dinner dessert and pile the remaining (un-iced) muffins into a Tupperware container for lunches.
An afternoon of baking has produced, 18 muffins, a tray of chewy granola bars, and 24 vanilla cupcakes. I have one more tray of cupcakes in the oven as M’s friend is celebrating a birthday tomorrow and she wanted to bring a birthday treat to school to share with friends at the lunch table. I have made a batch of cream cheese frosting and will finish icing the birthday cupcakes after dinner. A will sprinkle some colorful rainbow nonpareils over the frosting to make them look festive.
On the dinner menu…Teriyaki Chicken and Sweet Potato Fries…Another productive Sunday!

Apple and Spice Muffins

2 cups flour
1 teaspoon cinnamon
1/2 teaspoon nutmeg
1 teaspoon ground allspice
1/2 teaspoon salt
1 cup margarine, softened
2 cups sugar
4 eggs
1 teaspoon baking soda
1 tablespoon warm water
1 teaspoon vanilla extract
3 apples – peeled, cored and chopped

Preheat oven to 350 degrees. Line muffin tins with paper liners. Whisk together flour, spices, and salt. Set aside. Cream together margarine and sugar. Mix in eggs and vanilla. Stir together soda and 1 tablespoon warm water, and mix into the sugar mixture. Stir into flour mixture. Add apples and mix until well blended. Spoon batter into prepared muffin cups. Bake 17-25 minutes. Cool completely before frosting or sprinkle with powdered sugar.
( I use cream cheese frosting, homemade or store bought, depending on time)

Posted in appetizers/snacks, Baked goods, breakfast, Brunch, Desserts, Food, lunch box

Rise and Shine Morning Muffins

20130823-110826.jpg
Rise and Shine Morning Muffins

Well, I have the last of this week’s school lunches packed and heading out the door with my children. It’s Friday and as we head into the weekend, I will have to plan my selection of items that I will bake for next week’s menu.
This is one of my favorite lunchbox recipes to send to school. These little gems are filled with whole grains,apples, nuts, pineapple and raisins. Plenty of goodies to keep a hungry tummy satisfied. I bake a large batch and store them in an air-tight container in the fridge for a week’s worth of lunches.

Rise and Shine Morning Muffins

1 cup whole wheat flour
1 cup all- purpose flour
2 teaspoons baking powder
1 teaspoon ground cinnamon
1/2 teaspoon salt
1/2 cup canola oil
3/4 cup packed brown sugar
3 eggs, beaten
1 teaspoon vanilla extract
2 cups grated carrots
1/2 cup peeled and finely chopped apple
1/2 cup crushed pineapple, drained
1/2 cup shredded coconut
1/2 cup pecans, chopped
1/2 cup raisins

Preheat oven to 350 degrees; line muffin pan cups with paper liners. In a medium mixing bowl, stir together flour, baking powder, cinnamon, and salt; set aside. In another mixing bowl, stir together butter, sugar, eggs, and vanilla. Mix in carrot, apple, coconut, pecans, pineapple and raisins. Add flour mixture and stir just until blended.
Spoon batter into prepared cups. Bake for 20-25 minutes or until toothpick inserted into center comes out clean. Let muffins cool in pan for 5 minutes. Transfer muffins to cooling racks to cool completely. Store muffins in an air-tight container in the refrigerator.

Posted in appetizers/snacks, Baked goods, breakfast, Brunch, Desserts, Food, lunch box

Easy Banana Crumb Cake

20130818-113016.jpg

Well, it’s back to school for my high school kids this week and I am baking
packable lunch items for the start of the school year. I spied a few overly ripe bananas on the kitchen counter last night so I searched my old recipe folder for a banana recipe that would be suitable for lunch box storage. I used to make this cake all the time but it seems other recipes have become favorites and this one was moved to the back of the folder. I seriously can’t figure out why…this is a great moist, sweet, crumbly cake that is really easy to assemble quickly. Once again, I am using a cake mix to reduce time while adding flavor.

Easy Banana Crumb Cake

1 package white cake mix
3/4 teaspoon baking powder
3 medium ripe bananas
3 eggs
1/2 cup water
1/3 cup vegetable oil
1 cup chopped pecans

Topping:
1/4 cup sugar
1/4 cup brown sugar
1/2 cup flour
1/4 cup butter, cubed and cold
1/4 cup chopped pecans

Preheat oven to 350 degrees. Spray with cooking spray a 13×9″ baking pan. Place first seven ingredients in a large bowl. Beat well. Pour into prepared pan. In a medium bowl, combine topping ingredients until crumbly; sprinkle evenly over batter. Bake at 350 degrees for 40-45 minutes. Cool completely before slicing.

20130818-113348.jpg

Posted in appetizers/snacks, Baked goods, Desserts, Food, lunch box

Chocolatey Oat and Peanut Butter Cookies

20130815-091224.jpg
So, tomorrow my oldest will be leaving for college…I am surely going to miss her smiling face on a daily basis. It will be hard for me to let her go….
I have spent a good part of the morning baking goodies to pack in containers and load into boxes. Cooling on the counter top, there is a loaf of Irish soda bread, a tray of granola bars, and some Chocolatey Oat and Peanut Butter Cookies (recipe below).
I will wait for them to cool completely and then arrange them in containers for the long drive down to Purdue University. My hope is to continue to send her “care packages” on a weekly basis so that she knows that we miss her and that she is in our thoughts…sending a little “home-baked love” her way as she begins her journey through college life on campus. We love you, K!

Chocolatey Oat and Peanut Butter Cookies

2 cups peanut butter
1/4 cup old fashioned oats
2 cups sugar
2 eggs
1 teaspoon vanilla extract
2 teaspoons baking soda
1/4 teaspoon salt
1/2 cup chocolate chips
Extra oats for sprinkling

Preheat oven to 350 degrees. Lightly spray cookie sheets with non-stick spray. In a medium bowl, stir peanut butter, oats, and sugar together until smooth. Beat in the eggs. Mix in the baking soda, salt, and vanilla. Stir in chocolate chips. Roll dough into 1 inch balls (or scoop out dough with a small ice cream scoop) and place 2 inches apart onto the prepared cookie sheets. Press down with slightly damp fingers. Lightly sprinkle with extra oats.
Bake for 10-12 minutes. Allow cookies to cool for 5-10 minutes before removing to a wire rack to cool completely.

Posted in breakfast, Brunch, Food

Blueberry Oatmeal Flapjacks

20130814-185946.jpg
Pancakes are a breakfast favorite in my house. The problem is, I don’t always have time in the early morning hours to make fresh pancakes for my crew. As the new school year will be starting up again next week, I have been making and freezing batches of pancakes to be thawed and reheated for busy school mornings. This recipe is hearty and filling because of the added oatmeal and berries. I try to use old fashioned oats instead of the quick oats for a heartier, whole grain flavor and texture. I first made this recipe when my children were very young. Every time I try to cut corners and make the pre-mixed, boxed pancake recipe, my kids complain about the bland, rubbery taste and texture. I have learned that my Blueberry Oatmeal Flapjacks are definitely worth the extra time and effort.

Blueberry Oatmeal Flapjacks

1 cup all-purpose flour
1 cup quick cooking oats
2 tablespoons sugar
2 teaspoons baking powder
1 teaspoon baking soda
1/2 teaspoon salt
1 1/2 cups buttermilk
1 teaspoon vanilla extract
1 tsp almond extract
1/4 cup vegetable oil
2 eggs
1 cup fresh blueberries

In a large bowl, combine flour, oats, sugar, baking powder, baking soda, salt. In a separate bowl, combine buttermilk, vanilla, oil and egg. Pour wet ingredients into dry ingredients and mix well. Carefully fold in blueberries.
Heat a lightly buttered griddle or frying pan over medium high heat. Pour the batter onto the griddle, using approximately 1/4 cup for each pancake. Brown on both sides and serve hot.

20130814-190137.jpg

20130814-190156.jpg

Posted in Food, Gardening, Grilling, side dishes

Grilled Corn on the Cob

20130801-192307.jpg
Ok…it’s grilling season and the Indiana corn is ripe for the picking. As blueberry season winds down…fresh vegetables are truly showing off their colors. This year, we planted plenty of tomatoes, cucumbers, celery, herbs, peppers, cauliflower and squash. Our property seems to be surrounded by acres and acres of beautiful golden corn. Farmers in the area often put a table out at the end of their driveway with a load of fresh picked corn. Next to the corn sits a coffee can where neighbors and others passing by can leave their money to pay for their corn purchase.
This recipe is surprisingly tasty. The corn in Indiana is super sweet so the flavorful herbs contrast the sweetness quite well. While I often steam or boil corn on the cob…this recipe is a nice change of pace.

Grilled Corn on the Cob

6 ears of corn, husked and cleaned
1/2 teaspoon chili powder
1/4 teaspoon dried oregano
1/4 teaspoon onion powder
1/4 teaspoon garlic powder
1/4 teaspoon salt
1/4 teaspoon pepper
A pinch of cayenne pepper
1/2 cup butter, softened

Preheat the grill to medium-high heat. In a medium bowl, mix together the chili powder, oregano, onion powder, cayenne pepper, garlic powder, salt, and pepper. Mix the softened butter into the dry ingredients. Brush this mixture on each ear of corn. Wrap each ear tightly in aluminum foil so melted butter does not leak out during cooking.
Place wrapped corn on the preheated grill. Grill for 20 to 30 minutes turning corn several times during cooking.