Posted in Baked goods, Baking, Cake, Desserts

Easy Blueberry Upside Down Cake


This time of year, there are plenty of local blueberry farms lining the county roads throughout the Midwest.  In early July, rustic hand painted signs announce the arrival of a new blueberry crop at many of these farms.  Last Sunday, I stopped at one such farm to gather a supply of fresh fruits and vegetables.  To my surprise, there were “slim pickings” available for sale. The unprecedented soggy, Midwest rains and cooler summer temperatures have made a bit of a mesh of things.  When I asked if they had any blueberries for sale, the owner expressed her disappointment as she said the crop was a bit overripe and the berries seemed uncharacteristically  soft.  I usually bring home a 25 pounds box, but instead, I purchased only two pints.  Hopefully, I can visit another stand with a bit more success.

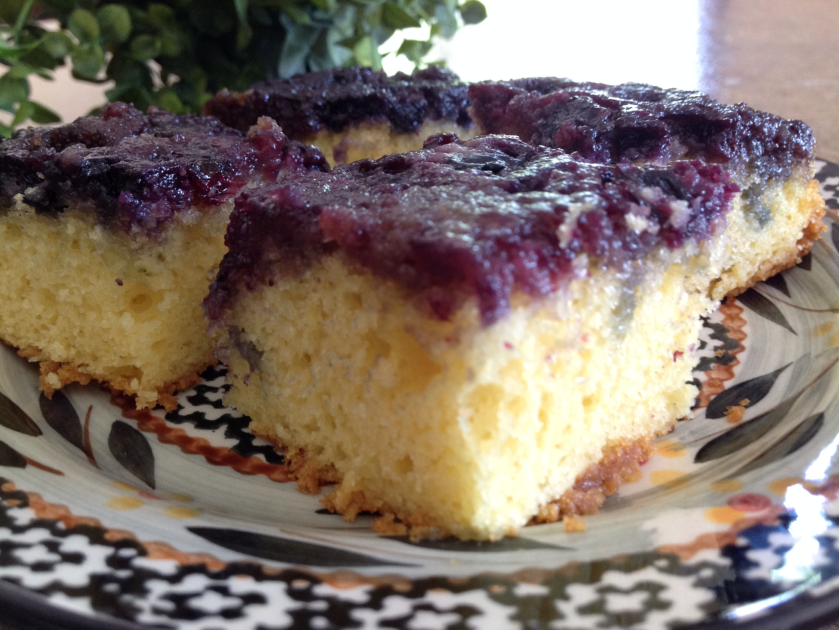
For a quick summer treat, I assembled this incredibly easy recipe that is sure to tantalize your taste buds.  It’s much like a traditional upside down cake that usually includes pineapple.  Instead, a few cups of berries are used to top the tender butter cake.  I hope you’ll give this simple recipe a try. It seems the flavor grows as the cake sits for a bit.

Easy Blueberry Upside Down Cake

1/4 cup butter, melted

1/2 cup brown sugar

2 cups fresh blueberries

1 package yellow or butter cake mix + recipe eggs, oil, and water

1 teaspoon almond extract

Coat the bottom of a 13×9″ baking dish with butter; sprinkle with brown sugar and blueberries. Prepare cake batter according to package directions.  Add almond extract, mix well.  Evenly spread the batter over the blueberries.

Bake at 350° for 40-45 minutes or until a toothpick inserted near the center comes out clean. Cool for 10 minutes on a wire rack. Invert onto a serving plate. If desired, serve warm with ice cream.  

Posted in Canning, Food, Gardening, Home Food Preservation

“Real Pickles”


This is my favorite time of year… It’s amazing to see the soft rains and bright sunshine help strong plants bare fruits and vegetables.  As I browse through the fresh produce at the farmer’s market, I spy dark red cherries, plump blueberries and lots of gorgeous fruit.  Pickling cucumbers and fresh dill are making their way to the forefront of my mind as I am a bit excited about my newest kitchen gadget.  

Several months ago, as I was reading up on preserving and fermenting, I came across a fermentation device that seemed super simple to use.  After watching the web video promoting the product, I quickly ordered it and anxiously awaited it’s arrival in the mail.  Well, it’s here, and this is my first attempt at “Real Pickles”, as Kraut Source has named them.  To find the recipe and to learn more about this amazing product, visit http://www.krautsource.com.

Here’s a sneak peek at the fermentation process for “Real Pickles”…

First, I made a brine with water and salt.  Then, I started the assembly with a clean quart canning jar. I rinsed the pickles and cut an 1/8″ slice off the blossom end of the pickles.  


Then, I added mustard seed and a bay leaf…


1/4 of a sliced onion…


5 cloves of peeled garlic…


1 tablespoon of loose tea and 2 sprigs of deliciously fresh dill…  I added 6 pickling cucumbers and filled the jar with the brine…


I topped it with the Kraut Source contraption and added a bit more water in the mote around the top of the device….


Viola’ …  The pickled will sit on my counter for 7-10 days to ferment!  Can’t wait to try them…


Posted in Cake, Chocolate, Desserts, Food, holiday, No-Bake

Oreo Ice Cream Cake

  
This weekend, we had the pleasure of visiting my sister and her family for the July 4th holiday. One of the activities that we enjoy most is remaking recipes that have become a tradition in our family. This no-bake cake is a winner. The July 4th weather is usually warm and breezy so the ice cream cake is a refreshing treat after a long day of grilling, baseball, and fireworks. Just pop the finished cake into the freezer at the start of the day and it will be waiting for you when you want to sit down and enjoy time with family and friends. What a great, no fuss, dessert!

Oreo Ice Cream Cake

1 package (20 oz.) Oreo cookies

1/4 cup margarine, melted

1 1/2 gallon vanilla ice cream, slightly softened

1 package (8 oz.) Cool Whip (thawed)

1 jar (16 oz.) hershey’s hot fudge or chocolate syrup

1/2 cup chopped nuts

1/2 cup mini Reese’s peanut butter cups or your favorite chocolate candy, optional

Lightly spray, with cooking spray, a 9×13″ pan. Crush cookies in the food processor or put them in a plastic bag and crush them with a rolling pin. Add melted butter and mix thoroughly. Press evenly into the bottom of the pan. Carefully spread the softened ice cream over the cookies. Evenly layer on the Cool Whip. Warm the fudge or chocolate until pourable in the microwave and drizzle over the Cool Whip. Sprinkle nuts over the entire cake. (Add the mini candies, optional.) Freeze for at least two hours or until firm. Enjoy!