Posted in Dinner, Food, lunch box, Soup

Creamy Tomato Basil Soup

Another school year begins…

Our daughter is beginning her clinical year up in Evanston, IL.  Once again, we loaded up all of her belongings to move her into a cute little apartment, not far from the “Purple Line” in a beautiful part of town, just outside the Northwestern University campus.  The cool breezes off the shores of Lake Michigan have made for an unseasonably cooler summer.  

After settling her into the apartment, we walked into town to find a local place to eat lunch.  We spotted an adorable restaurant called The Farmhouse-Evanston.  The menu touted local foods, brews, and seasonal fare.  With a chill in the air, the tomato soup and grilled cheese sandwich sounded wonderful. My daughter ordered it without hesitation.  All through the meal, she raved about the creamy soup and hearty, three-cheese sandwich.  

After returning home, I was inspired to make a big pot of flavorful tomato soup for the family. What a treat.  This recipe makes enough to serve the whole clan with extras to pack into containers for weekday lunches.

…Outstanding soup!  Don’t forget to garnish with pieces of garlic toast, Parmesan cheese, and fresh basil.
Creamy Tomato and Basil Soup

3 tablespoons olive oil
4 garlic cloves, minced

1 large white onion, chopped

2 (28 oz) cans San Marzano whole, peeled tomatoes

1 1/2 cups water

3 teaspoons chicken soup base

2 1/2 tablespoons sugar

1/4 cup half and half

6 – 8 large fresh basil leaves, roughly chopped

1/4 teaspoon dried Italian seasonings

1 teaspoon kosher salt or to taste

3/4 teaspoon ground black pepper or to taste

In a medium pot, heat olive oil over medium-high heat. Add garlic and saute for 30 seconds, don’t over cook.  Add onion; stir and cook until translucent.

Add the two can of tomatoes with juice, chicken base, water, and sugar. Bring to a low simmer. Cook uncovered, for 12-15 minutes. Add the half & half, basil, Italian seasonings, salt and pepper.

Using an immersion blender,  puree soup until smooth. Serve immediately with a hearty grilled cheese sandwich or a fresh salad.

Posted in Baked goods, Baking, Bread, breakfast, Brunch, Desserts, Food

Back To School Blueberry Bread

It’s that time of year again… Back to school!   This is a great quick bread loaf to bake in quantity and pop in the freezer for lunchbox treats throughout the year.  We recently visited our daughter who has started her clinical year at a hospital in Illinois.  I brought along an assortment of quick breads that I carefully sliced and individually wrapped for the freezer.  This way, she can take out one slice at a time and pack it into her lunch bag for a morning snack or a lunchtime treat. As I think back to all of the blueberry recipes I’ve made for the family, this one is surely a winner!


Back to School Blueberry Bread

1/3 cup butter, melted

1 cup sugar

3 tablespoons fresh lemon juice

2 eggs

1 1/2 cups all-purpose flour

1 teaspoon baking powder

1/2 teaspoon salt

1/2 cup milk

1 cup fresh blueberries

1/2 cup walnuts, chopped

2 tablespoons grated fresh lemon peel

GLAZE:

2 tablespoons fresh lemon juice

1/4 cup sugar or 1 cup powdered sugar

In a large bowl, beat the butter, sugar, lemon juice and eggs. Combine the flour, baking powder and salt; stir into egg mixture alternately with milk, beating well. Fold in the blueberries, nuts and lemon peel.

Transfer to a greased 9X5″ loaf pan. Bake at 350° for 60-70 minutes or until a toothpick inserted near the center comes out clean. Cool for 10 minutes before removing from pan.  Continue to cool on a wire rack.  

Combine the glaze ingredients and drizzle over warm bread. Cool completely before slicing.


Posted in Baked goods, Baking, Food

Cranberry Walnut and Buttermilk Muffins

After an enjoyable St. Patrick’s Day holiday, I am often faced with a bit of leftover buttermilk as it is one of the main ingredients in my Irish Scones and Irish Bread recipes. This year was no different. Over the last few days, every time I open the fridge, I notice a half-filled jug of buttermilk that will need to be used before it expires. 

As spring is just around the corner,  I decide to make one of my favorite muffin recipes.  This recipe is moist and flavorful due to the addition of buttermilk. The sweet taste of cranberries and walnuts combined with the buttermilk and orange juice concentrate make for a fresh start to the day. Substituting yogurt or sour cream is definitely an option if you don’t have buttermilk on hand.  Remember, you can always add an acidic ingredient like vinegar or lemon juice to regular milk in order to make your own substitute for buttermilk.  Don’t miss the recipe for cranberry butter at the bottom of the post as it is DELICIOUS and really makes this muffin recipe extra special.

Cranberry Nut and Buttermilk Muffins

1 cup cranberries, coarsely chopped

1/2 cup walnuts, chopped

3⁄4 cup sugar, divided

3 cups all-purpose flour

3 1⁄2 teaspoons baking powder

1⁄4 teaspoon baking soda

1⁄2 teaspoon salt

1⁄2 cup butter

1 egg

1 1⁄2 cups buttermilk 

2 tablespoons frozen orange juice concentrate, thawed

2 tablespoons old fashioned oats (optional)

2 tablespoons sunflower seeds (optional)

Combine cranberries, walnuts, and 1/4 cup sugar; set aside.  In a large bowl, mix together flour, remaining sugar, baking powder, baking soda, and salt.  With a fork or pastry blender, cut cold butter into dry ingredients until mixture resembles coarse crumbs.  In a medium bowl, beat together egg, buttermilk and orange juice concentrate.  Add the liquid and sweetened cranberries to dry ingredients, stirring until just moistened; do not over mix.  Spoon batter into greased or paper-lined muffin cups. Lightly sprinkle with old fashioned oats and seeds (optional). Bake at 350 degrees for 23-27 minutes.  For mini-muffins, bake at 350 degrees for 12-15 minutes or until toothpick inserted in center comes out clean.

If you are so inclined, here is a recipe for cranberry butter that tastes delicious slathered over the warm muffins…

Creamy Cranberry Butter
1 cup cranberries, finely chopped
1 cup powdered sugar

1⁄2 cup butter or margarine, softened

1 tablespoon lemon juice or orange juice

Purée cranberries in a blender; add remaining ingredients and  process until smooth.  Refrigerate.

Posted in Baked goods, Baking, cookies, Desserts, Food

Crispy Ginger Snaps

There’s nothing like a quiet weekend morning when all in the house are still asleep.  I so enjoy tiptoeing through the kitchen to watch  the sun come up while sipping a cup of freshly brewed coffee.  I use this time to plan weekly meals and search my “kitchen file” for clipped recipes from years past that I’ve been wanting to try again.  This “kitchen file” holds recipes from my college days, the early years of marriage, the harried years of raising young children, and the middle aged years of managing a busy work schedule.  My recipe interests seem to morph depending on my stage of life.  During my college years, my favorite recipes were quick and inexpensive.  During the early ears of marriage, my favorite recipes showcased new and interesting ingredients.  While raising my young children, as I had three children within one year, it was mandatory that my recipes be quick and easy!  Now, in my middle aged years, I’m all about prepping for a week’s worth of meals so I don’t have to fuss too much after a long day of work.

I think you’ll enjoy this recipe as my family seems to grab these cookies for any occasion.  An “on the go” breakfast with a cup of tea, an afternoon snack, or a quick evening dessert…   Delicious!

This is the version I make most often but I have also posted a link for a low sugar version that is delicious as well.


Crispy Ginger Snaps


2 cups flour

2 teaspoons baking soda

1 1/2 teaspoons ground ginger

1 teaspoon ground cinnamon

1/2 teaspoon kosher salt

1/4 teaspoon ground allspice

1/4 teaspoon ground cloves

1/2 cup margarine, softened

1/4 cup unsalted butter, softened

1/2 cup brown sugar, firmly packed

1/2 cup sugar

1/4 cup molasses

1 large egg

1/4 cup turbinando sugar

Preheat the oven to 350 degrees.  In a medium bowl, whisk together the flour, baking soda, ground ginger, cinnamon, salt, allspice and cloves. Set aside.  In a large bowl, combine the margarine, butter, and brown sugar and sugar.  Beat until light and fluffy.  Next, add the molasses and egg, beat until fully combined.  Add the flour/oat bran mixture to the wet ingredients; mix until combined.

In a small bowl, pour in the turbinado sugar. Roll the dough into 1″ balls, then roll in the sugar. Place on a baking sheet roughly 2″ apart. Bake at 350 degrees for 10-12 minutes.  Slightly cool before removing from baking sheets to cool completely.

For a healthier version of this recipe try this website…

http://amyshealthybaking.com/blog/2014/12/11/soft-baked-ginger-cookies/


Posted in Chicken, Dinner, Food, Soup

Homestyle Chunky Chicken Noodle Soup

This post goes out to all the folks that might be suffering from the effects of this year’s harsh cold and flu season…

My week began with a trip to urgent care as I woke on Monday with the symptoms of a bad flu. My chest felt heavy and I had a low hacking cough that shook my core every time it took a hold of me. After being diagnosed with an upper respiratory infection, I headed home with a supply of medication to help ease my discomfort.  I knew that a bit of rest and a pot of piping hot chicken noodle soup would certainly help me find relief.  

This is a quick and easy recipe that has become a family favorite over the years.  Chunks of onion, carrot, celery and chicken make for a hearty base while the steaming hot broth warms the throat and nestles down into the tummy.  Comfort food at its best. To save a bit of time, I often purchase a rotisserie chicken from the local grocer and shred up the juicy, well seasoned chicken before adding it to the broth.  My favorite stock base to use is L.B. Jamison’s.  I follow the directions on the back of the jar.  Perfect every time…  What a welcome recipe when you’re feeling under the weather.

Homestyle Chunky Chicken Noodle Soup

8- 10 cups water

8 teaspoons chicken flavored soup base (or adjust to taste)

3 medium carrot, peeled and sliced

3 stalk celery, sliced

1 medium onion, diced

2 cups shredded cooked chicken

2 teaspoons black pepper

1 teaspoon garlic powder

1 teaspoon dried parsley

2 cup cooked noodles

Heat water to boiling, add soup base.  Reduce heat to simmer.  Add carrots, celery, onions, pepper, garlic, and parsley.  Simmer vegetables until tender.  Add chicken and cook for an additional 10 minutes, stirring occasionally.  Keep cooked noodles separate and add a small handful to each bowl of soup before serving.  This keeps noodles al dente.

Posted in Baked goods, Baking, cookies, Food, Gifts, holiday, holidays

Melt in Your Mouth Christmas Cutouts

The holiday season is upon us and it’s just about time to start our Christmas baking.  We had a great time this weekend as we welcomed a few young guests to share in the fun.  I was happy to have found some package labels (last year’s clearance aisle) to wrap up our tasty treats for gift giving.  As one of my favorite cookie recipes, I posted it several years ago… You can find it here.  These tasty morsels truly do “melt in your mouth” and they are relatively simple to make.  Great little gifts for those that we share our lives with… Coworkers, colleagues, the mail carrier, our anyone else that you care to share a heartfelt gift with.  

Wishing you the blessings of the season as you celebrate the holidays with your family and friends.


Posted in appetizers/snacks, Baked goods, Baking, Bread, breakfast, Cake, Desserts, Food

Amish Snack Cake


Jeepers creepers, it sure is busy around here…

This happens every December as the temperatures drop, the snow starts to fall, and holiday celebrations begin.  

I recently attended an early morning co-worker’s meeting.  We only meet four times a year and our December meeting is more like a meeting/potluck lunch.  We discuss business during the morning hours and then celebrate the upcoming holidays with a carry-in lunch in the afternoon.  As a special breakfast treat, I had volunteered to bake a few items and run to a local coffee shop for a box of hot coffee for the crowd.

Well, to my dismay, it started to snow heavily the night before the event and I knew the snow would hamper my trip to the donut shop the following morning.  I decided that I would get up really early to throw my baked goods into the oven so that I could travel into town and onto the meeting in a timely manner.  I wanted to make an uncomplicated recipe with only a few ingredients to speed up the process so I grabbed my recipe file to look for a recipe that had appeared in the newspaper many years ago.  I had clipped it out and tucked it away for just such an occasion. For this simple recipe, I used a box of spice cake mix and a can of apple pie filling for two of the ingredients.  The addition of three eggs was all that was needed to finish off the batter.  I threw in a handful of chopped walnuts to add a bit of crunch.

Below you will find the basic recipe.  The addition of nuts, raisins, chocolate chips, etc. will certainly add to the flavor and texture of the cake.  I’ve added a note with some classic flavor combinations if you would like to change things up a bit… Enjoy this moist and flavorful cake!


Amish Snack Cake

1 box cake mix, any flavor (I use spice cake mix)

3 large eggs, beaten

1 can pie filling, any flavor (I use apple pie filling)

Preheat the oven to 350 degrees. Spray a 13×9″ pan with non-stick cooking spray.  In a large mixing bowl, combine cake mix, eggs and pie filling. Stir together until well blended.  Bake for 40-45 minutes or test for doneness with a toothpick inserted in the center of the cake.  Cool completely before icing (if desired).

Other variations:

  • Chocolate cake mix with cherry pie filling and chocolate chips
  • Butter pecan cake mix with apple pie filling and nuts
  • Yellow cake mix with peach filling and walnuts
  • Pineapple cake mix with blueberry filling and coconut
  • Yellow cake mix with cherry filling
  • Spice cake mix with apple pie filling and walnuts
Posted in appetizers/snacks, Food, holidays, Salad, salads

Festive Cranberry, Pecan and Feta Salad

I recently attended a daylong training in Indianapolis.  A soup and salad lunch was served mid-day.  One of the local restaurants was asked to provide a bounty of fresh rolls, piping hot turkey chili and a fabulous cranberry and feta salad.  I passed on the rolls and chili but piled a healthy portion of the salad on my festive plate.  As I munched on the salad, I was reminded of a recipe that I used to make years ago and made a note to look through my cookbook collection to remake the dish for the Thanksgiving table (for some lighter fare.) Here is the version that I made… I don’t recall where the recipe originated, I have a handwritten note with the dressing ingredients loosely estimated.  We sure enjoyed this recipe. To save time, I’ve used a bottled raspberry vinaigrette or poppy seed dressing.  I have also added some freshly sliced pears to the mix. Super easy and delicious! Great for the upcoming holidays.
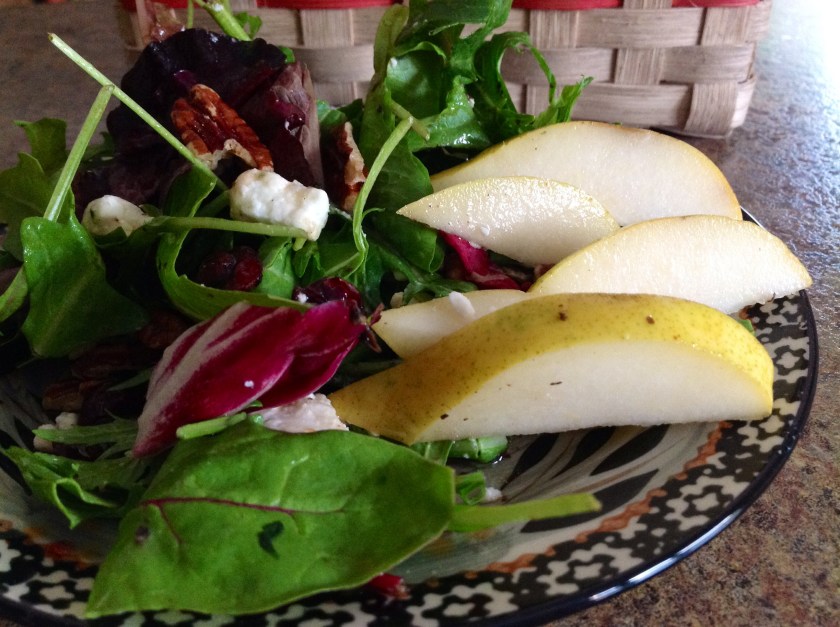
 

Festive Cranberry Feta and Pecan Salad

2 tablespoons raspberry or apple cider vinegar

1/2 teaspoon Dijon mustard

1/2 teaspoon sugar or the equivalent sweetener

1/2 teaspoon salt

1/4 teaspoon ground black pepper

6 tablespoons olive oil

6 cups mixed salad greens, rinsed and dried

3/4 cup dried cranberries

3/4 cup crumbled feta cheese

1 cup pecan halves, lightly toasted

In a small bowl, stir together the vinegar, mustard, sugar, salt, and pepper; mix until sugar and salt dissolve. Slowly whisk in olive oil.  In a chilled  glass salad bowl, toss together the greens, cranberries, pecans, and cheese. Drizzle with vinaigrette, and gently toss to coat. Serve immediately.

Posted in Baked goods, Baking, Desserts, Food, holiday

Lemon Christmas Cake

A couple of years ago, I was invited to an afternoon luncheon where a gathering of friends would celebrate the coming of Christmas. When I arrived, several women were happily chatting as they placed holiday favors at each place setting.  An assortment of Christmas chocolates, candy canes, and holiday ornaments were individually wrapped for each guest.  One woman had made at least 3 dozen mini-quick bread loaves, each beautifully bundled in festive cellophane wrap. She had baked lots of different flavored loaves; pumpkin nut, cranberry orange, banana, and lemon pound cake.  I was tickled to receive the lemon flavored loaf for the glaze glistened through the cellophane and looked absolutely delicious.
Arriving home, I promptly put on the kettle and sliced the loaf to share with the family. A quick bite had me rummaging through my recipe files as the taste reminded me of an old recipe I had tucked away years before.  The lemony flavor is perfect and the texture is incredibly moist.   This recipe makes a beautiful bundt cake that is baked for about 1 hour.  (I often pour the batter in two 8X4″ loaf pans and bake for 40-45 minutes.) The zesty glaze adds a boost of flavor that soaks into the cake and makes it a wonderful addition to the holiday dessert table.

Lemon Christmas Cake

For the cake:

2 1/2 cups sugar

1 1/2 cups butter, softened

4 eggs

3 1/2 cups flour

1/2 teaspoon salt

1/2 teaspoon baking soda

 1 cup buttermilk or plain yogurt

1 teaspoon lemon extract

For the glaze:

2 cups confectioners’ sugar

1/4 cup lemon juice

2 tablespoons butter, softened

1 1/2 tablespoons lemon zest

For the cake: 

Preheat oven to 350 degrees.  Grease and flour a bundt pan.

Beat sugar and butter together in a bowl until light and fluffy, nearly 10 minutes. Add eggs one at a time, thoroughly beating after each addition into the butter and sugar mixture. Stir in lemon extract.  In a medium bowl, sift flour, salt, and baking soda together. Add a third of the flour mixture to the butter mixture; mix well. Pour in half the buttermilk and beat until combined. Continue adding the remaining flour mixture and buttermilk, beating well after each addition, and ending with the flour mixture. Evenly pour batter into prepared pan. Before baking, reduce oven temperature to 325 degrees.

Bake until a toothpick inserted into the center of the cake comes out clean, about 60 to 75 minutes. Cool in the pan for 10 minutes before removing from pan.

For the glaze:

Beat confectioner’s sugar, lemon juice, 2 tablespoons butter, and lemon zest together in a bowl until glaze is smooth. Pour about half the glaze over the cake; let cool. Pour remaining glaze over the cake.

Posted in Desserts, Food, Kids in the Kitchen

Refreshing Whipped Jello Dessert


I was looking for a refreshing, lite dessert this past Halloween weekend and I remembered this four-ingredient, low-sugar treat that everyone seems to enjoy.  I usually store the finished product in the fridge for a grab-and-go snack, but it’s also crazy delicious frozen. 

If freezing this treat, dump the mixture into a 13X9 baking dish, spread evenly and freeze.  Then, slice it into squares before serving.  (I use the sugar-free ingredients to assemble this recipe but using the “regular”  ingredients will work just as well.)

Refreshing Whipped Jello Dessert (low-sugar)

1 (8 ounce) container Cool Whip, sugar free

1 (16 ounce) container cottage cheese

2 (3 ounce) packages orange sugar-free Jello

1 can Del Monte Mandarin Oranges (no sugar added), drain well


In the order provided, mix all ingredients in a medium sized bowl.  Refrigerate for 1 hour before serving.