Posted in Canning, Food, Sauces

Sweet and Spicy Pepper Relish

While waiting in the checkout line at a local grocery store this week, I noticed a monthly cookbook tucked into the magazine rack close to the register.  The front cover and title focused on “Canning and Preserving”.  It was a “Taste of Home” publication and I’ve always been a big fan of the reader provided recipe contributions showcased in the magazine. I’m a sucker for spending extra cash in the checkout lane so I threw the book in my cart.

 As I thumbed through my newly purchased mini-cookbook, a recipe for pepper relish caught my eye.  It looked simple and straightforward so I decided to purchase the ingredients to give it a try. 

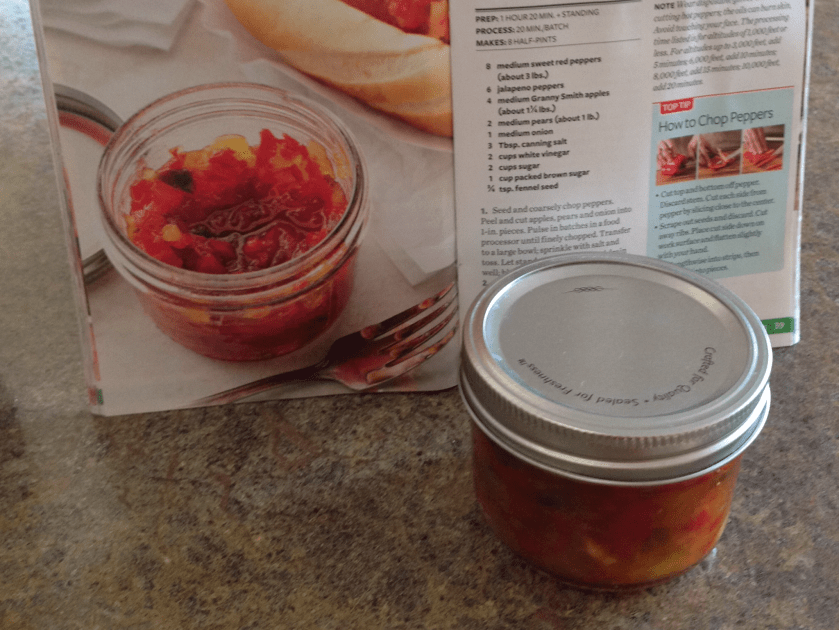
The result, a sweet and spicy mixture that’s a perfect condiment for bratwurst links,  steak or baked chicken. Great with anything cooked on the grill…   It can also be used as a flavorful appetizer paired with cream cheese and crackers.


 Here’s the link to the recipe:  

Autumn Pepper Relish

I changed the pepper ratio a bit, but not much…

Sweet and Spicy Pepper Relish

(Adapted for Taste of Home)

6 medium sweet red peppers 
2 medium green peppers

6 jalapeno peppers

4 medium Granny Smith apples (about 1-1/4 pounds)

2 medium pears (about 1 pound)

1 medium onion

3 tablespoons canning salt

2 cups white vinegar

2 cups sugar

1 cup packed brown sugar

3/4 teaspoon fennel seed

Seed and coarsely chop peppers. Peel and cut apples, pears and onion into 1-in. pieces. Pulse in batches in a food processor until finely chopped. Transfer to a large bowl; sprinkle with salt and toss. Let stand 6 hours. Rinse and drain well; blot dry with paper towels.
In a Dutch oven, combine drained pepper mixture, vinegar, sugars and fennel seed; bring to a boil. Reduce heat; simmer, uncovered, 40-45 minutes or until slightly thickened.

Carefully ladle hot mixture into eight hot half-pint jars, leaving 1/2-in. headspace. Remove air bubbles and adjust headspace, if necessary, by adding hot mixture. Wipe rims. Center lids on jars; screw on bands until fingertip tight.

Place jars into canner with simmering water, ensuring that they are completely covered with water. Bring to a boil; process for 20 minutes. Remove jars and cool for 12 to 24 hours before removing the bands and storing in a cool, dry location.

Posted in Baking, breakfast, Food, Home Food Preservation

Drying Your Own Fruit


One of my favorite ways to preserve fruits and vegetables is to thinly slice them and dry them in my dehydrator.  Drying is one of the oldest methods for preserving foods. This makes for a nutritious and convenient snack that needs little space for storage. There are two ways in which I dry fruits… I often purée fresh fruit in the blender, spread the purée on a dehydrating sheet and dry the product according to the manufacturer’s instructions. I then wrap long strands of the dried leather in cellophane and store it in a mason jar.  Other times, I simply slice ripe fruit, process it in the dehydrator overnight, condition the fruit and package for a nutritious and high-energy snack.  Drying your own fruit at home is far less expensive than purchasing packaged dried fruits and can insure that there are no extra preservatives added to the fruit.


Some fruits suitable for drying include apples, pears, peaches, plums, apricots, bananas, cantaloupe, and berries.  To process, carefully follow the directions that accompany your dehydrator or use a recipe from a reputable source.  These recipes  have been tested to reduce any food safety issues and boost nutritional impact.  If you are interested in making your own jams or jellies, pickles, salsa, fruit leather or dried fruit, here are a few sites that will provide you with an abundance of carefully tested recipes. 

The National Center for Home Food Preservation – http://nchfp.uga.edu

Drying Fruits and Vegetables Penn State Extension – http://extension.psu.edu/food/preservation/safe-methods/drying-vegetables

Ohio State Extension Food Preservation – http://extension.oregonstate.edu/fch/food-preservation


Posted in appetizers/snacks, Canning, Food, Gardening

Preserved Apple Slices

20140830-092921.jpg
This week I had the opportunity to attend a series of Master Home Food Preservation classes in central Indiana. I can’t even express my excitement over the valuable information that was shared during the week long certification class. We learned of techniques for freezing, water bath canning, drying, pickling, and pressure canning through PowerPoint slides and hands-on lab time.
It was a long, sometimes exhausting, week where I spent time with other classmates testing various techniques for preserving the best of the season. One important point that I would like to make about home food preservation is one that focuses on food safety…Never use a recipe that has not been tested by a reputable entity such as the USDA or Ball Canning. Use recipes that have been developed no earlier than 1995 as food science and technology specialists have shared new information that focuses on current food safety practices. The USDA is one of the only sources I use for my canning recipes. Here is the link for the National Center for Home Food Preservation/USDA canning recipe book.
You can download the whole book for free. The recipe for apple slices is on page 7. I can’t stress how important it is to use a laboratory tested recipe. It’s a matter of life and death! Botulism is no laughing matter so it’s important that you follow tested recipes exactly as they are written. Do not alter ingredients or quantities. Process as directed. I recommend using recipes as advised and then after you have opened a jar to serve the contents, make your adjustments to spice things up to favor your preference. Then, refrigerate and use up the quantity as directed.
For more information about home food preservation, visit the National Center’s website at http://nchfp.uga.edu.