Posted in Food, Gardening

Harvesting Honey

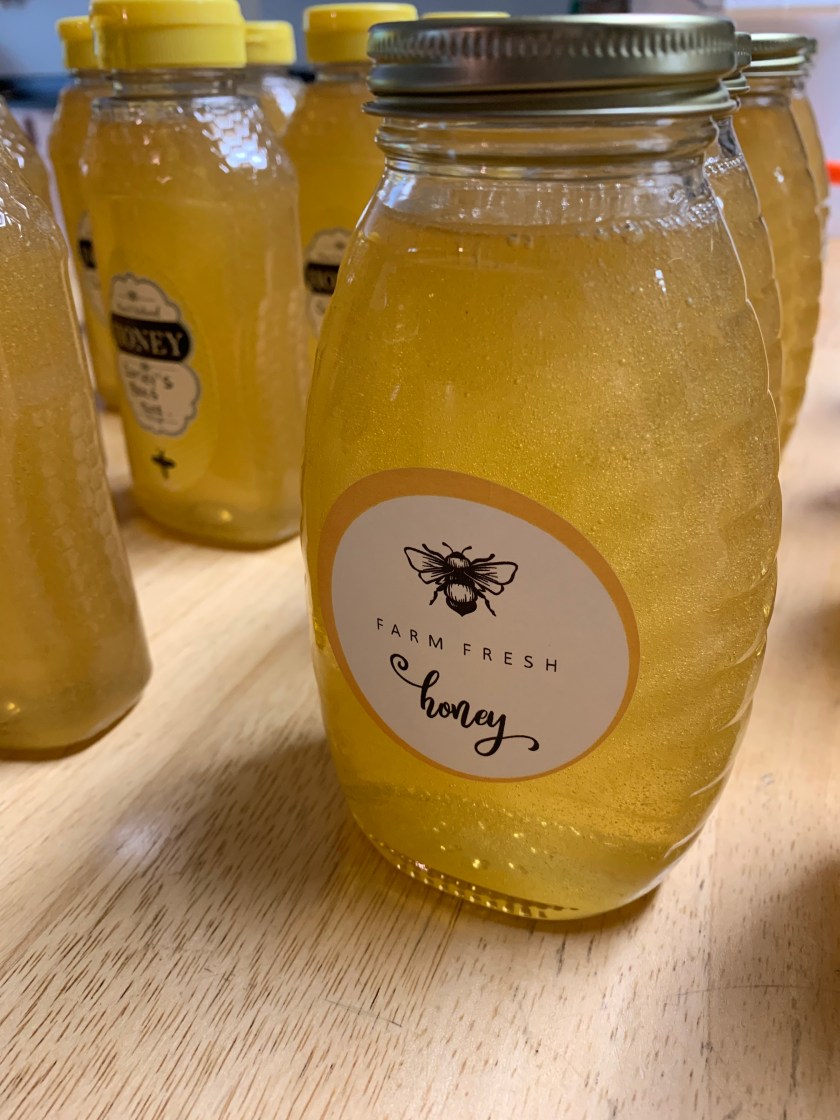
Today we had the pleasure of experiencing our first honey harvest. Our bees have been busy visiting fields of clover and Queen Anne’s Lace over the past several weeks. After watching hours of video focused on harvesting honey and rendering beeswax, we finally took a leap of faith and carefully extracted the liquid gold produced by our very own bees.

Here’s a step by step look at the process:

We carefully swept the bees off of the short, capped honey frames to prepare for extraction.

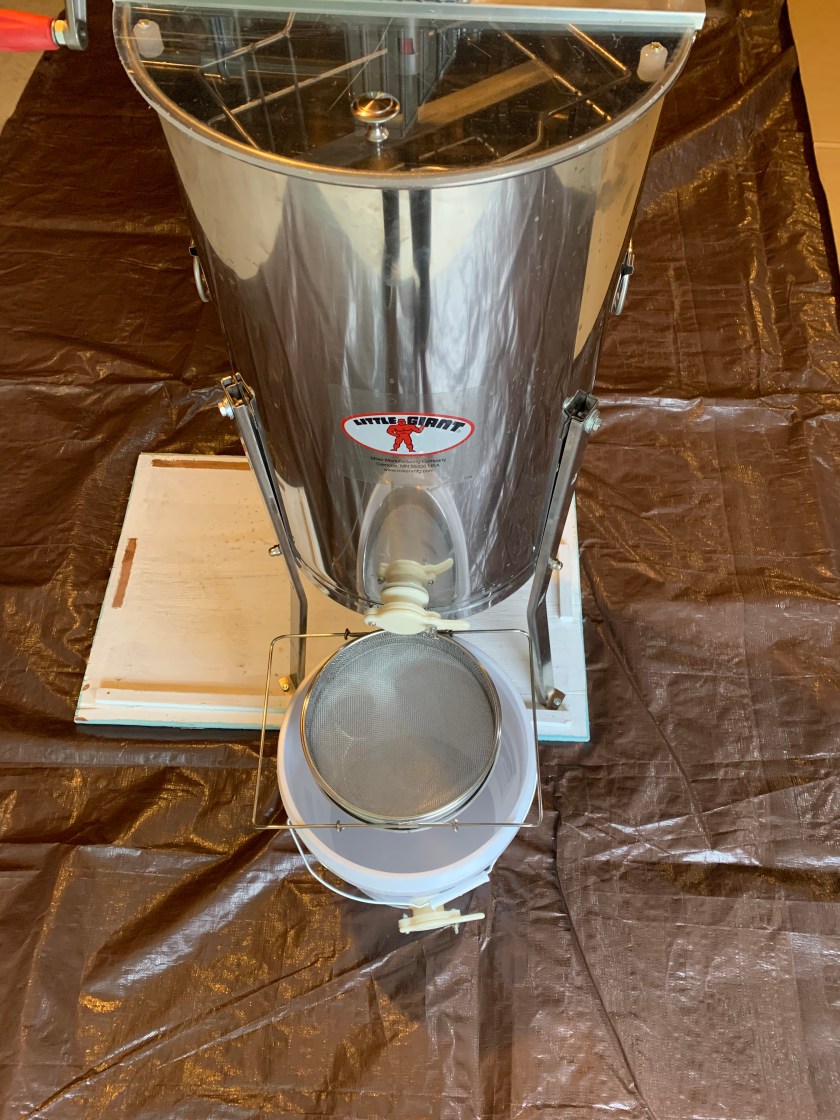
We set up the extractor and a screened sieve to remove the honey and filter out the wax and other unwanted items. A clean and organized area is imperative. We had buckets of soapy water with sanitizer and tarped surfaces in the extraction area.

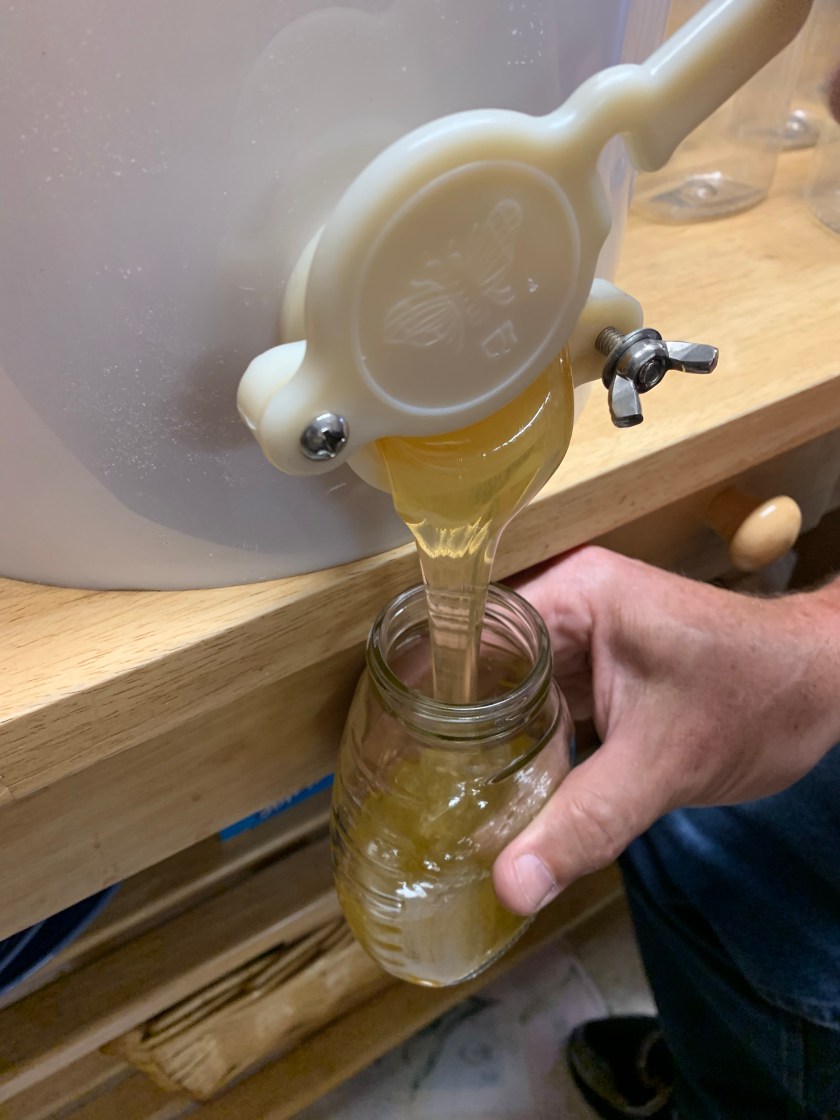
After the extractor does its work (we have a hand crank version), the gate can be opened to pour unfiltered honey into a clean, food-safe bucket. The sieve and filter will take out the impurities.

We cleaned and sanitized our honey containers prior to setting up our bottling station.

The filtered honey is ready for bottling. We used 12 and 16 ounce jars. We wanted to try a mixture of plastic and glass jars.

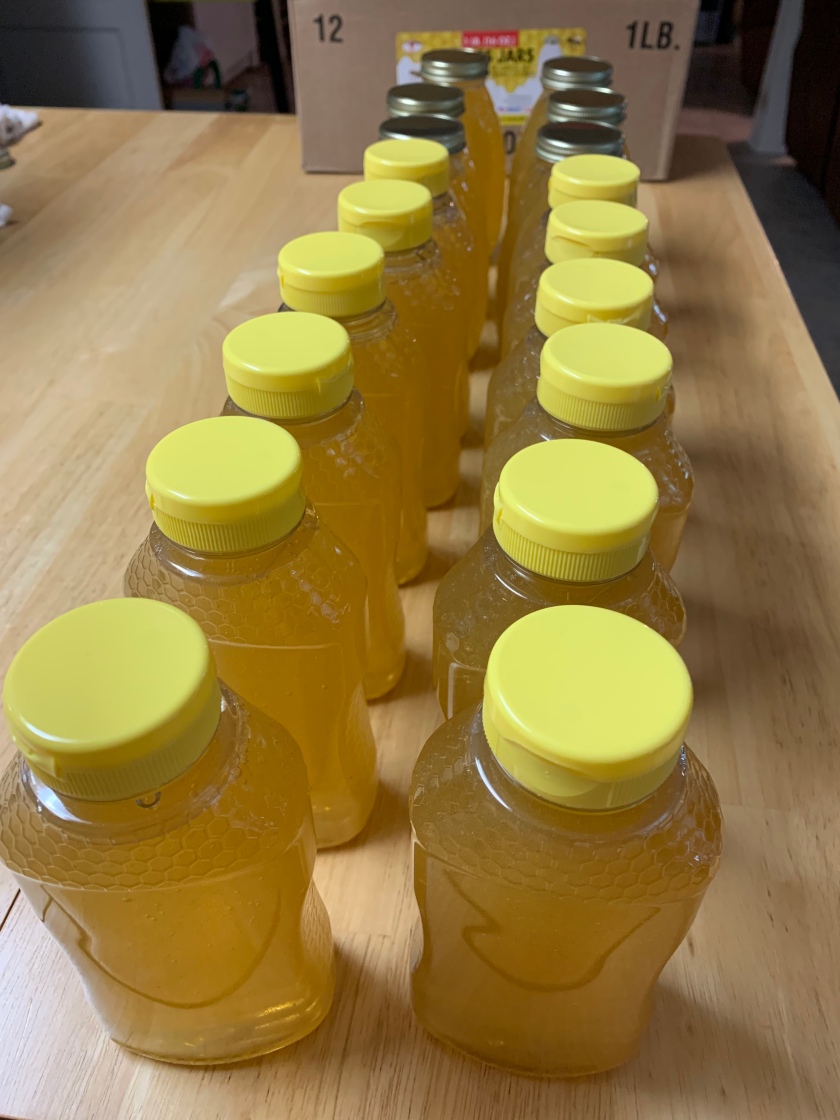
We were able to bottle 12- 12 ounce, 12- 16 ounce, and 2- 4 ounce jars. What a delight to get so much honey from just 8 short frames.

I order a few different labels from Amazon to finish off the process. I think I’ll order a set of more personally printed labels for next year.

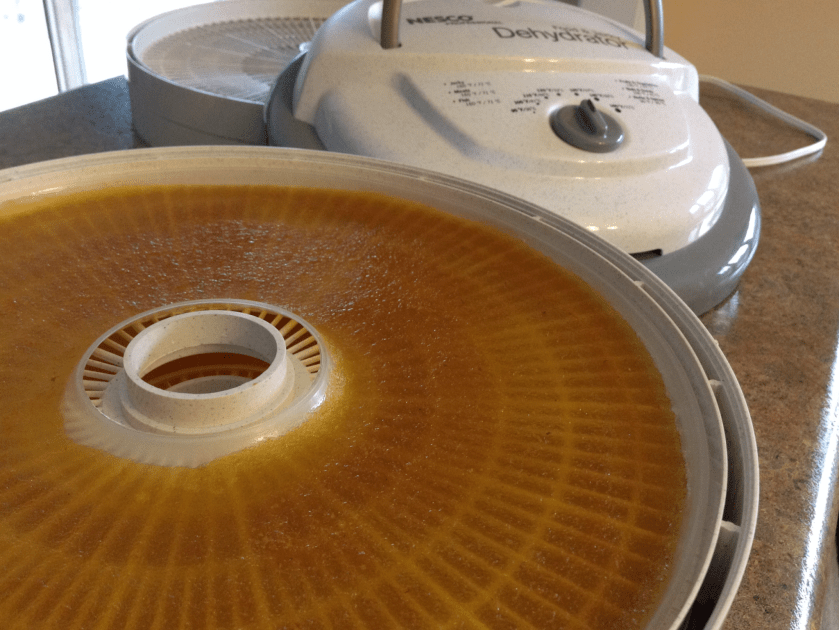
Now, it’s time to render the filtered wax to make our own beeswax blocks for future projects.

Advertisement
Posted in Baking, Bread, Canning, Gifts, holiday, Home Food Preservation, Homemade Mixes

Sparkling Christmas Jam

Around the holidays I love to make special “gifts from the kitchen” for friends and family.  Most times, I make batches of cookies, breads, candies, or snack mixes.  This year, I made brown bread loaves and Sparking Christmas Jam for everyone.


I was doing a major house cleaning and I had stumbled upon a few boxes of cute little jelly jars.  I was in the mood for a major cleanup and I was trying to get rid of anything I hadn’t used in a while.  This wide mouth batch would work just fine for gift giving jars. I remembered that I had loads of frozen strawberries and cranberries in the freezer that I could use for the intended mix, so I quickly scrubbed the jars in warm soapy water and began to prep the recipe.  Here are the instructions that I used.  

I must admit, the recipe is not very precise and of course, canning is a precise science. When processing for home preservation where items are to be stored on shelves, I only use tested, reputable recipes. Therefore, I processed the jars as instructed but I asked those receiving a jar to KEEP IT IN THE FRIDGE for safety purposes.  I gave them cold, refrigerated jars to remind them where they should be stored. No need to get anyone sick via an oversight when canning! 

This is a scrumptious recipe.  Great with bread and butter or tea and toast… I’ve already gotten a few requests for another jar next year. The beginning of a tradition…?


Merry Christmas and a Happy New Year!  Let’s make this a good one!

Posted in appetizers/snacks, Canning, Home Food Preservation, Kids in the Kitchen, Toppings

Lemony Strawberry Jam

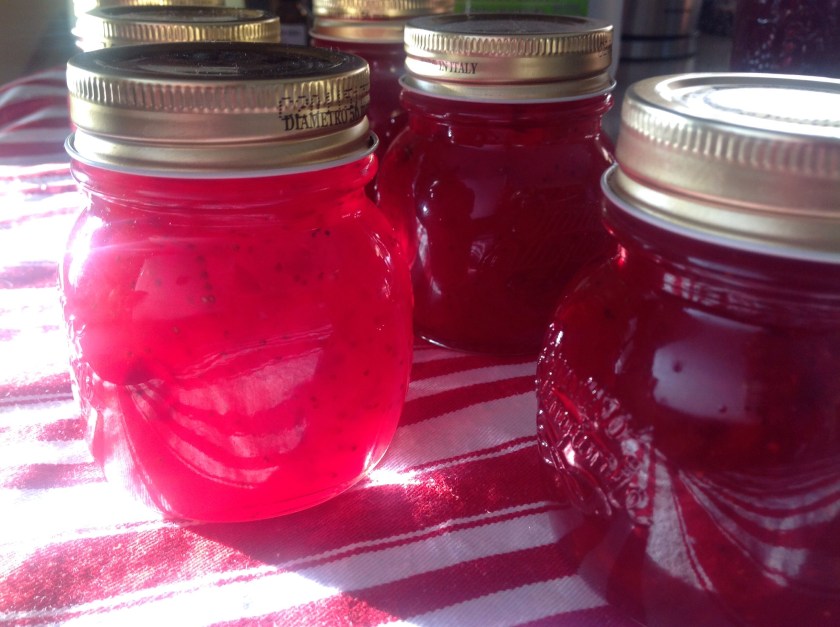
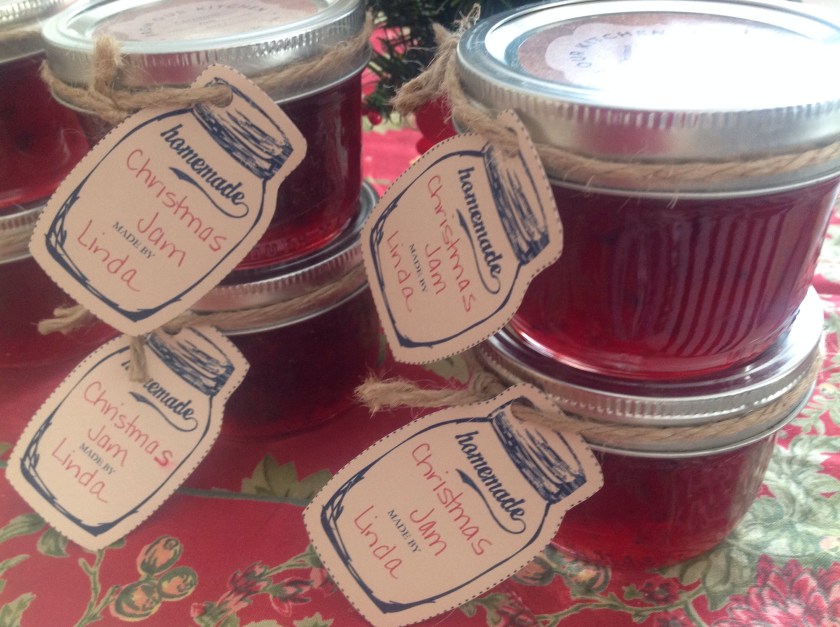
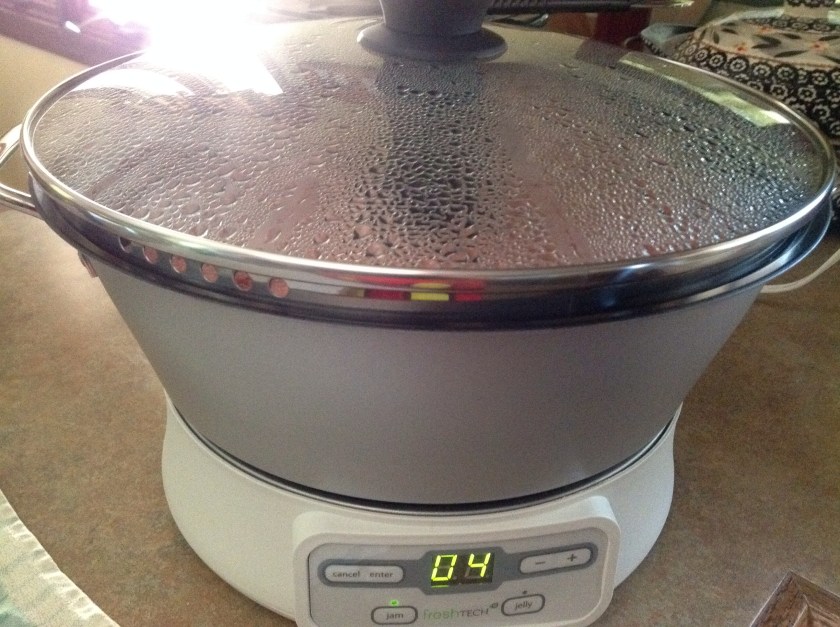
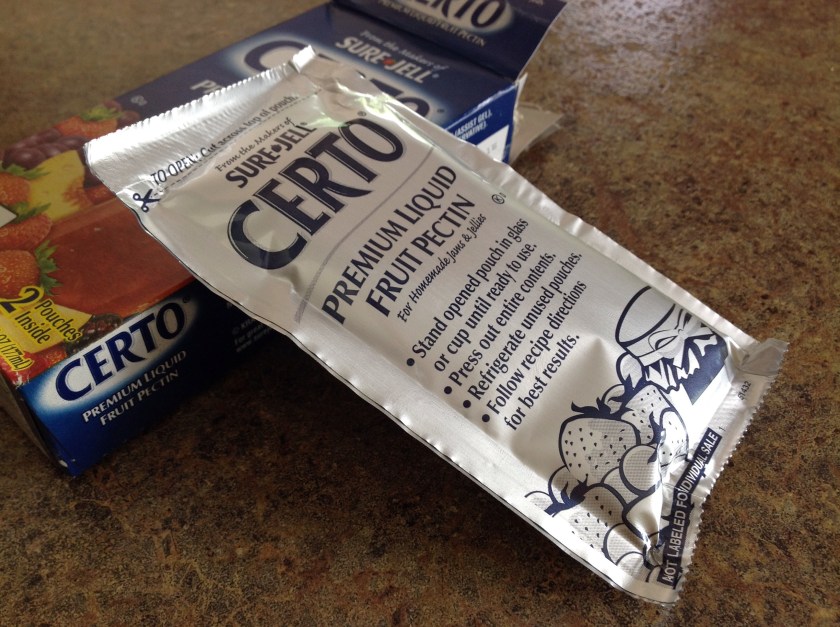
I was recently asked to do a food demonstration at a local county fair.  I thought it might be fun to showcase some of the new home food preservation products and make some lemon and strawberry jam.  I bought a bag of lemons, some sugar, pectin and fresh strawberries for the occasion.  A few portable appliances were easy to load into the back of my car and plug into the electrical outlet at the Home and Family Arts Building.  I had a blast making jam for all of the folks visiting the fairgrounds.  I was happy to answer questions and drum up some new found interest in canning.  If you have never preserved food or if you’re looking for a fresh new way to can fruit with ease, check out some of the new items on the market and get busy canning nature’s bounty!
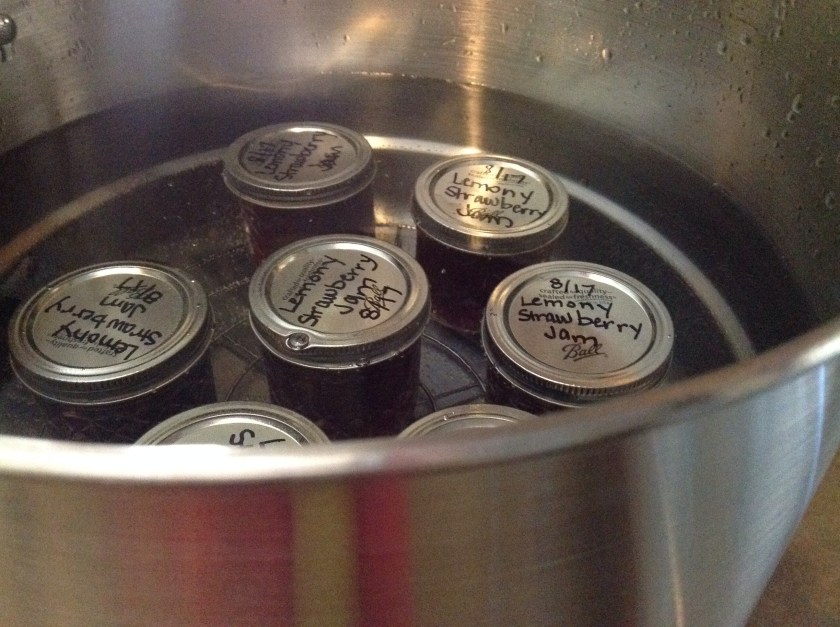
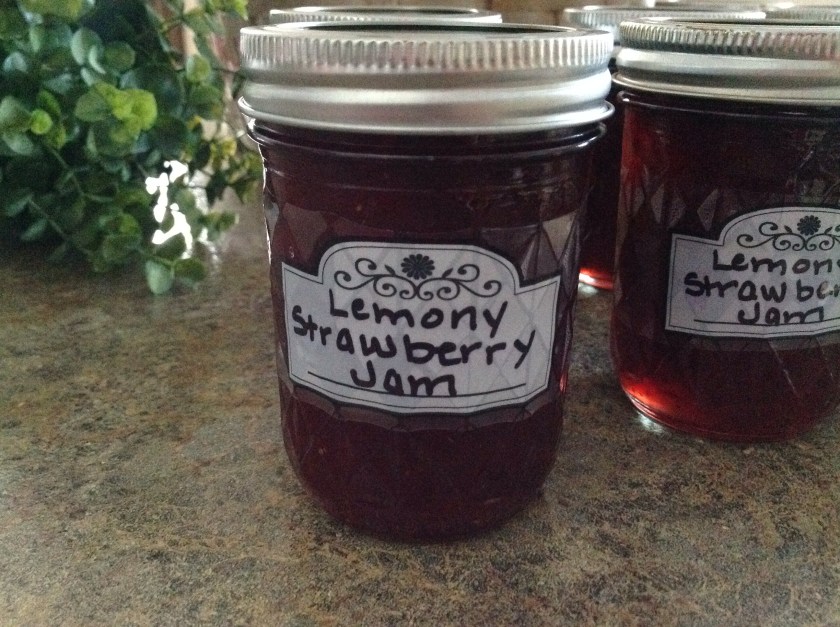
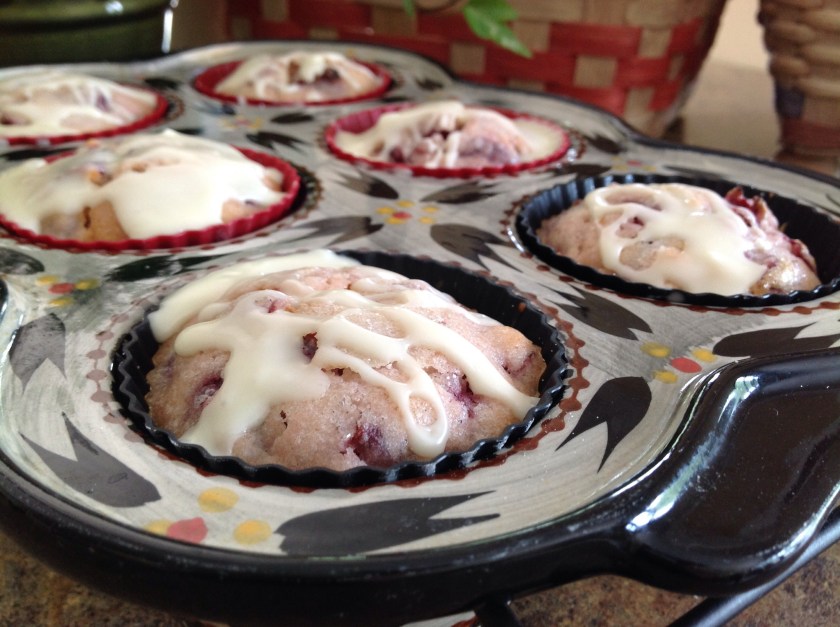
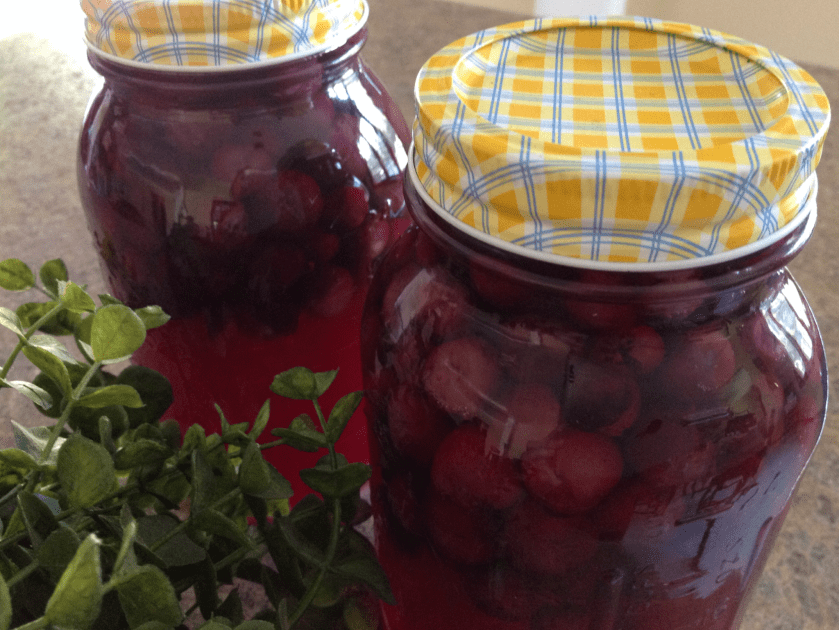


Sprinkle in the pectin…

Add the crushed strawberries…

A fresh additon… lemon zest

Time to give this a stir…

Add sugar and bring to a rolling boil…    This is an amazing little appliance.  Portable, electric, and easy to clean…  Small batch canning is highlighted with this jam and jelly maker.

Getting ready to process…

Set to “canning mode”…

Simply delicious!

Lemony Strawberry Jam

Strawberries

Lemons

Sugar

Pectin

Check out the recipe at the link below.  Follow the recipe exactly as written.  This is a must when preserving foods.  No substitutions, unless directed.  Always use reputable, tested recipes for home food preservation.

https://www.freshpreserving.com/lemony-strawberry-jam—ball-auto-canner-recipes-br1393.html

Posted in Baked goods, Baking, Gardening, Home Food Preservation

Iced Sour Cherry Muffins/Quick Bread


One of my co-workers sent me a text the other night.  She wanted to know if she might be able to successfully dry some of her sour cherries in the oven.  Her cherry tree had produced a bumper crop of fruit and she was creatively thinking of ways to preserve the bounty.  I quickly suggested she borrow my dehydrator as it is super easy to dry fruits and vegetables in this portable unit.  In return, she offered me some of those beautiful sour cherries.  I felt like one lucky girl!  

I quickly pitted, chopped and bagged the fruit to put in the freezer as I wasn’t quite sure what I would make with them.   Cherry pie filling… sour cherry jam… muffins … scones?  I settled on Iced Sour Cherry Muffins. What a great choice as these muffins are tart and sweet, packed with a good dose of sour cherries. The recipe only needed two cups worth of fruit so I froze the rest of the cherries for another day, another recipe.  I used some of the batter for muffins and the rest for a small loaf of quick bread.  Again, I am one lucky girl! 

 
Iced Sour Cherry Muffins/Quick Bread 

 ¾ cup buttermilk 

 ¼ cup orange juice 

 ⅔ cup canola oil 

 1 large egg 

 1 teaspoon orange extract 

 1 heaping tablespoon orange zest 

 2 cups flour 

 1 cup sugar 

 1 tsp baking powder 

 2 cups sour cherries (pitted and chopped) 

 2 tablespoons brown sugar and cinnamon instant oatmeal (optional) 

Preheat oven to 350 degrees. If making muffins, line pans with paper liners or use silicone muffin cups.  If making quick bread, spray small loaf pans with cooking spray.   

In a medium bowl mix together buttermilk, orange juice, extract, canola oil and egg; mix well.  Next, add the orange zest, flour, sugar, and baking powder; mix well.  Carefully fold in the cherries, just until combined.  Scoop batter into muffins cups about ¾ full. Sprinkle with instant oatmeal mix (optional).   

 Bake for 25 minutes, or until a tooth pick inserted into the center comes out clean.  (If making 7×3″ loaves, fill and bake for 40-50 minutes or until a toothpick inserted into the center comes out clean.)

Let rest for a few minutes, and then transfer to a wire cooling rack and allow to cool completely before icing. 

 For glaze:
1 cup confectioners’ sugar

1 tablespoon milk or orange juice

In a medium mixing bowl, combine ingredients and mix well. If glaze is too thick, carefully add extra juice or water (a 1/2 teaspoon at a time) until mixture is smooth and creamy. Lightly drizzle glaze over cooled muffins.

Posted in and sauces, Canning, Gardening, Home Food Preservation

Bumbleberry Jam


As the spring season ushers in warmer temperatures, I am focused on the blossomed plants that will soon produce ripe, succulent berries. My last year’s supply of Bumbleberry Jam is running low so I am hopelessly awaiting the opportunity to pick fresh berries and the prospect of an abundant canning season. 

There is nothing sweeter than a freshly baked scone or a slice of whole grain bread slathered with creamy butter and a heaping scoop of Bumbleberry Jam.  We also enjoy pairing the jam with a hearty helping of extra crunchy homemade peanut butter to assemble the classic PB&J.  Oh, it’s all so berry delicious!

Below you will find the link for this incredible jam.  Always remember that using a reputable source for canning recipes is imperative.  Some of these sources include the National Center for Home Food Preservation, University Extension Websites, and Ball or Bernardin Recipes. These organizations have thoroughly tested recipes making sure to focus on food safety guidelines.  

It’s relatively simple to make jam.  Follow the directions exactly as written and you’ll end up with a safe, delicious product.  Most jam recipes require an abundance of crushed berries…

Then you’ll often need some pectin and sugar…


You’ll need a large pot to mix all of your ingredients together according to the directions…


After processing the jars in a water bath canner for the recommended time, you’ll let the jars sit to cool for 12-24 hours…


The Bumbleberry Jam recipe can be found here:

http://www.bernardin.ca/recipes/bumbleberry-jam.htm?Lang=EN-US

Ball has a recipe for Mixed Berry Jam that tastes delicious as well.  Here is the link:

https://www.freshpreserving.com/mixed-berry-jam-%7C-mixed-berry-recipes—ball-fresh-preserving-br1276.html


Posted in Canning, Food, Gardening, Home Food Preservation

Sweet and Spicy Pickled Peppers


The first day of fall has hit the Midwestern region and it seems that gardens are producing a bounty of veggies that need to be picked and processed before the cooler temperatures set in.  Once again, a few local growers were kind enough to share an abundance of beautiful produce that was beyond what they could consume.  I was thrilled to see a small bag of assorted hot peppers in the mix.  The orange, red, and green, color combination would make for a beautiful display in canning jars. Because I would only have enough to fill one large jar, I decided to make refrigerator pickled peppers rather than canning them with a water bath method.  This is a quick and simple way to make the great tasting flavor of the peppers last as they sit on the refrigerator shelf and marinate in the sweet and spicy vinegar solution.  Use these peppers to top an Italian salad or to add some flavor to a grilled sandwich. Simply delicious!


Sweet and Spicy Pickled Peppers

2-4 cups sliced peppers

2 cups white vinegar

1⅓ cup water

1 tablespoon canning salt

2 tsp sugar

Canning jar(s) with tight fitting lid(s)

Wash jar(s) with warm soapy water; air dry.  Pack the sliced peppers in jar(s).  Set jar(s) aside.

In a saucepan, combine vinegar, water, salt, and sugar. Stir to dissolve sugar completely.  Bring to a simmer over medium heat.  Remove from heat and let cool.

Pour mixture over the peppers making sure they are completely covered. Twist on a tight fitting lid and store in the refrigerator. As the peppers sit, the flavors will develop. Store refrigerated for 4-6 weeks.


Posted in Canning, Gardening, Gifts

Homemade Concord Grape Juice

Well, it’s that time of year again!  Ready for the picking are clusters of deep purple grapes hanging off of the vines in my back yard.  While the last couple of years have brought bumper crops to our lot, this year’s pickings have been a bit slim. This didn’t stop me from making a few of our family favorites…flavorful grape juice and grape jam.

There’s no greater satisfaction than to grow and process your own produce.  Several years ago I planted two Concord grape pods and they have grown to cover a large open area with a plentiful bounty of fruit.  Fresh air, rain and sunshine nourish the plants throughout the summer months until the gorgeous fruit are ready for picking.  I don’t water, fertilize, trim or fuss.  This is my kind of gardening!  The reward for leaving the plant to do what it naturally does; lots and lots of grape jam and juice that will last throughout the year.


Above is the recipe from the Ball Blue Book published by Alltrista Corporation.

Here is another method that produces similar results…
Homemade Concord Grape Juice

TO EACH STERILIZED QUART JAR
2 cups washed and cleaned concord grapes

1/2 cup sugar

Boiling water

In sterilized jar place 2 cups grapes. 

Add 1/2 cup sugar.  


Fill with boiling water leaving 1/2″ headspace. 

Seal jars at once with 2 piece lids. Process in water-bath canner for 10 minutes. Remove from canner and let sit for 24 hours.  Remove metal lid-bands, and label with date and contents.  Let juice stand 3 to 4 weeks before using. (The longer you let it sit, the greater the concentration.) Strain juice from grapes and use juice. Refrigerate after opening. 

For a great tasting homemade Grape Jam, try this Ball Blue Book recipe…


Posted in Canning, Gardening, Home Food Preservation

Fresh from the Garden Refrigerator Pickles

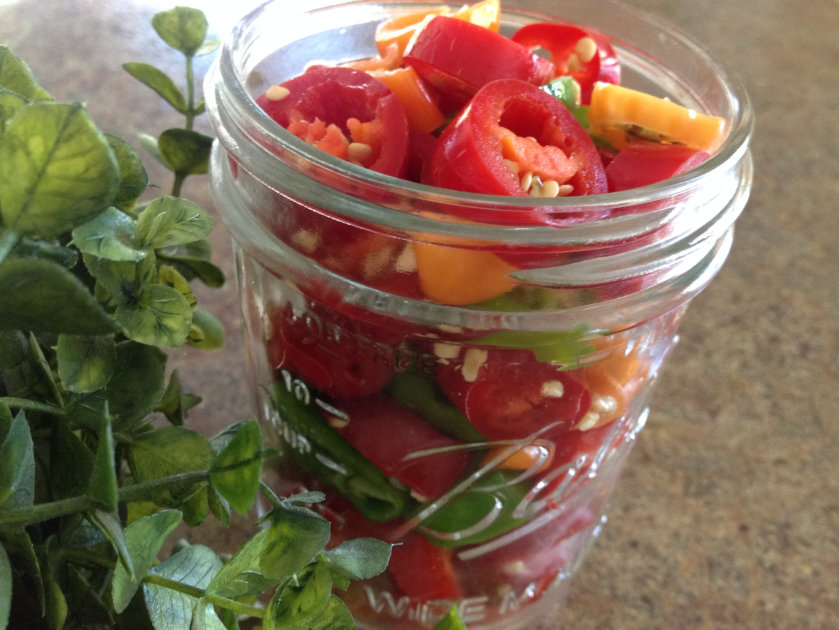
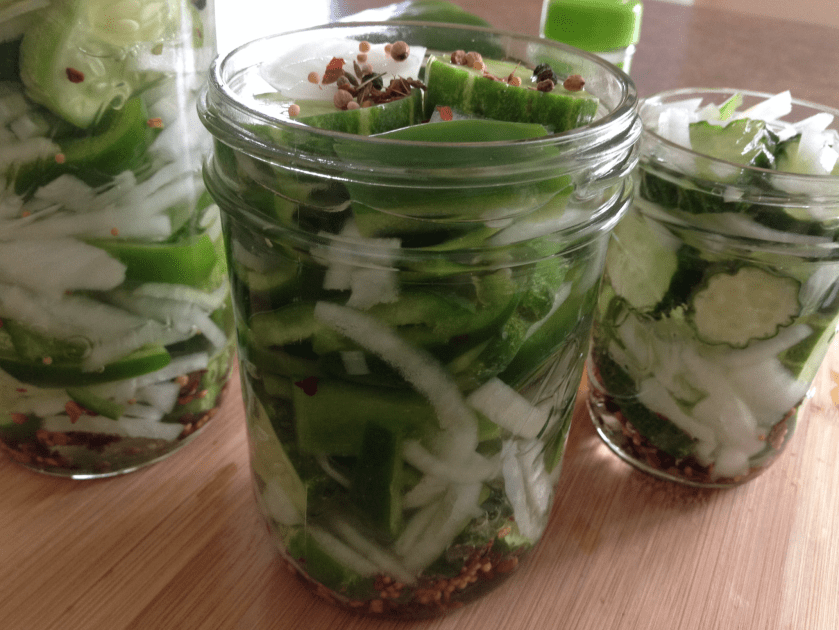
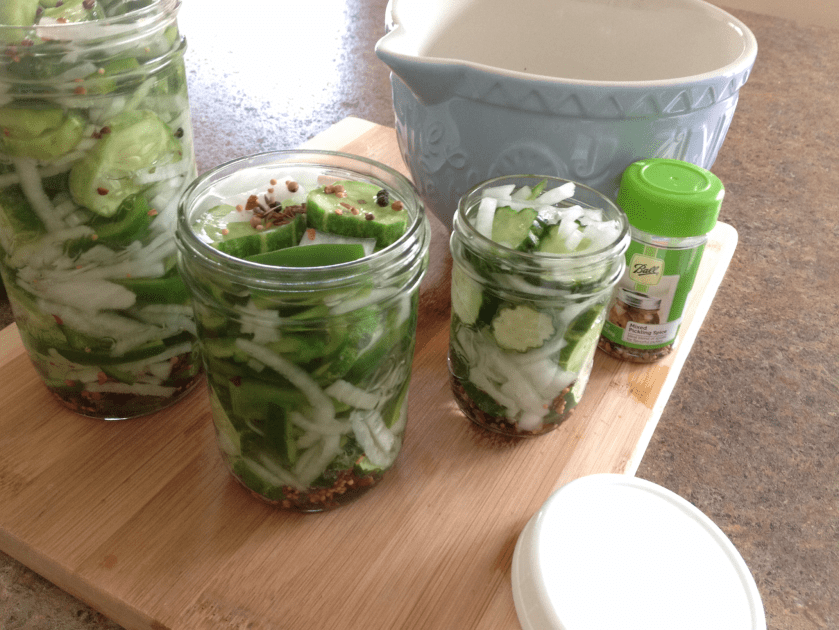
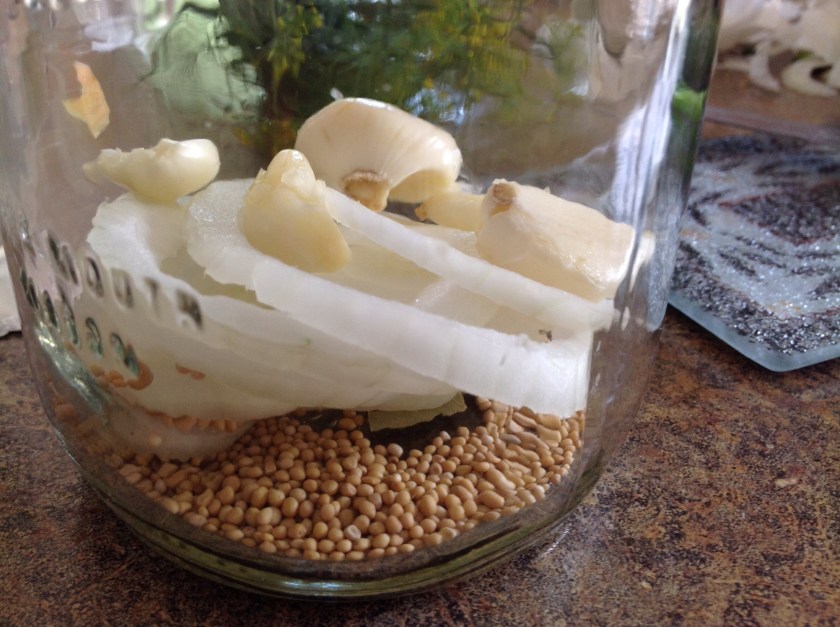
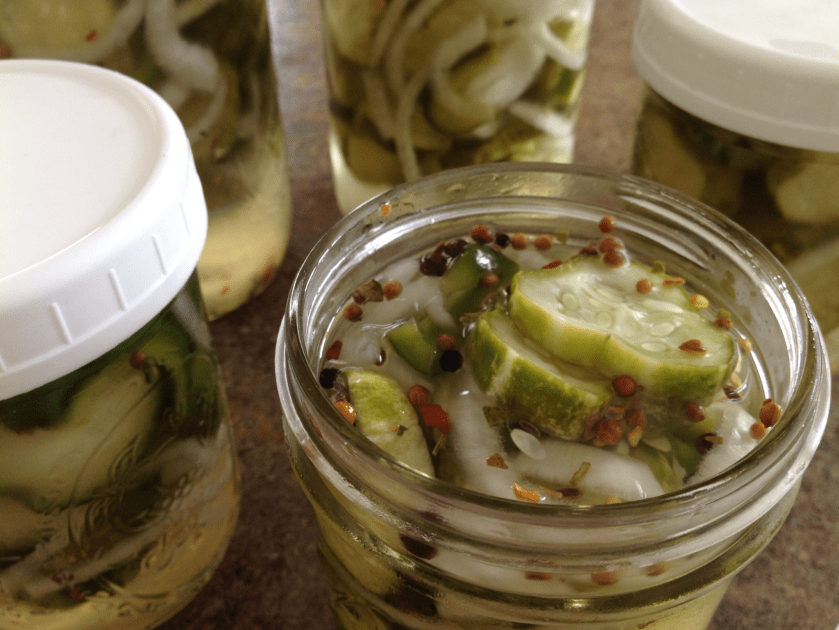
I was pleasantly surprised this week when a co-worker brought in a big bag of freshly picked pickling cucumbers and plopped them on the break room table.  She announced that the cucumbers were from her father’s garden and that anyone was welcome to take as many as they liked.  Straight away, I scooped up a good majority of the pickles and packed them away for one of my favorite summer projects.  When I returned home from work that evening, I began the task at hand, slicing the veggies for my refreshing refrigerator pickles.  

This recipe yields several jars of a delicious, crunchy, sweet condiment.  Use a variety of green, red, or yellow  peppers to add a bit of color to the mix.  You will love the ease at which this recipe comes together (ridiculously easy). More importantly, you will love the taste of these refreshingly delicious refrigerator pickles!


Fresh from the Garden Refrigerator Pickles

1 cup distilled white vinegar

1 tablespoon salt

1 1/2 cups white sugar

1/4 cup mixed pickling spice

6 cups sliced pickling cucumbers

1 cup sliced onions

1 cup sliced green bell peppers

In a medium saucepan, bring vinegar, salt and sugar to a boil. Simmer until the sugar has dissolved, 5-10 minutes. Meanwhile, drop a teaspoon of pickling spices into the bottom of each sterilized canning jar.  

Tightly pack the mixture of cucumbers, onions and green bell peppers into jars. Pour the vinegar mixture over the vegetables, covering vegetables completely.  Twist on lids and store in the refrigerator for three days before serving.


Posted in Canning, Food, Gardening, Home Food Preservation

“Real Pickles”


This is my favorite time of year… It’s amazing to see the soft rains and bright sunshine help strong plants bare fruits and vegetables.  As I browse through the fresh produce at the farmer’s market, I spy dark red cherries, plump blueberries and lots of gorgeous fruit.  Pickling cucumbers and fresh dill are making their way to the forefront of my mind as I am a bit excited about my newest kitchen gadget.  

Several months ago, as I was reading up on preserving and fermenting, I came across a fermentation device that seemed super simple to use.  After watching the web video promoting the product, I quickly ordered it and anxiously awaited it’s arrival in the mail.  Well, it’s here, and this is my first attempt at “Real Pickles”, as Kraut Source has named them.  To find the recipe and to learn more about this amazing product, visit http://www.krautsource.com.

Here’s a sneak peek at the fermentation process for “Real Pickles”…

First, I made a brine with water and salt.  Then, I started the assembly with a clean quart canning jar. I rinsed the pickles and cut an 1/8″ slice off the blossom end of the pickles.  


Then, I added mustard seed and a bay leaf…


1/4 of a sliced onion…


5 cloves of peeled garlic…


1 tablespoon of loose tea and 2 sprigs of deliciously fresh dill…  I added 6 pickling cucumbers and filled the jar with the brine…


I topped it with the Kraut Source contraption and added a bit more water in the mote around the top of the device….


Viola’ …  The pickled will sit on my counter for 7-10 days to ferment!  Can’t wait to try them…


Posted in appetizers/snacks, Food, Home Food Preservation

Apple-Apricot Fruit Leather

This week I decided to try my hand at making fruit leather.  I’ve had a great deal of success drying fruits and vegetables so I thought it might be fun to change things up a bit. My dehydrator comes equipped with various trays and supplies for drying fruits, vegetables, herbs, and leathers.  Using puréed fresh fruit, baby food, or applesauce make for quick and easy assembly.  Plug the dehydrator in just before going to bed and (in most cases) in the morning, you’ll have a delicious homemade treat that can be stored at room temperature for a few weeks in an airtight container.  You can also pop these treats into the freezer and they’ll keep for about 1 year.  

These were a big hit with my family.  I’ve got lots of fresh strawberries parked in the fridge so I think I’ll give this a try with puréed strawberries and honey next time.

Apple-Apricot Leather

1 (8 oz) jar puréed baby food

1-2 cups sweetened or unsweetened applesauce

In a medium bowl, mix applesauce with apricot purée.  Cover with plastic wrap and microwave on high for 6-8 minutes or until the mixture reaches 160 degrees.  Stir every few minutes.  

Cool slightly.  Spread mixture evenly on dehydrator fruit leather drying trays.


Drying times very depending on equipment, humidity in the air, and thickness of fruit.  Fruit leather usually requires at least 8 hours to set completely.  Follow manufacturer’s directions for specifics about varying drying times.  


Dry fruit at 140 degrees until no indentation is left when you touch the center with your finger.

While still warm, peel fruit leather from drying tray.

Quarter fold the fruit leather for slicing.

Slice into wedges or as desired.

Wrap well in plastic wrap for storage.

Store at room temperature in airtight container.


Here’s a great resource for important guidance when drying fruit…
http://nchfp.uga.edu/how/dry/fruit_leathers.html