Posted in and sauces, appetizers/snacks, Food, Toppings

Cowboy Candy

Cowboy Candy serves as a delicious condiment to slather over crackers with cream cheese, spoon over burgers or spicy sausage links, or to top a crispy baked flatbread crust. The sweet and spicy pickled combination makes this a winner every time! Watch out… It’s addictive!

Cowboy Candy

3 pounds jalapeño peppers 

6 cups sugar

2 cups apple cider vinegar 

1 Tbs garlic powder

1 tsp celery seed

1/2 tsp cayenne pepper

Slice jalapeños into rounds. (We use the slicing blade on our food processor.)

Combine the remaining ingredients in a pot on the stove. Bring to a hard boil over high heat. Reduce heat and keep at a low boil for five minutes.

Add jalapeños and heat through for 3-5 minutes.

Using a slotted spoon, ladle jalapeños into clean jars. Then top with the spicy juice to fill jars within a 1/2” from the rim.

Wipe rims. Twist on lids and store in the fridge for up to one month.

Posted in appetizers/snacks, Baked goods, Baking, Food

Union Square Cafe Bar Nuts

As the summer garden begins to flourish, I find myself trimming down my rosemary plants a little too quickly these days. You see my family is addicted to this recipe for party nuts. The aroma and flavor of rosemary mixed with the kick of cayenne pepper makes for an irresistible treat. Buy canned mixed nuts when they are on sale because these are gone shortly after they come out of the oven. You’ll find yourself making a new batch quite frequently.

The original recipe developed by The Union Square Cafe’ in New York can be found here.

Union Square Cafe (Big Batch) Bar Nuts

4 cups lightly salted mixed nuts (2-8 oz. cans)
2 Tbsp butter, melted
4 Tbsp fresh rosemary, finely chopped
1 tsp cayenne pepper
4 tsp brown sugar
1 tsp kosher salt

Pre-heat oven to 350 degrees.

Line a baking sheet with aluminum foil. Toast nuts on baking sheet until lightly golden, about 10 minutes.

In a large bowl, combine melted butter, chopped rosemary, cayenne pepper and brown sugar; stir until thoroughly combined.
In a large bowl, toss hot nuts with butter and spice mixture. Season with salt and toss to coat thoroughly.

Posted in appetizers/snacks, breakfast, Food, Toppings

Homemade Farmer Cheese

When my children were young, I used to watch all of the PBS cooking shows during their afternoon nap. I’d fold clothes, wash dishes, clean-up the toy rooms, or catch up on laundry while some of my favorite TV cooking personalities demonstrated current techniques along with new and unique recipes. When I saw a recipe that I wanted to try, I quickly jot down the main ingredients and search the library for similar recipes to combine and develop. One such recipe, Homemade Farmer Cheese…

I recently ran across this hand-written recipe in my recipe binder and decided to revisit the idea of making my own cheese. I had pots of beautiful fresh herbs that needed to be trimmed and used before the cold weather made its way to the Midwest. The result was a creamy, flavorful, spreadable mixture that beats the flavor of any store bought variety.

A word of caution… Don’t use ultra-pasteurized milk as it will not curdle as needed for this easy recipe. Also, use a thermometer to measure the temperature of the milk.

Homemade Farmer Cheese

1 gallon whole milk (not ultra-pasteurized)

½ teaspoon salt

¼ cup lemon juice or vinegar

Pour the milk into a large pot, and stir in the salt. Cook over medium heat, stirring occasionally to prevent the milk from scorching on the bottom of the pot.

When the milk begins to simmer and then reaches 190 degrees, turn off the heat. Stir lemon juice or vinegar into the milk. The acid will make the milk curdle. Let sit for 10 minutes.

Line a sieve or colander with a few layers of cheesecloth, and pour the milk through the cloth to catch the curds. The solid within the cheese cloth is the cheese (curd) and the liquid released from the mixture is the whey. Gather the cloth around the cheese, and squeeze out as much of the whey as you can. Tie up the cloth to form a cheese ball or disk, refrigerate in cheesecloth for several hours. Remove from cloth and wrap in plastic, or place in an airtight container. Store in the refrigerator.

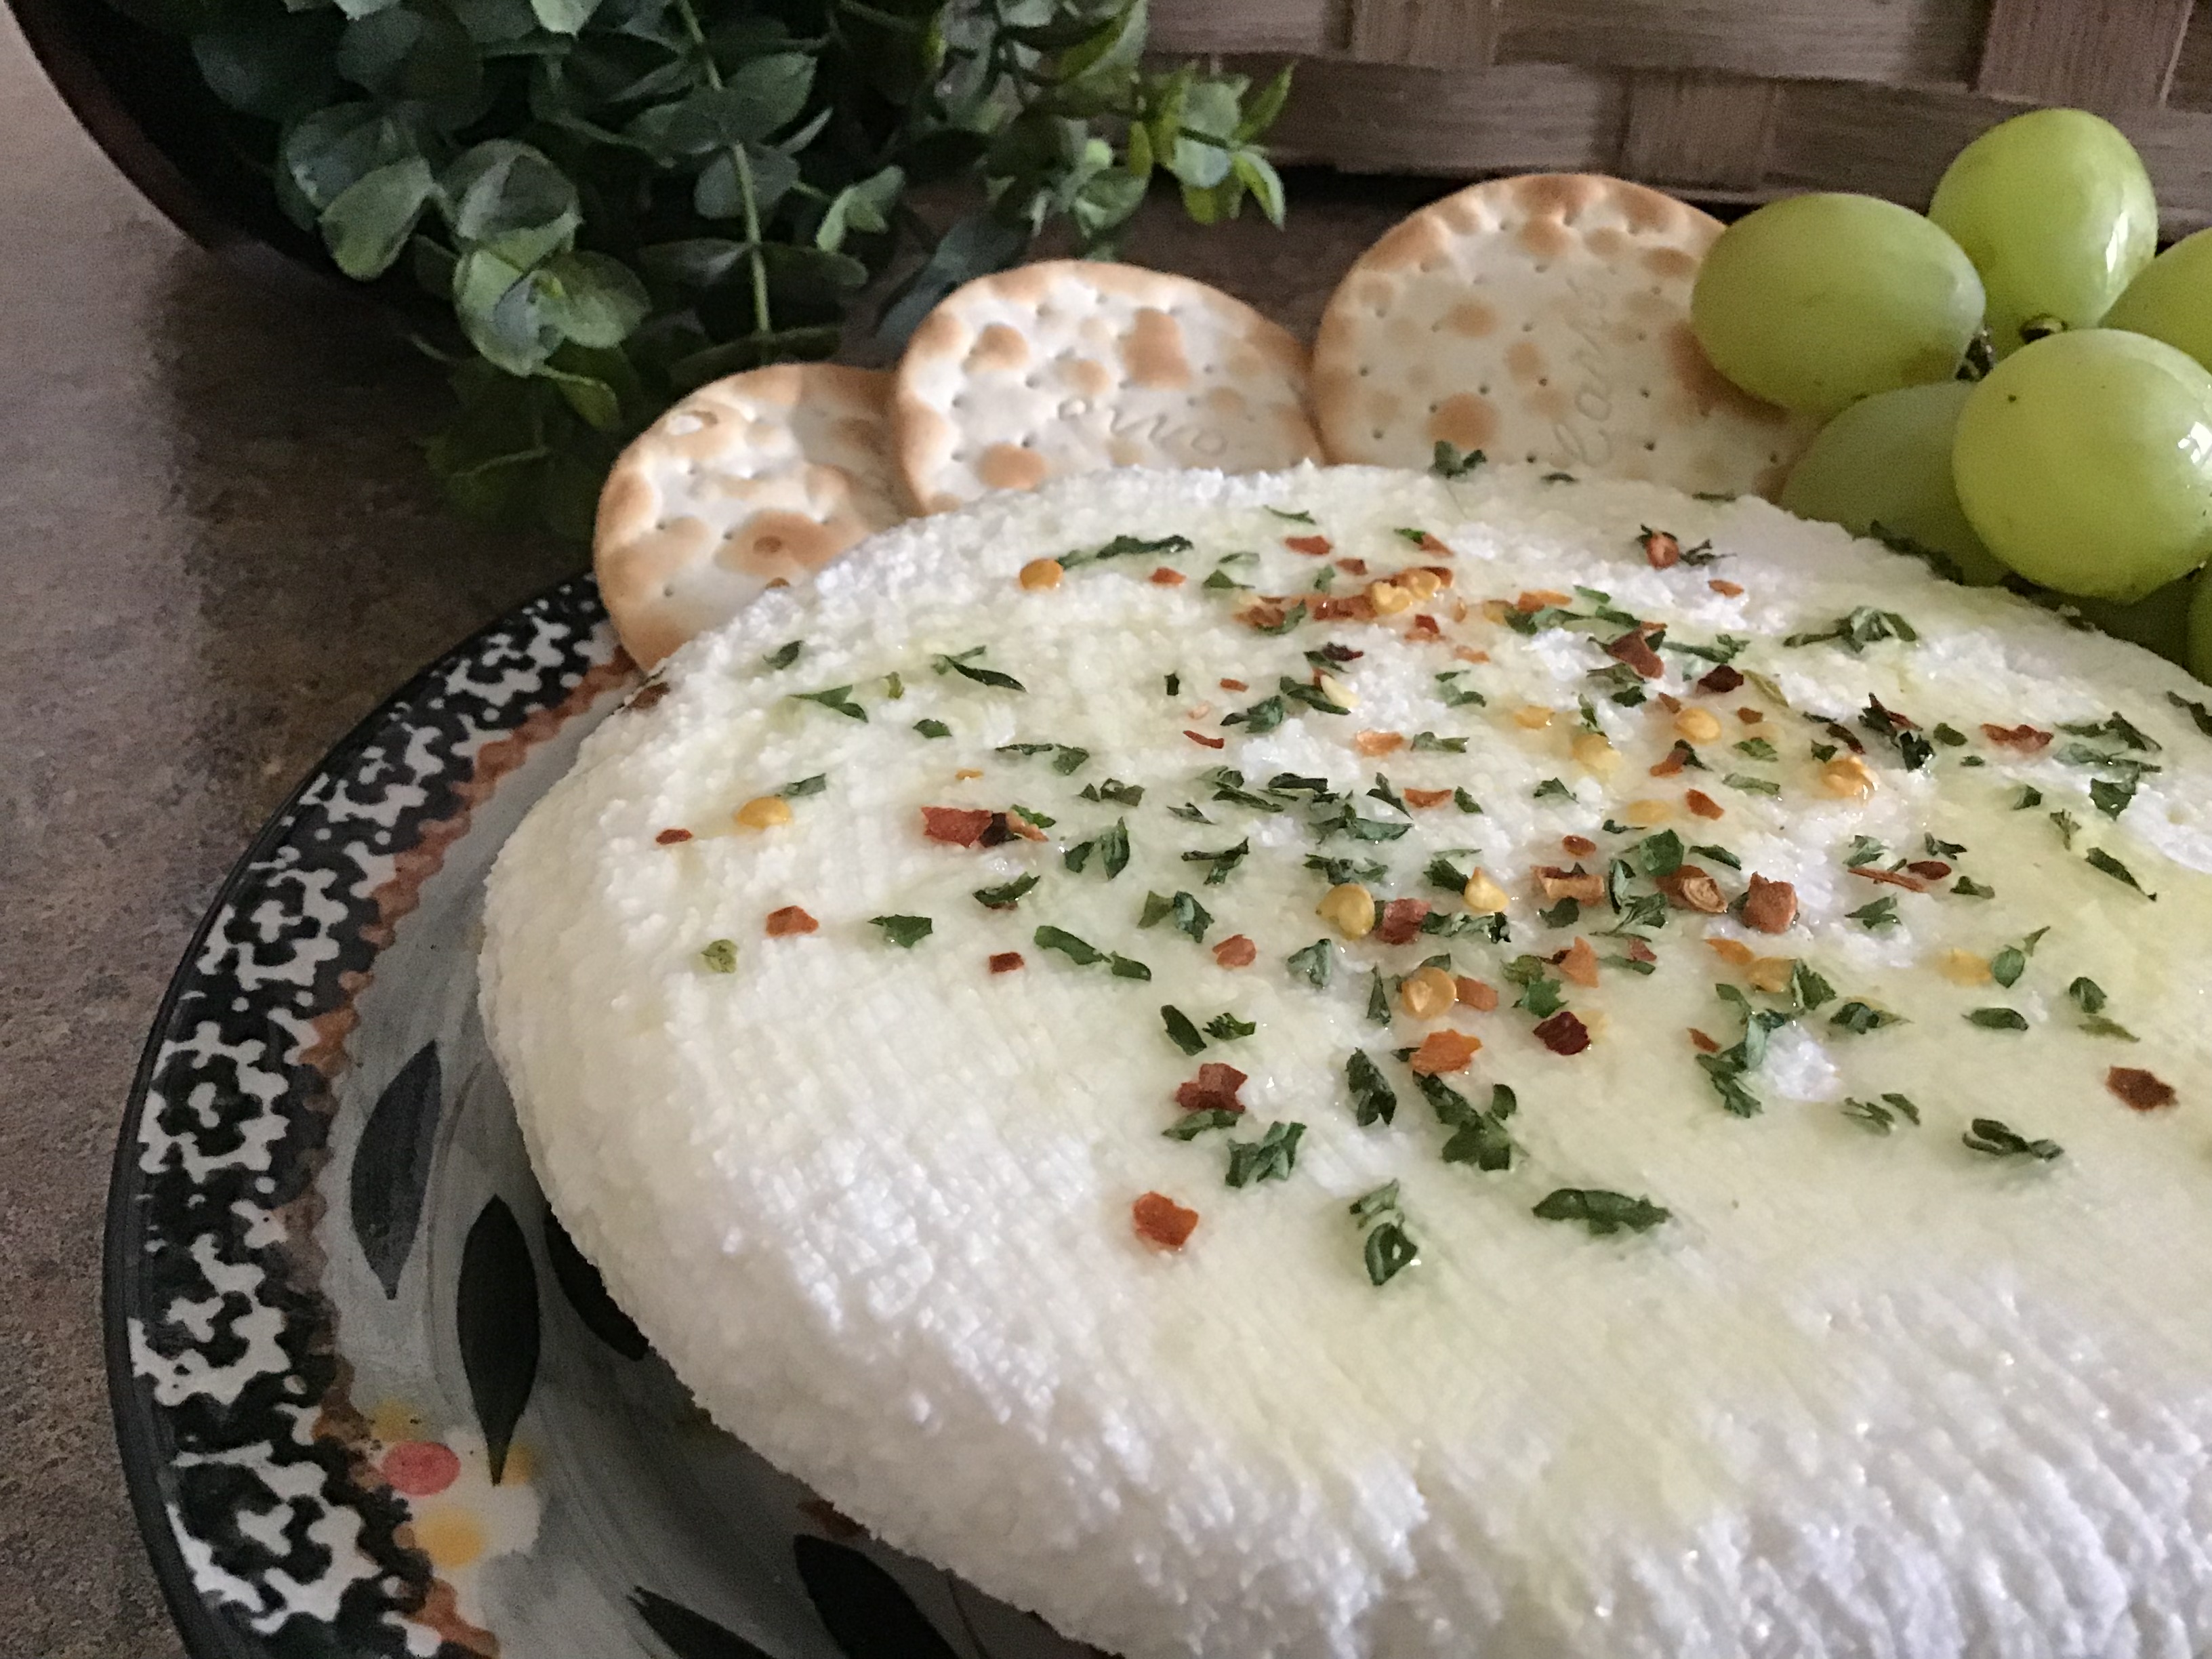
Before serving, drizzle with good quality olive oil, sprinkle with course salt and fresh chopped herbs of your choice. I usually use basil, rosemary, and oregano. You can also use crushed red pepper flakes or chopped green onions. Serve on toasted Italian bread or hearty crackers.

For a sweeter flavor, drizzle with honey and serve with bagels, jam, and fruit.

Posted in Brunch, Food, Gardening, Kids in the Kitchen, lunch box, No-Bake

Cucumber Finger Sandwiches

My daughter recently called to ask if I could share an easy appetizer recipe as she needed to assemble a quick item for a coworker’s going-away party. She had already looked through the recipes on my blog and couldn’t find one that she could easily make ahead of time and store in the fridge. My mind quickly turned to a simple recipe that I used to make when our children were young. I made this recipe for our annual St. Patrick’s Day Party when we lived in the southwest Chicago area. The yearly parade (and party) was always a fun event for all of the Irish families living in the neighborhood. Slices of pumpernickel cocktail bread are loaded up with a spiced cream cheese mixture and a thick slice of fresh cucumber. A quick sprinkle of dill adds a layer of flavor. Drawing the tines of a fork down the side of the cucumber before slicing, adds a unique design to the appetizer.

Cucumber Finger Sandwiches

1 (8 ounce) package cream cheese, softened

1 (.7 ounce) package dry Italian-style salad dressing mix

1 (1 pound) loaf sliced pumpernickel party bread

2 English cucumbers

2 teaspoons dill weed or dill seed

Mix cream cheese and Italian salad dressing mix in a bowl until well blended. Draw the tines of a fork down the sides of the cucumber before slicing (Make sure to pierce the skin of each cucumber.) Spread cream cheese mixture atop pumpernickel party bread and top each slice with a cucumber slice. Sprinkle with a light dose of dill weed or dill seed.

Posted in Beef, Dinner, Uncategorized

Beef Salami

We recently had a substantial amount of local beef delivered to our home. One of my colleagues owns a beef ranch and I decided to try the product that so many often rave about.  The delivery came with a selection of cuts including various roasts, steaks, and ground beef.  As I looked at all of the individually wrapped beef packages, I was reminded of a recipe that I first spotted in a community cookbook that I’m fond of.  It’s an ole’ time recipe for homemade beef salami and the ingredients are few and common.  I substituted Lawry’s seasoning salt for the “tender quick salt” just because I didn’t have any on hand.  The beef salami turned out just fine.


As the holiday weekend approaches, I thought this might be a fun recipe to try as I’m often assembling plates of appetizers when friends stop by and the kids open the fridge constantly looking for something to munch on.


Posted in appetizers/snacks, Baked goods, Food, Homemade Mixes

Sweet and Spicy Roasted Nuts


As the cool winds blow down the length of Lake Michigan, they usher in autumn showers and chilly temperatures.  This weekend we are experiencing “lake effect rains” and the cooler temperatures have me searching through my files for all of my favorite “comfort food” recipes. 

This irresistible snack is great for a fall tailgate party or family get-together.  Roasted cashews mixed with a blend of sweet and spicy ingredients make this crunchy finger-food hard to resist.  Nearly everyone that has tried these spiced nuts find them irresistible.  Make a couple of batches because they’re usually gobbled up rather quickly.

Sweet and Spicy Roasted Nuts

1 1/2 lbs. cashew nuts

1½ tablespoons butter, melted

2 tablespoons fresh rosemary, finely chopped

2 teaspoons brown sugar 

½ teaspoons cayenne pepper

2 teaspoons sea salt

Preheat oven to 375 degrees.  Spread cashews in a single layer on a jelly roll pan.  Roast the cashews for 8 to 12 minutes, or until lightly toasted and golden brown. 

Meanwhile, in a large mixing bowl, combine fresh rosemary, brown sugar, cayenne, and salt; add melted butter, mixing well.Remove the nuts from the oven and carefully add hot cashews to the spice mixture.  With a large spoon or spatula fold in the nuts to completely coat with the spice mixture. Cool cashews in a single layer on a piece of foil or parchment. Serve warm or  transfer to an airtight container and keep at room temperature for a few days.

(adapted from the Food Network)

Posted in appetizers/snacks, Food, Gifts, Kids in the Kitchen

Italian Nut Medley

20140716-063250.jpg
When looking for a salty snack, I usually reach for a jar of nuts on the pantry shelf. Recently, I scoured my cookbooks for a recipe that might change up the taste of my everyday snack staple. Most recipes I found included a good dose of sugar which was definitely not the direction I was headed. I stumbled on a recipe in my Best of Country Cooking Cookbook from 1999. I had all of the ingredients on hand so I whipped up the quick recipe. What a yummy, crunchy, surprise! The four ingredient recipe calls for a mixture of Italian spices, a bit of butter and soy sauce mixed in with a few cups of quality nuts. After tasting this flavorful crunchy mix, I’m sure this will become a staple recipe in my snack folder.

Italian Nut Medley

2 tablespoons butter
4 cups quality mixed nuts ( cashews, hazelnuts, walnuts, almonds)
1 tablespoon soy sauce
1 envelope Italian salad dressing mix

In a skillet, melt the butter over medium heat. Add nuts; cook and stir constantly for 2 minutes. Stir in soy sauce. Sprinkle with salad dressing mix, stir to coat. Immediately transfer to a baking sheet and spread thinly to cool. Store in an airtight container.
Adapted from The Best of Country Cooking – 1999.

20140716-063603.jpg

20140716-063744.jpg

Posted in appetizers/snacks, Brunch, Food, Main Dish, Salad, Skillet Meal

Shrimp Bruschetta

20140615-102335.jpg
Recently, I bought some raw shrimp at the local market. Because of our crazy busy summer schedule, I needed to prepare the shrimp in a way that was quick and easy. Basil has been growing like mad in my garden so I thought it best to whip up a fast sauté with tomatoes, basil, shrimp and Parmesan cheese. As many of you know, I try to stay away from white flour and high carbs, so this fit the bill for a light Sunday brunch dish.

Shrimp Bruschetta

1 lb. shrimp, shelled, cleaned, and deveined
2 medium tomatoes, washed and roughly chopped
2 tablespoons fresh basil, chopped
3 tablespoons Parmesan cheese
1 tablespoon olive oil
1 clove garlic, minced
Salt and pepper to taste

Preheat a large sauté pan over medium-high heat; add olive oil and garlic. Sauté until garlic is lightly browned. Add shrimp and cook quickly until shrimp is pink and cooked through. Remove from pan. In a medium bowl, combine remaining ingredients and toss in the shrimp. Season to taste. Serve as a salad or pour it over lightly toasted crusty bread for a tradition bruschetta appetizer.

Posted in appetizers/snacks, Food, Kids in the Kitchen, lunch box

Simply Made Veggie-Style California Roll

20140427-102020.jpg
Our local grocer has a wonderful sushi station set up in the produce section of the store. Each time I visit the store, I load up my cart with a few packages of veggie style California Roll. M loves to take it to school in her bento box. She eats it for lunch or saves it for her after-school snack, just before track practice. Lately, my long work hours have kept me from visiting the market during the sushi making hours. It seems the hours for the station are limited and once the station is closed, the remaining sushi is often removed from the refrigerator case well before I arrive.
M and I were out shopping yesterday, and once again, the sushi station was closed. As M passed by the station with a disappointed look on her face, she spied a display that included all of the supplies needed to make our own California Roll recipe. We quickly gathered up all the supplies and headed home to begin our sushi making project. On a recent visit to Disney, we had purchased a bamboo sushi rolling sheet so we were excited to finally put it to use. We carefully read the directions for making the rice, although, we eliminated the addiction of sugar and salt. We then proceeded to assemble the California roll. Wow, what a simple project…and so delicious! I hope you have a chance to try the recipe on your own. Add any combination of fresh veggies you prefer…cucumber or jicama might be nice. This is really a fun family cooking project.

Simply Made Veggie California Roll

2 cups Premium Grade Nishiki Sushi Rice, cooked according to package directions
1/2 cup seasoned rice vinegar
5 sheets nori (dry seaweed)
1 avocado, sliced thinly,
3 stalked celery, cut julianne style, about the length of the nori sheet
3 carrots, peeled and cut julianne style, about the length of the nori sheet

20140427-102433.jpg

20140427-102447.jpg

20140427-102500.jpg
Transfer cooked rice to a bowl and carefully cut in rice vinegar using a rice paddle or wooden spoon. Allow to cool to room temperature, about 30 minutes. Place a sheet of nori, on the rolling mat.

20140427-102716.jpg
Place 2 to 3 pieces of each of the avocado slices, celery, and carrots on top of the nori in one layer.

20140427-102811.jpg

20140427-102828.jpg
Using the mat as a guide, carefully roll the California roll into a tight log. Remove the rolling mat.

20140427-103006.jpg

20140427-103020.jpg
With a sharp wet knife, cut roll into 6 even pieces. Repeat with remaining sheets of nori and filling. Sprinkle with sesame seeds, if desired.

20140427-103124.jpg

20140427-103146.jpg

Posted in appetizers/snacks, Dinner, Food, Homemade Mixes, Salad, salads, Sauces

Sweet Italian Dressing

20140103-075522.jpg
I’ll bet that you have noticed that I post loads of recipes for sweet delicious baked goods on a regular basis… What you might not know is that I don’t eat any of them. They are all lovingly made for family and friends, but I stay away from them completely. You see, several years ago, I decided to give up eating carb laden goodies with lots of sugar. Oh, I still enjoy the sweet taste of sugar but I have found some great substitutes over the years. A few of my latest favorites are monk fruit extract, stevia in the raw, or coconut palm sugar.

20140103-080559.jpg
Sure, there is quite a bit of controversy circling artificial sweeteners, but these are the few I choose that seem to work for me. When I’m looking for something sweet, I engineer things for myself so that the carbs are low and the fiber content high.
A sweet revelation…
This salad recipe idea came to me after having a similar salad at a recent Christmas party. It was a carry-in party where my co-workers and I were asked to bring beverages, salads, side dishes and desserts. One of my co-workers brought in a fabulous pre-made salad that she bought at Cosco. There were 7 different greens, sunflower seeds, pepitas, and dried cranberries. A pre-made dressing was included. Everything delivered in a sizable package. Here’s the kicker…all for just $5.00.

20140103-080808.jpg
Well, I went back for seconds…and thirds on the salad. I raved about it all afternoon. It’s called the Sweet Kale Vegetable Salad Kit. It’s made from a blend of kale, broccoli, shaved Brussels sprouts, green cabbage and chicory. Seven “super greens” are blended within the salad to provide a wide variety of textures and flavors. One drawback here…is the dressing. My taste buds are highly sensitive to the sweet taste of sugar and I tasted a lot of it in the pre-made poppyseed dressing. The other drawback…I don’t live near or have a shopping card for Costco.
So, I did the next best thing…I made my own salad. It’s a bit different because of the availability of some of the salad items in my grocery store. When I priced out the cost of purchasing all of the different “super greens” needed to make the salad, the bill really added up quickly. My next idea meant looking for salad blends that had been prepackaged to save a little “green”. I found a blend made with broccoli stalks, red cabbage, romaine lettuce, and green onion. I found another mix with mini kale and Brussels sprouts so I combined the two. Then, instead of the poppy seed dressing, I added my own sweet Italian dressing and topped the salad with 1/4 cup of finely diced lean meat and a light sprinkle of shredded mozzarella cheese. I often add sunflower seeds, walnuts, or slivered almonds.
The Sweet Italian Salad Dressing is sort of a copy cat recipe of the Olive Garden salad dressing recipe. The important thing here is to find a mix of greens that you enjoy that are packed with vitamins and nutrients, lots of texture and flavor. Chop the greens up finely, mix in a little of your favorite dressing, add a few flavorful toppings and eat more vegetables!
Here’s to the new year…here’s to your health!

Sweet Italian Salad Dressing

1/4 cup red wine vinegar
3 tablespoons water
1 (2/3 ounce) package Good Seasons Italian dressing
1/2 cup olive oil
1/2 cup sugar or 2 packets sugar substitute

Combine all ingredients. Shake vigorously. Store refrigerated in an air-tight container.