Posted in Baked goods, Baking, Bread

Rosemary and Basil Herbed Flat Bread


I usually make this bread during the late spring and summer months when fresh herbs are abundant and ready to be trimmed.  There’s no point in making this bread unless you have fresh herbs to incorporate into the batter and snip over the finished product.  As the bread toasts in the oven, the irresistible aroma of freshly cut basil and rosemary, garlic, and olive oil is like no other.  The combination of herbs and spices help to make this summer staple undeniably scrumptious! Often served with pasta and red sauce, cheese and grapes, or a lite summer salad… It’s crazy delicious!


Rosemary and Basil Herbed Flat Bread

1-3/4 cups all-purpose flour

1 tablespoon fresh rosemary, minced

1 tablespoon fresh basil, minced

1 teaspoon baking powder

3/4 teaspoon salt

1/2 cup water

1/2 cup olive oil

Sea salt, garlic powder, Italian seasoning mix, and fresh herbs (to sprinkle over the top of bread after baking)

Preheat oven to 450 degrees.  Lightly spray two baking sheets with cooking spray or line each sheet with parchment paper.  In a large bowl, combine the flour, herbs, baking powder and salt. Stir in water and 1/3 cup oil until mixture forms a soft dough. Turn onto a floured surface; knead for about 1 minute.

Divide dough in half; shape into two balls. Roll each ball into a thin oblong shape to fit on prepared baking sheet. Carefully transfer dough to prepared baking sheets.

Bake for 8-10 minutes or until golden brown. Remove from pan to a wire rack and  lightly brush each with remaining oil; sprinkle with salt and garlic powder, seasoning mix and fresh herbs. Slice for serving. 


Posted in Beef, Dinner, Uncategorized

Beef Salami

We recently had a substantial amount of local beef delivered to our home. One of my colleagues owns a beef ranch and I decided to try the product that so many often rave about.  The delivery came with a selection of cuts including various roasts, steaks, and ground beef.  As I looked at all of the individually wrapped beef packages, I was reminded of a recipe that I first spotted in a community cookbook that I’m fond of.  It’s an ole’ time recipe for homemade beef salami and the ingredients are few and common.  I substituted Lawry’s seasoning salt for the “tender quick salt” just because I didn’t have any on hand.  The beef salami turned out just fine.


As the holiday weekend approaches, I thought this might be a fun recipe to try as I’m often assembling plates of appetizers when friends stop by and the kids open the fridge constantly looking for something to munch on.


Posted in Baked goods, Baking, Bread, breakfast, Brunch, Casserole

Pumpkin Cobbler Spiced Bread Pudding

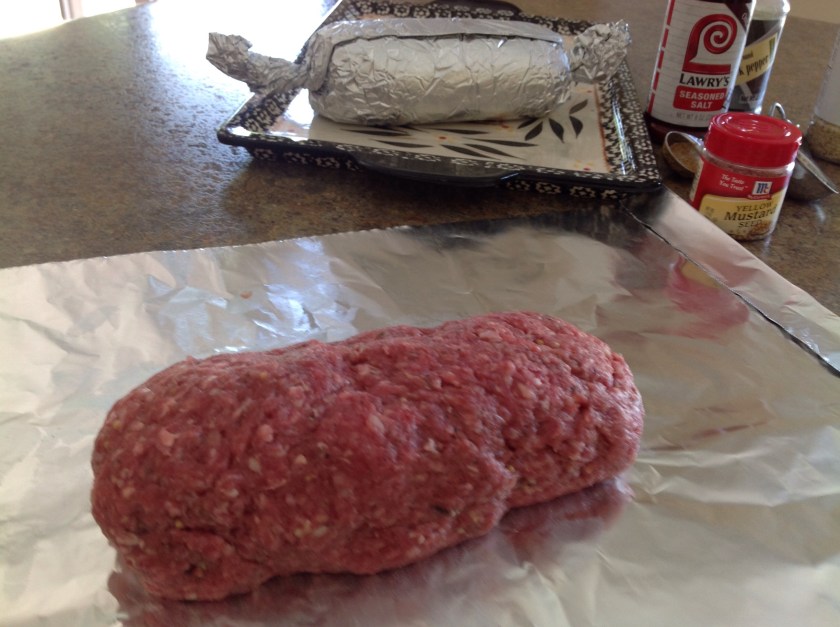
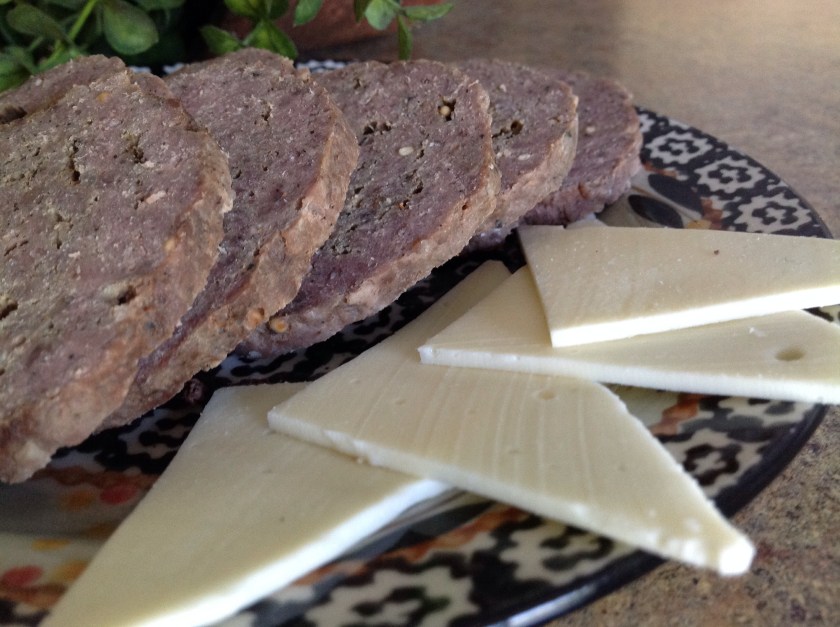
I often visit a local discount bread store during my lunch hour.  The outlet carries nearly expired items that I use for stuffing, meatloaf, and bread pudding recipes.

Recently, I spied a few loaves of Pumpkin Cobbler bread on the “reduced shelf” and quickly loaded the loaves into my cart.  After arriving home, I promptly froze the bread to have on hand for a quick Saturday morning bread pudding bake made with scrumptious cubes of pumpkin spiced loaves.  The crunchy streusel-like topping puts this breakfast treat over the top.  I drizzle a teaspoon of our delicious homemade maple syrup over the top of a warm slice for a bit of added sweetness.


Pumpkin Cobbler Spiced Bread Pudding

5 eggs, beaten

1 1/2 cups sugar

2 cups milk

2 teaspoons vanilla extract

3 cups pumpkin cobbler or cinnamon swirl bread, cubed

1/2 cup brown sugar, packed

1/4 cup cold butter, sliced into small cubes

1 cup pecans or walnuts, chopped

Preheat oven to 350 degrees.  Grease or spray with cooking spray, a 13 X 9″ pan. 

In a medium bowl, mix together eggs, sugar, milk, and vanilla. Place cubed bread in a large bowl and pour egg mixture over the top; gently mix and let sit for 10 minutes.  Pour bread mixture into prepared pan. Sprinkle brown sugar and pecans over the top; dot with butter.   Bake for 35 to 45 minutes, or until set. 

If desired, drizzle with maple or vanilla syrup.  Serve warm.


Posted in Crafts, Uncategorized

Traveling with Portable Craft Projects


The greatest dilemma I face when traveling is “How can I travel with a few compact and relaxing crafts while I’m away from the amenities of home?”
Once a year, we travel to Disney World and I am often stumped as to what I can bring along that isn’t too complicated or oversized.

I have thought about bringing quilt squares to hand sew poolside but the sewing machine does a much better job of securing the blocks as opposed to my, less than stellar hand sewing skills. I have also thought about bringing along my long term crochet projects but most are large, cumbersome (blankets or scarves) and too hot to be draped across my lap in the summer sun.
This year, I visited a YouTube website and found a video for a super easy crocheted sock pattern and I was thrilled to find a project that I could easily travel with.  

Here’s the website: https://m.youtube.com/watch?v=gasKXmcyrXgGlamma’s easy crocheted tube socks

Here are a few pictures of the craft items I carried in my tote bag. 

Here are a few other ideas I packed for soaking up the sun in a relaxed environment:


All were perfectly portable and helped me to find plenty to do as I relaxed in the sunshine of the Walt Disney World – Old Key West -Disney Vacation Club – Main Pool.


Who says Spring Break in Walt Disney World can’t be relaxing?!  Once again, we had a “magical” vacation.

Posted in Baked goods, Baking, Syrup

Homemade Maple Syrup Muffins

This year we decided to try our hand at tapping the maple trees on our property so that we could make our own maple syrup.  Last fall, just before the leaves fell from the trees on our wooded lot, we marked trees that we had identified as maple trees.  After a long hard winter, as the overnight temperatures dipped below 30 degrees and the daytime temperatures climbed above this mark, we tapped the trees so that a clear syrupy liquid (sap) would flow down the trunk of the trees into our collection buckets.  We were surprised to find that this process was really quite quick and our buckets were filled within the first couple of hours.  Next, we boiled down the syrup until it was golden and met the temperature standard for just the right consistency.  


This morning, I made a batch of Oat and Maple Muffins using our very own, utterly delicious maple syrup.  I’m so happy we decided to try the maple syrup making process and I look forward to doing it again next year!

Oat and Maple Muffins 

1/2 cup canola oil

1/2 cup dark brown sugar

1/2 cup real maple syrup

1 egg

1 teaspoon vanilla extract

1/2 cup milk

 1 cup flour

1 cup old fashioned oats

2 teaspoons baking powder

1 teaspoon baking soda

1 teaspoon salt

1 teaspoon ground cinnamon

1/2 cup chopped walnuts

Preheat oven to 350 degrees. Grease muffin cups or use paper muffin liners.  In a large bowl, mix together oil and brown sugar. Beat in maple syrup, egg, milk and vanilla.  In a separate bowl, stir together flour, oats, baking powder, baking soda, salt and cinnamon. Stir flour mixture into egg mixture just long enough to incorporate. Fold in chopped walnuts. Spoon batter into prepared muffin cups.  Bake for 20 – 25 minutes. Remove from pans and place on a wire rack to cool before serving.

Posted in Baked goods, Baking, Cake

Banana Streusel Swirl Cake

  The grocery store was packed with holiday shoppers yesterday.  The warm sun and mild temperatures brought people out in light jackets and cropped pants.  I’m so happy that Spring has arrived in our part of the world.  

Like many of you, I’ve been baking goodies for the Easter weekend.  The local grocer had a huge display of overly ripened bananas on hand so I picked a decent selection of fruit and carted it home with me.  I headed to my trusty file to find one of my spring-time favorites. This scrumptious Banana Streusel Swirl Cake is absolutely delicious. I hope you have a chance enjoy this crunchy, sweet, delicate cake made with pecans, cinnamon, mashed bananas, and a convenient cake mix.  Happy Easter, Everyone!

Banana Streusel Swirl Cake

Streusel:

1/2 cup chopped pecans

1/3 cup brown sugar, packed

1 teaspoon cinnamon

1/2 teaspoon nutmeg

Cake:
1 package Yellow, Spice or Banana Cake Mix 

1 package vanilla instant pudding mix

4 eggs, slightly beaten

3-4 medium ripe bananas, mashed

1/3 cup canola oil

1/4 cup water

Preheat over to 350 degrees.  Grease a 10″ bundt pan.  
For the streusel: combine all 4 ingredients and stir well.  Set aside.

For the cake:  combine all 6 ingredients and mix by hand or with a mixer for 2 minutes.  Batter should be thick and well combined.

Pour half the batter into bundt pan.  Sprinkle streusel over batter.  Spread remaining batter over streusel. Gently swirl the batter with a butter knife in a circular motion.  Bake for 50-55 minutes or until toothpick inserted in the center of the cake comes out clean.  Cool for 25 minutes.  Loosen sides of cake from pan and invert on a cake plate. If desired, frost with glaze and sprinkle with chopped pecans.


Posted in Baked goods, Baking, Casserole, Food, Low Carb

Low-Carb Taco Casserole

While most households were gobbling up lots of carb-laden snacks and appetizers this past Sunday, we watched the Super Bowl while munching on this delightful Low-Carb Taco Casserole.  I used to make this recipe without the added Doritos chips but I find the crust to be a bit more crunchy and a lot less low-carb tasting… just by added 3 little chips to the mix.  I looked up the  nutritional facts for Doritos and calculated that 11 chips equal 16 grams of carbohydrates so you can do the math to figure how many carbs exist in just 3 crumbled chips. Boy, those chips add a world of difference to the crust.  You be the judge…  It’s totally up to you if you’d like to omit the chips.  …Hope you enjoy this simple recipe that’s packed with flavor!

Low-Carb Taco Bake

For the crust:
4 ounces cream cheese, softened

3 eggs

1/3 cup half & half

1/2 package taco seasoning mix

8 ounces cheddar cheese, shredded

3 Doritos chips, crumbled

For the topping:
1 lb. ground beef
1/2 package taco seasoning

1/4 cup tomato sauce

2 tablespoons green chilies, optional

1/2 cup tomato, diced

8 ounces cheddar cheese, shredded

Preheat oven to 375 degrees.  Grease a 9×13″ baking dish; set aside. 

To make the crust:  Beat the cream cheese and eggs until smooth.  Add the half & half and taco seasoning, mix well.  Spread the cheddar cheese over the bottom of the baking dish.  Spread the egg mixture evenly over the cheese. Sprinkle crumbled Doritos over egg mixture. Bake at 375ºF, 25-30 minutes or until golden brown on the edges.  Let stand 5 minutes.

To make the topping:  Reduce oven temperature to 350 degrees.  Brown the ground beef until no longer pink; drain thoroughly.  Stir in the taco seasoning, tomato sauce and chiles.  Spread over the crust.  Top with diced tomato and shredded cheese.  Bake for 20-25 minutes or until hot and bubbly. Cool slightly before cutting into serving-sized squares.

Posted in Bread, Dinner, Food, Pizza, Skillet Meal

Easy Skillet Pizza


I keep extra loaves of frozen pizza dough on hand for this Easy Skillet Pizza.  Using an old, well seasoned cast iron skillet is the secret to a crispy flavorful crust. Be creative and add your own vegetable favorites and toppings. Give this one a try… I think you’re family will love it. 

Easy Skillet Pizza

2 tablespoons extra-virgin olive oil

1 pound Italian sausage, browned and crumbled

1 pound fresh pizza dough or frozen bread dough, thawed and at room temperature

1 cup your favorite marinara sauce (or 1 1/2 cups crushed, strained San Marzano canned tomatoes)

3 cloves garlic, minced

1 teaspoon oregano

1/2 cups sliced red or green peppers, sliced (optional)

1/2 cup sliced pepperoni rounds (optional)

2 cups mozzarella cheese, shredded

1 tablespoon dried Italian seasonings

1/2 cup grated Parmesan

Preheat the oven to 400 degrees and grease the inside of a 12-inch cast-iron skillet with 2 tablespoons of olive oil.   Place the pizza dough in the center and spread evenly across the bottom edge and 1 1/2 inches up the sides. 

Spread sauce, garlic, and oregano over crust.  Sprinkle browned sausage evenly over the sauce.  Add desired fresh, sliced vegetables and pepperoni, if desired.   Next, add the mozzarella. Sprinkle the Italian seasonings on top. Finish with the Parmesan and drizzle with the remaining 2 tablespoons olive oil.


Place the skillet pizza on the bottom rack of the oven and cook until the edge of the crust is golden brown and crusty, 30 to 40 minutes. Remove and let rest for 5 minutes before serving.


Note: If the crust and toppings start to brown too quickly, cover with a piece of foil and continue baking until cooked through.

Enjoy!


Posted in Baked goods, Baking, breakfast, Cake, Food

Best Banana Cake Ever

During my weekly shopping trips, I usually purchase a load of bananas for quick breakfasts and simple snacks.  By the end of the week, the bright yellow and slightly green fruit has turned to more of a brown and yellow speckled mass of goodness. While some might pitch the ripe bananas in the trash, to me, these gorgeous specimens are best for baking.  The sugar becomes more concentrated and the texture of the banana lends a moist property to scrumptious treats baked in the oven. I often toss the brown fruit into the freezer, skins and all, so that they become even more flavorful and delicious. Just pull the frozen bananas out of the freezer a bit before baking, peel the slightly thawed fruit, mash, and add to your favorite banana based recipes.

Best Banana Cake Ever
1 package yellow or white cake mix (with directed ingredients – eggs, water, oil)
2-3 very ripe bananas, mashed

1 teaspoon baking soda

1 teaspoon vanilla extract

Prepare cake mix according to package directions. Mash the bananas with the baking soda and stir into the cake mix batter. Pour batter into one greased and floured 9×13 inch baking pan. Do not preheat oven. Place uncooked cake in oven and turn oven on to 350 degrees. Bake for 45 minutes to 1 hour. Let cool thoroughly before frosting, slicing, and serving.

Posted in Baked goods, Baking, Bread, holiday

Leftover Holiday Cranberry Sauce Quick Bread

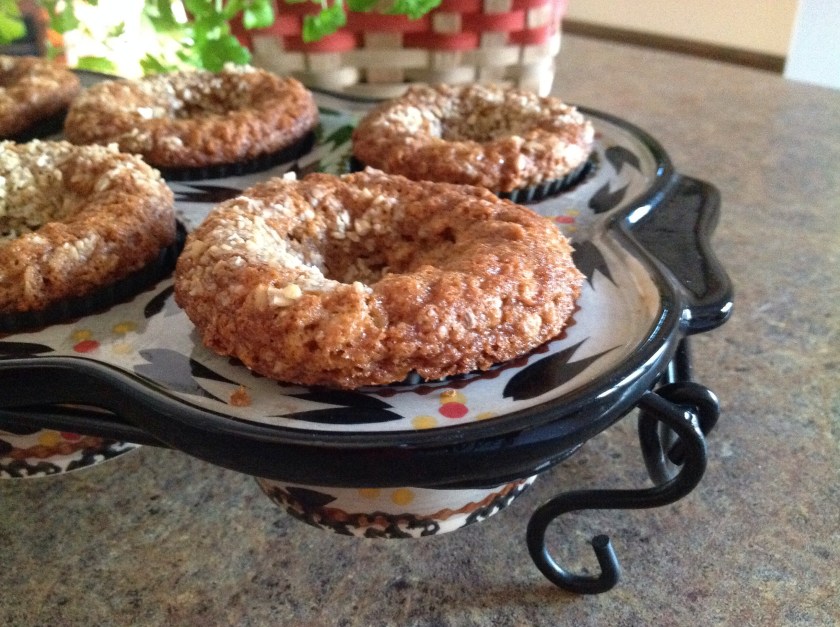
Making my way through the leftovers after a holiday meal is always a challenge.  I hate to waste food so I try to be as creative as possible when reinventing leftovers to make tasty meals for the family.  Yesterday I came across a plastic container containing a few cups of homemade cranberry sauce.  I remembered a recipe that I had made years ago for a chunky cranberry quick bread that would use up the two cups of sauce that I had leftover.  I searched my trusty kitchen  file and found the recipe.  With staple ingredients, this batter comes together rather quickly.  A sprinkle of maple/cinnamon steel cup instant oats makes for a sweet crunchy topping.  This is a great way to turn those holiday leftovers into a sweet treat the whole family will enjoy.

Leftover Holiday Cranberry Sauce Quick Bread

2 cups flour

2 teaspoons baking powder

1/2 teaspoon salt

1 teaspoon cinnamon

1/2 teaspoon nutmeg

1/2 cup canola oil

1/2 cup sugar

1 egg

1/2 cup water

1 teaspoon vanilla

2 cups cranberry sauce

1 cup chopped walnuts

Preheat oven to 350 degrees. Grease an 8 1/2 x 4 1/2″ loaf pan, set aside.  Combine flour, baking powder, salt, cinnamon and nutmeg in a small mixing bowl; set aside.  In a medium bowl, mix oil and sugar until light and fluffy. Add egg and cranberry sauce; mix well. Combine dry ingredients to the cranberry mixture, mixing just until the dry ingredients are moist. Fold in chopped walnuts. Spread batter evenly into prepared loaf pan. Bake until golden brown and a toothpick inserted into the center comes out clean, about 1 hour. Cool completely before slicing.