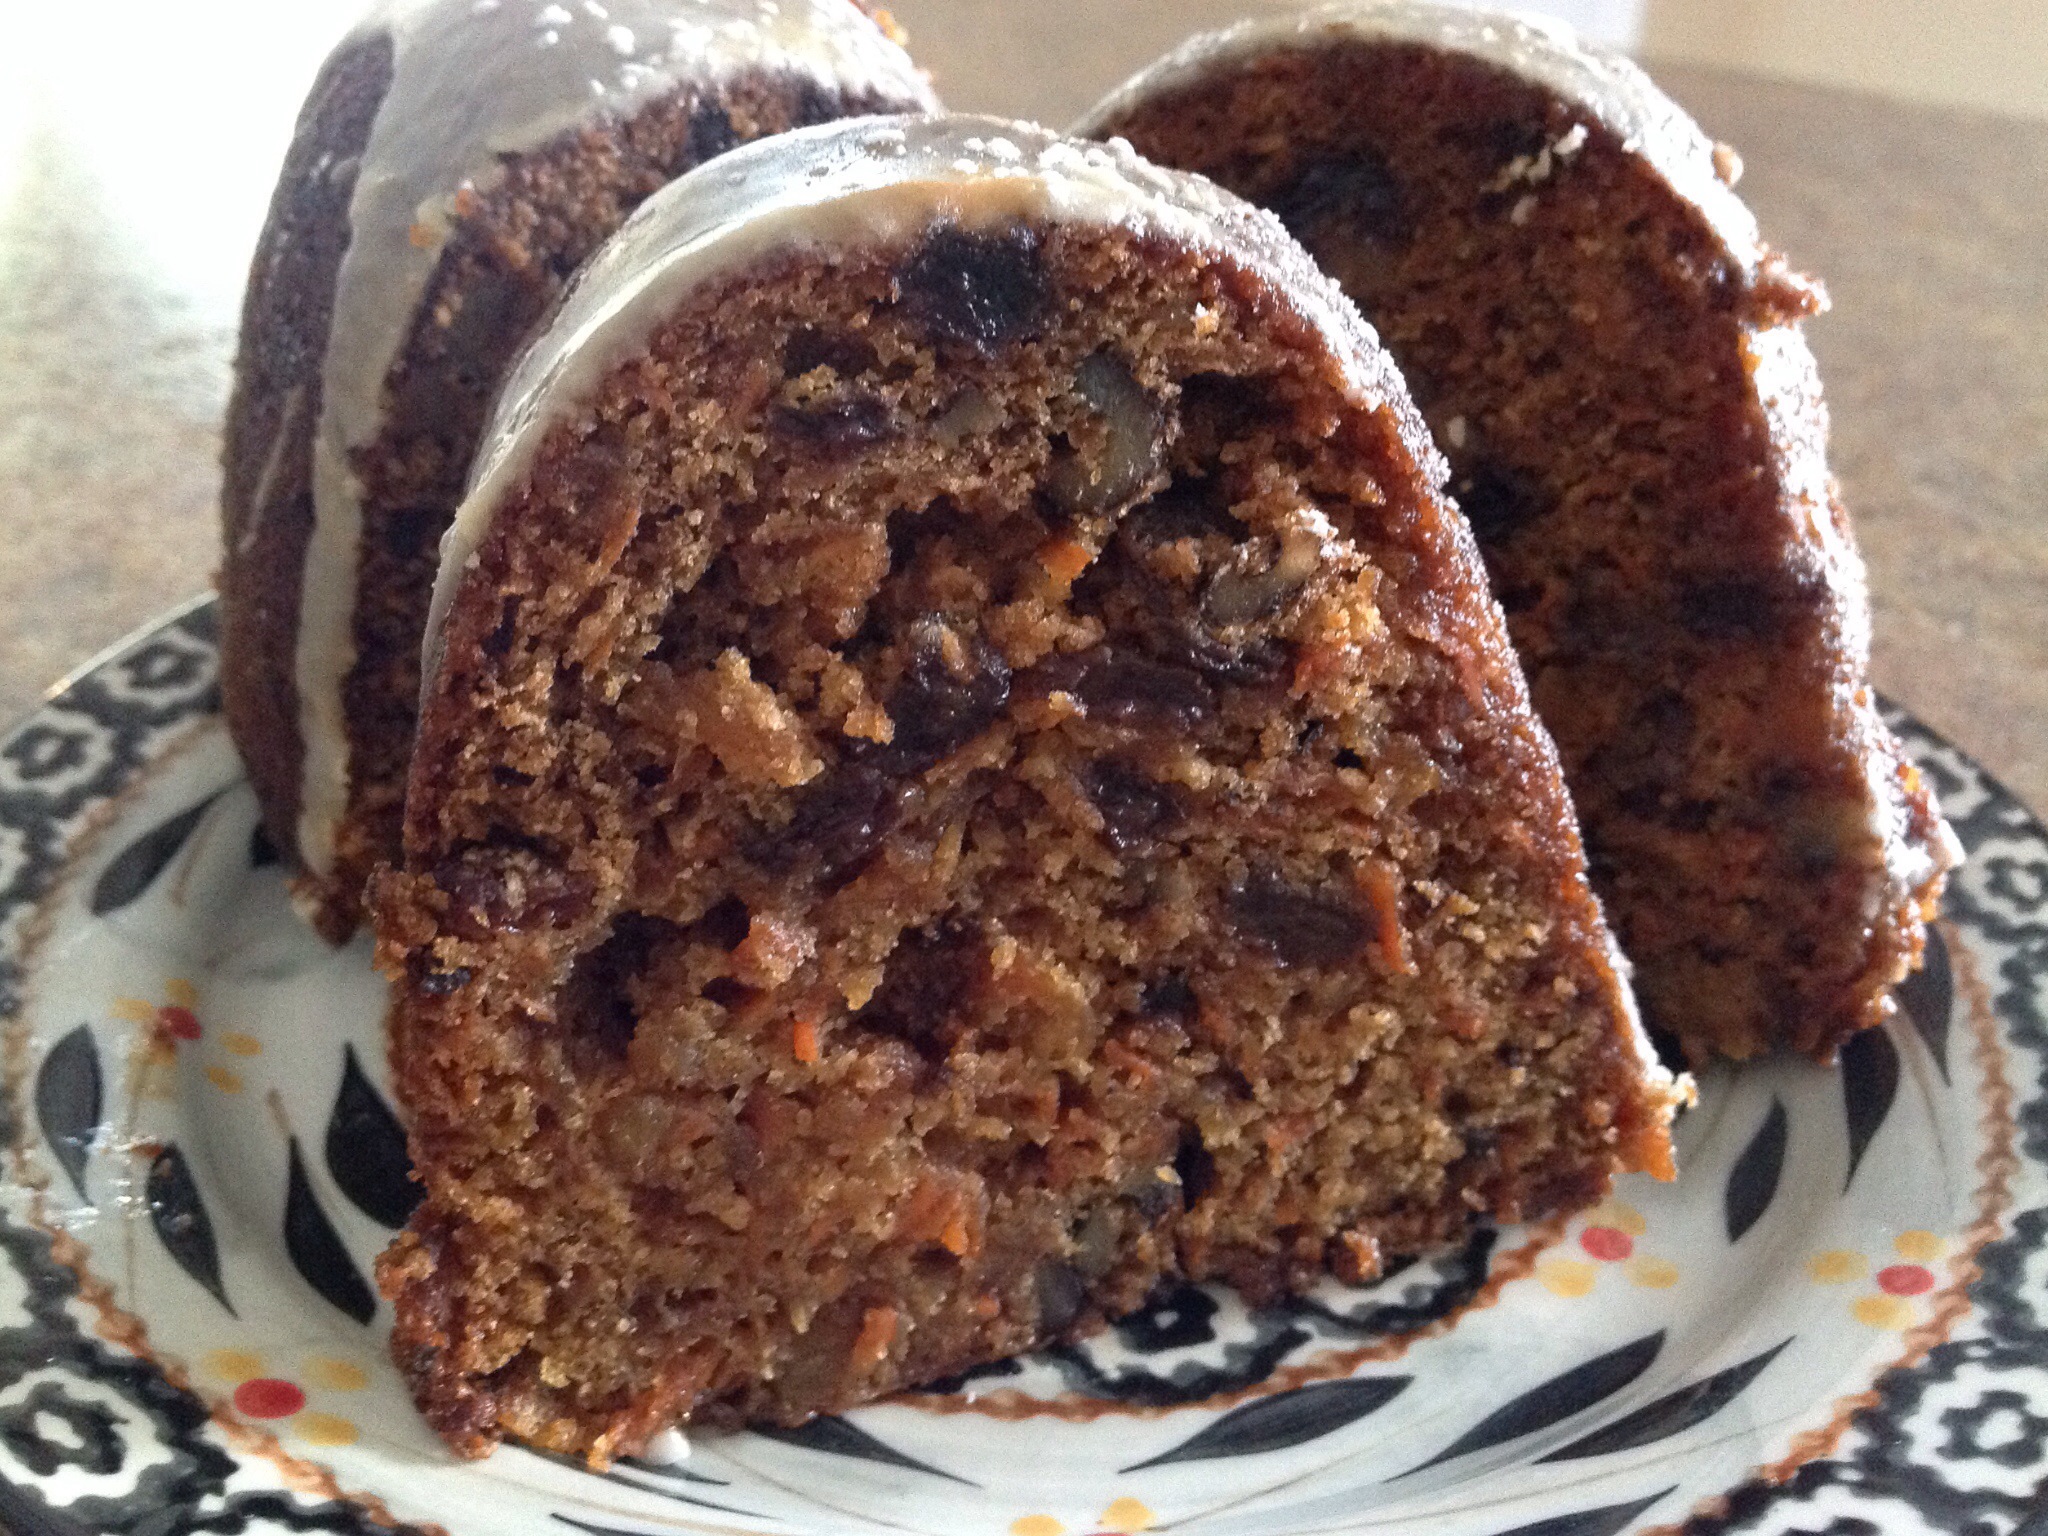
Posted in Baked goods, Baking, Cake, Chocolate, cookies, Desserts, Food

Devilishly Delicious Brownies

20141206-224554.jpg
I must admit, I often use a boxed mix when baking brownies. While it seems relatively easy to open a box and pop in a few ingredients, the result is never quite as delicious as the “made from scratch” product. This brownie recipe is quite easy as it combines a few simple ingredients and is truly delicious. The four, lightly beaten eggs help create a cake-like texture with a moist, fudgy interior. The chocolate chips are a wonderful (partially melted) surprise. So, if you’re looking for a quick fix as you move through the stressful holiday season, this recipe just might fit the bill. I must caution you though, these babies are devilishly delicious!

Devilishly Delicious Brownies

1 cup butter, melted
2 1/2 cups sugar
1 tablespoon vanilla extract
4 eggs, lightly beaten
1 1/2 cups flour
1 cup unsweetened cocoa powder
1 teaspoon salt
1 cup semisweet chocolate chips

Preheat oven to 350 degrees. Lightly coat a 13X9″ baking pan with non-stick cooking spray. Combine butter, sugar, and vanilla in a large bowl. Add eggs and mix well. In a medium bowl, sift flour, cocoa powder, and salt together. Combine flour mixture and the egg mixture; mix just until batter is combined. Stir in chocolate morsels. Spread the batter evenly into the prepared baking dish. Bake until inserted toothpick comes out clean, 35 to 40 minutes. Cool completely before cutting. Lightly sprinkle with powdered sugar, if desired.

Posted in Beef, Food, Main Dish, Soup

Chilly Weather Chili

20141123-095234.jpg

The past few days, I’ve been thinking of those living in New York that have been hit with an unimaginable amount of snow. While many in the Midwest might feel the need to complain about the bitter cold (late fall) temperatures, in comparison, we’ve certainly got nothing to complain about.
As the cold winds begin to blow down the length of Lake Michigan, I often turn my attention to chilly weather recipes that seem to comfort us as we make our way through a season of bitter cold and snow.
This Chilly Weather Chili recipe fits the bill as the spicy notes bring their own kind of warmth to the tummy. The recipe makes a nice sized pot of goodness that can be easily scooped into serving sized containers and kept frozen for a quick future meal.

Chilly Weather Chili

3 lbs lean ground beef
1 (29 ounce) cans tomato sauce
1 (29 ounce) cans kidney beans ( with liquid)
1 (29 ounce) cans pinto beans ( with liquid)
1 medium onion, diced
1/2 cup diced green chili pepper
1/2 cup diced celery
3 or 4 medium tomatoes, chopped
2 teaspoons cumin powder
3 tablespoons chili powder
1 1/2 teaspoons black pepper
2 teaspoons salt
2 cups water

In a large (thick bottomed) pot , cook ground beef over medium heat until no longer pink; drain. Combine beef with the remaining ingredients, and bring to a simmer over low heat. Continue to cook while stirring every 15 minutes, for 2 to 3 hours.

Posted in Baked goods, Baking, Food, Gardening, side dishes

Caramelized Butternut Squash Cubes

20141108-211655.jpg
I’m a fan of simplicity and this autumn recipe really couldn’t be any easier…
A few days ago, my boss arrived to the office with a box full of assorted squash that she had picked from her garden. She admitted neglecting the overgrown weeds in and around the produce and to her surprise, had found a plethora of ripe, fresh squash that she couldn’t possibly eat on her own. She placed the box on the reception desk with a note encouraging employees to take whatever we wanted. I was elated and quickly rummaged through the produce looking for the best of the bunch.
I guess the hardest part of this recipe is getting the thick skin off of the flesh. Carefully use a knife to trim away the light colored skin keeping the cut side of the squash flat against the cutting surface. Scoop out the seeds and cube the firm flesh. In a short while, get ready for a fantastic side dish!

Caramelized Butternut Squash Cubes

3 butternut squash, peeled, seeded, and cubed
2 tablespoons olive oil
Salt and pepper to taste
2 tablespoons brown sugar, optional

Preheat oven to 350 degrees. In a large bowl, toss cubed squash and olive oil until well coated. Arrange squash on an 11X17″ baking pan and sprinkle with salt and pepper. Bake for 20 minutes until golden brown and slightly caramelized.
Remove from oven and sprinkle evenly with brown sugar; return to the oven, continue baking for 5-7 minutes or until fork tender.

Posted in Baked goods, Baking, Bread, breakfast, Food, lunch box

Two-Ingredient Pumpkin Muffins

20141102-115303.jpg
I’m not kidding…just two ingredients quickly mixed together makes for a batch of terrific tasting pumpkin muffins! Yes, that’s right, I said two ingredients…
I needed a quick morning lunch box treat this week and I turned to the quickest muffin recipe I could think of, the Two-Ingredient Pumpkin Muffin recipe. Quickly mix a can of pumpkin with a cake mix and pop it in the oven. In less than 20 minutes, you’ve got a great little snack. While I used the Butter Pecan Cake Mix in my recipe, the spice and vanilla flavored cake mix work well too. Pop in the lunchbox, bake for an autumn bake sale, or share with co-workers for an office carry-in.
If you’d like to spruce up the recipe a bit, sprinkle with powdered sugar or a light glaze with chopped nuts. As I have mentioned in earlier posts, I love to top my cakes and muffins with a pre-package flax seed oatmeal mix and that is what I did here. …Quick, easy and oh, so yummy!

20141102-120529.jpg
Two-Ingredient Pumpkin Muffins

1 (18.25 ounce) package butter pecan cake mix
1 (15 ounce) can pumpkin

Preheat the oven to 350 degrees. Grease muffin tins with a light coating of cooking spray or insert paper liners. In a large bowl, combine the cake mix and canned pumpkin until well blended. Evenly distribute into prepared muffin cups.
Bake for 15-17 minutes in the preheated oven, or until a toothpick inserted into the center comes out clean. Cool and serve. (This tastes even better as the muffins sit for a couple of days.)
Optional: Top with oatmeal topping, powdered sugar, or powdered sugar glaze.

20141102-115417.jpg

Posted in appetizers/snacks, Baked goods, Baking, breakfast, Cake, Desserts, Food, Gardening

Apricot Snacking Cake with Crunchy Flax Topping

20141026-150154.jpg
The view out my window teams with an array of fall colors. The season’s best; deep golden yellow, burgundy red, and burnt sienna cover the trees as the leaves slowly fall and the cooler temperatures usher in the Midwest climate change.

20141026-150233.jpg

20141026-150257.jpg
I stepped outside a few minutes ago, to enjoy another beautiful autumn Sunday. As I made my way across the deck, I was greeted by the aroma of a wood fire. Neighbors in the area are taking advantage of their fire pits as they rake leaves and clean up garden beds for it is time we put the backyard to sleep for the coming winter months.

20141026-150525.jpg

20141026-150541.jpg

20141026-150603.jpg

20141026-150619.jpg

20141026-150631.jpg

20141026-150653.jpg

20141026-150706.jpg
A fitting autumn treat, Apricot Snacking Cake, bakes in the oven as we hope to enjoy a relaxed evening munching on this delicious, pudding-like, dessert with a few scoops of vanilla ice cream. (Even better, a steamy cup of tea will accompany this scrumptious autumn treat just perfectly.) I’m hoping the mild temperatures will hold on as the autumn sun begins to set. What a delight it might be if we can enjoy this delicious dessert outdoors as the soft breezes blow and the leaves delicately dance to the ground.
Afterwards, I’ll slice up the left over cake into serving-sized squares and pack it in an airtight container to make for a quick morning bite, as we hurry out the door to start another busy work week.

Apricot Snacking Cake with Crunchy Flax Topping

1 1/2 cups white sugar
2 cups all-purpose flour
1 teaspoon salt
1 teaspoon baking soda
1 teaspoon ground cinnamon
1 cup vegetable oil
3 eggs, beaten
2 12 oz. cans apricot pie filling (I use Solo brand)
1 serving sized packet – steel cut instant oatmeal with flax

Preheat oven to 350 degrees. Spray with cooking spray, a 9×13 baking pan.
In large bowl, combine the sugar, flour, salt, baking soda and cinnamon. Make a well in the center and stir in the oil, eggs and pie filling. Stir until well combined. Spoon batter into the prepared pan. Sprinkle with one serving sized packet of instant oatmeal.
Bake at 350 degrees for 45 to 50 minutes or until cake tests done. Drizzle with icing, if desired.

20141026-152153.jpg

Posted in Baked goods, Baking, cookies, Desserts, Food, holiday, holidays, Kids in the Kitchen, lunch box

Holiday Cutouts

20141019-120202.jpg
As I mentioned in one of my earlier posts, I’m all about sending goodies to my college kids living on campus. Receiving a thoughtful care package from home is always a welcome surprise for students. Last week, while I was visiting campus, I dropped off decorative trays of Holiday Cutouts to each of my children. I’m told they were a big hit as M shared her tray with her Resident Assistant, roommate and a few of her friends from home. K and P shared their cookies as well. M confessed that she couldn’t imagine eating too many of the cookies without putting on a few pounds so, “out of site, out of mind”, was her motto when passing off the tasty treats to friends and floor mates.
This cookie is quick and easy to assemble as the recipe doesn’t call for the traditional wait time for refrigeration when making the stiff rolled dough. Use your favorite cookie cutters to represent holidays, birthdays, or other special occasions. After a quick cool down, top with icing and colorful sprinkles. Pack in airtight containers or transfer to a platter for a friendly holiday tray. (I found a few Halloween buckets at a local discount store so I packed a few cookies in with a bit of tissue paper.)
Kids, no matter what their age, always enjoy a flavorful treat for the holidays.

20141019-120314.jpg
Holiday Cutouts

1 cup butter, softened ( 2 sticks)
1 cup sugar
1 large egg
1 teaspoon pure vanilla extract
1/2 teaspoon almond extract
3 cups all-purpose flour
2 teaspoons baking powder
1/2 teaspoon salt

Preheat oven to 400 degrees. Cream together the butter and sugar. Add the egg, vanilla, and almond extract; mix until well blended. In a separate bowl sift together the flour, baking powder and salt. Carefully, add the dry ingredients to the butter mixture and combine well. Form the dough in to a smooth ball. Roll dough on a lightly floured surface to 1/4″ thick. Cut out with cookie cutters and place on ungreased cookie sheets. Bake 6-8 minutes or until very lightly browned. Remove from cookie sheets and cool on wire racks. Decorate as desired when cool.

Posted in Crafts, Gifts, holiday, holidays

Chunky Infinity Scarf

20141009-161802.jpg
Last week I posted a picture and link for a beginner infinity scarf that I found on the web. As I had mentioned in the post, I am at the very bottom of the ability scale when it comes to my yarn, needlework and craftsmanship abilities. I stick with basic techniques and have to rely heavily on video tutorials (played over and over again) to grasp basic construction concepts. I have been so pleased with my new found skill for crafting the beginner infinity scarf that I have taken to making several different scarves with yarns of various weight and color for my family and friends. Honestly, these scarves are so quick and easy to make, it literally takes about 1 1/2 hours to construct this trendy accessory.
This week, I wanted to post another of my creations crafted with a different type of yarn but crocheted with the very same stitch as the blue patterned scarf that I posted last week. I wanted you to see what a difference yarn choice can make in the look and feel of the garment or accessory. Again, you can find the video here. This is a great little scarf as we move into the cold weather months in the Midwest. Don’t forget that this would be a fantastic Christmas present for teens, moms, teachers, and co-workers. Look for yarn colors to match college, high school or professional sports teams. Or, look for chunky yarns to match the trendy look of current retail scarves found in all the stores.
Here is the yarn that I used for this project. I also used an 11 mm crochet hook.

20141009-162521.jpg

20141009-162558.jpg
… Hand made, totally inexpensive and a thoughtful gift… Happy crocheting!

Posted in Crafts

Beginner Infinity Scarf

20140929-064814.jpg
Grocery shopping on Saturday is never fun but as I worked my way through a local super store this past weekend, I was stopped in my tracks when I came to the craft aisle and spied a load of beautifully crafted yarns and fabrics. I had just received a call from M asking if I could send some warmer clothes to campus as the early morning walk to class had become quite chilly. She asked for her scarves and gloves along with long sleeved fleece jackets. The selection of yarn inspired me to rummage through the colors to find a combination that would match M’s fair complexion and silver/gray winter jacket. I quickly snapped a few pictures of the skeins that I had selected and sent the pics on the M so that she could make the final selection. She decided on the soft blue/green combination and I quickly scooped up her favorite and threw it in the cart.
When I returned home, I made my way to the IPad where I watched a beginner crochet video to refresh my limited crochet skills. I watched the video several times and began my project. The basic rectangular shape took about 1 1/2 hours to craft. I can’t wait for M to open her care package to find this stylish infinity scarf, that I hope will keep her warm as she makes her way across campus this winter.

20140929-065140.jpg

20140929-065152.jpg

Posted in Baked goods, Baking, Bread, breakfast, Brunch, Food, lunch box

Triple Berry and Oat Muffins

20140925-064902.jpg
Lately, I have been sending quite a few care packages to the Purdue University campus as my three children have all decided to become Boilermakers while they work to complete their undergraduate degrees. I have been dehydrating fresh fruit and baking up a storm to send cookies, muffins, and snacks by way of UPS.
Last week, I sent these muffins to my daughters (my son is not a fan). I received rave reviews from both.
The muffins are filled with triple berry goodness. The oat topping makes for a moist and tasty center with a sweet and crunchy finish. …Absolutely delicious!

Triple Berry and Oat Muffins

3 cups all-purpose flour
1 1/2 cups old fashioned oats
1 1/2 cups sugar
1 tablespoon ground cinnamon
2 teaspoons baking powder
1 teaspoon salt
1 1/2 cups vegetable oil
4 eggs
1 1/2 cups milk
1 teaspoon almond extract
1 1/4 pounds fresh berries, sliced (raspberries, strawberries, blueberries)

Topping
1/4 cup old fashioned oats
1/2 teaspoon sugar

Preheat oven to 350 degrees. Grease or line with paper liners, two muffin pans. Mix flour, oats, sugar, cinnamon, baking powder, and salt in a large mixing bowl. In another bowl, whisk together the vegetable oil, eggs, milk, and extract; stir into flour mixture until just moistened. Carefully fold in berries. Scoop into prepared muffin pans. Mix together topping ingredients and sprinkle over the muffins.
Bake in the preheated oven until a toothpick inserted into the center comes out clean, about 20-25 minutes.