Posted in Baked goods, Baking, Chocolate, Desserts

Chocolatey Angel Food Cake

20140217-071519.jpg

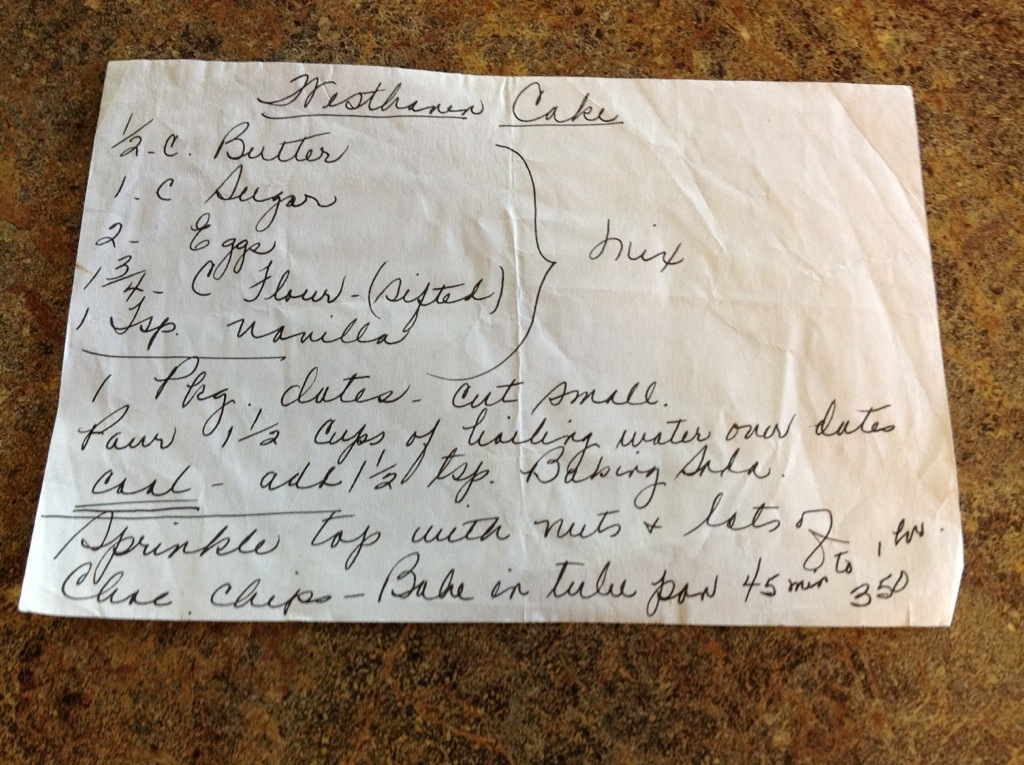
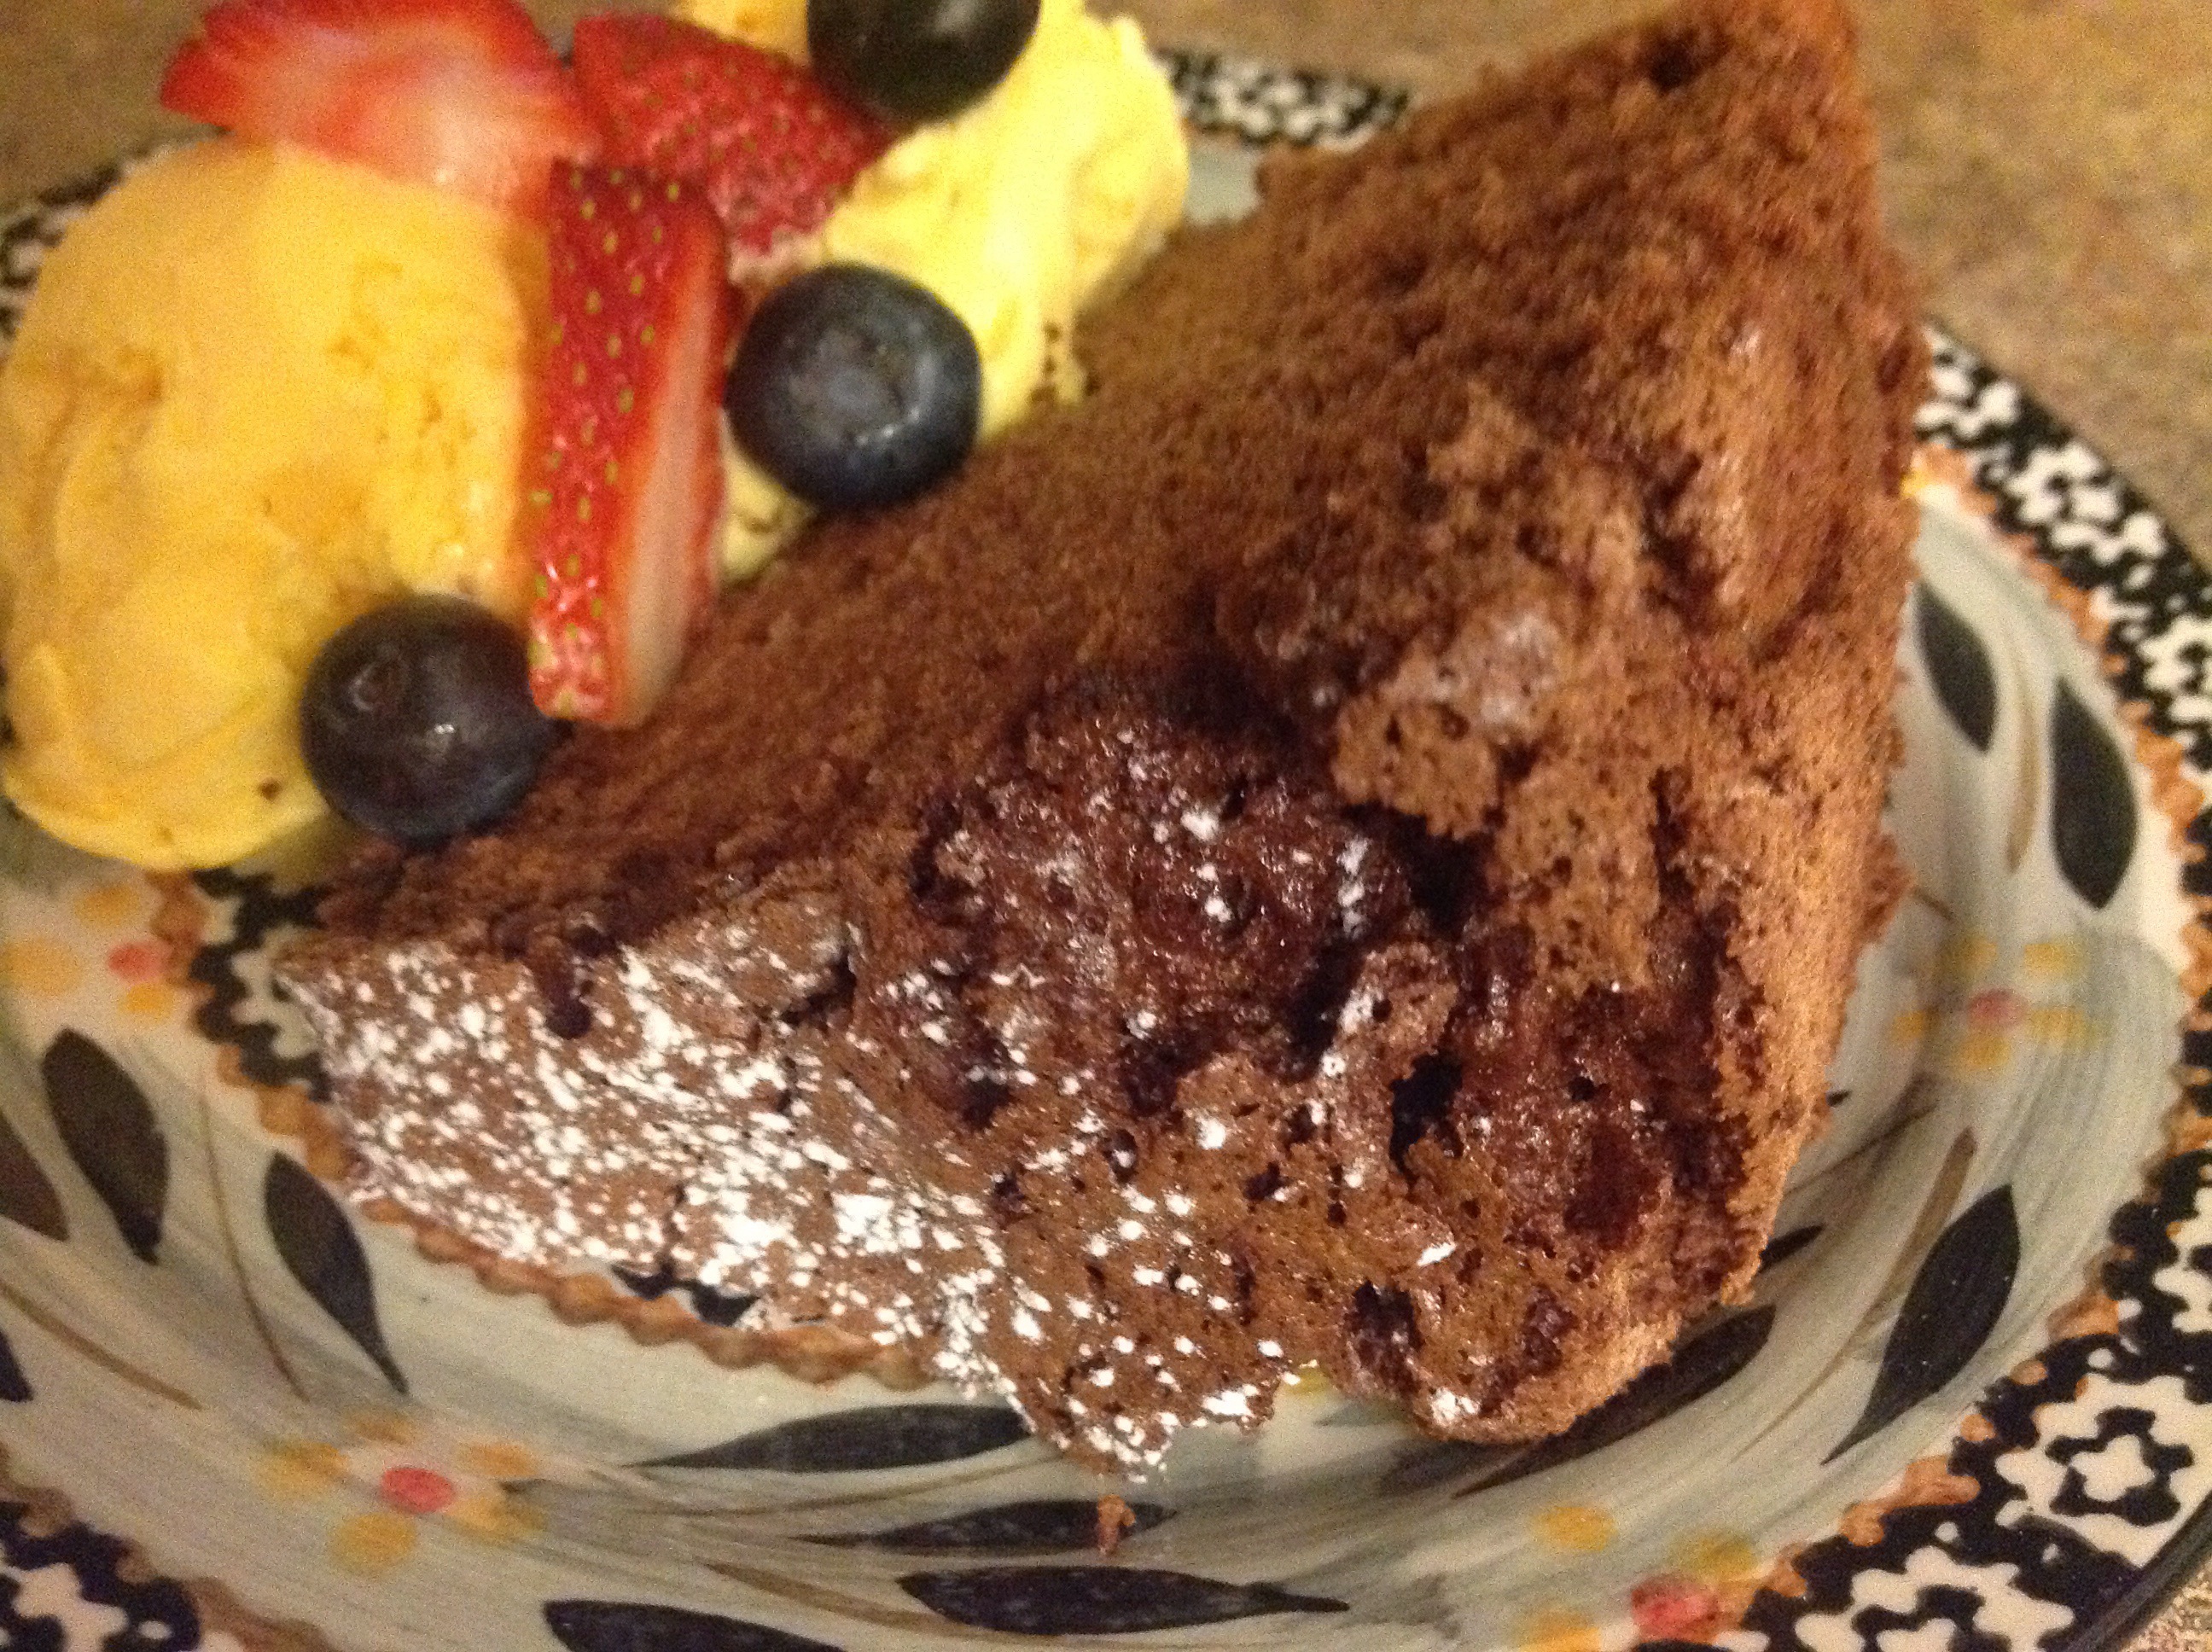
With busy weekend activities, sporting events, and altered work schedules out of the way, we were finally able to celebrate Valentine’s Day on Sunday. The suggestion of a nice dinner at a favorite restaurant was a welcome treat. While dinner was taken care of by the restaurant staff, we decided to choose a movie and gather at home to share a homemade chocolatey dessert.
This is a great last minute recipe as there are only three ingredients involved. Water, cake mix and premium cocoa. That’s it. The light airy texture of the angel food cake, mixed with the rich chocolate flavor of the cocoa make for a delicious valentine treat. A few scoops of French vanilla ice cream and a scattering of berries make this dessert a bit more decadent. What a wonderful way to spend a quiet evening with the family!

Chocolatey Angel Food Cake

1 pkg. (14.5 to 16 oz.) angel food cake mix
1/2 cup premium baking cocoa
powdered sugar (optional)
Fresh berries (optional)

Preheat the oven according to cake mix package directions. In a large bowl, carefully combine cocoa with angel food cake mix. Prepare and bake the cake mix according to package directions. Finish cake by drizzling with icing or sprinkling with powdered sugar; garnish with berries.

20140217-072053.jpg

Posted in Baked goods, Chocolate, Food, Kids in the Kitchen

Dump It In Brownies

20140120-080230.jpg
Many years ago, while looking through a magazine at one of our regularly scheduled well visits for the kids, I stumbled upon this recipe for brownies. I was amazed by the simplicity involved in making this rich, chocolatey treat.
The first time I used the recipe, I had three small children in tow. All of them sporting hand-made aprons and propped up on stools to assist with the baking project. I had pre-measured all of the ingredients and had things lined up so that the kids could pour everything into the bowl before mixing. I kept saying, “Go ahead, guys…just dump it in!” Well, the look on their faces was priceless! Mom is actually letting us just dump this stuff in? I’m usually quite methodical when baking so my carefree attitude was really messing with their minds.
Weeks later, K asked if we could bake again. She asked if we could make the “dump it in” recipe. Well, the name stuck and that’s what we called these moist, delicious brownies ever since. I’ve changed up the recipe a bit but it certainly is a moist flavorful treat, that’s fun to make with the kiddos.

Dump It In Brownies

2 cups sugar
5 eggs, beaten
1 cup canola oil
1 teaspoon vanilla extract
1 1/3 cups all-purpose flour
1/2 cup unsweetened cocoa powder
1 teaspoon salt
1 cup semisweet chocolate chips
1 cup peanut butter chips

Preheat oven to 350 degrees. Spray with cooking spray, a 9×13 inch baking pan.
In a large bowl, dump in all ingredients. Combine well, stirring just until moistened. Spread the batter evenly into prepared pan. Bake for 30 to 35 minutes in preheated oven, or until brownies start to pull away from the sides of the pan. Cool completely before icing. Sprinkle extra chips over chocolate frosting of your choice.

20140120-081728.jpg

Posted in Baked goods, Baking, Chocolate, Desserts, Food, Gifts, Homemade Mixes, Kids in the Kitchen, lunch box

Scrumptious 1,2,3 Cake

20140117-184631.jpg
This little cake is so light and sweet it’s like eating chocolate cotton candy!
It’s called the (1) One – (2) Two – (3) Three Cake and it’s really delicious. You won’t believe that there are only two ingredients involved here!

This past Christmas, my daughter arrived home from college for her holiday break. Her suitcase was filled with lots of dirty clothes, books to sell after a long semester, and a beautiful jar filled with a taupe colored, powdery mix; a recipe card attached. The jar was wrapped in a ball of crinkled holiday, tissue paper. In the rush of unpacking and catching up, the jar was put aside. A few hours later, I noticed the jar on the kitchen counter. The container was quite beautiful and I was intrigued by the contents so I carefully read the attached index card.

20140117-184806.jpg
Well, I couldn’t resist the temptation. I quickly scooped out 3 tablespoons of the mix and added 2 tablespoons of water. I swirled it around in a heat-safe mug and popped it in the microwave. As I looked through the viewing glass, the mix immediately began to rise and puff up. It was like magic, the speed at which it rose. I patiently waited the full minute as the kitchen began to smell like a baker’s wonderland. When the bell went off, I retrieved my creation and quickly ran to tell everyone what had transpired. We all grabbed a spoon and tested the sweet chocolatey mound. Ohhhh, it was so delicious! Now, I really try to stay away from sugar so I took the tiniest of bites but I was delighted that it turned out so spectacular. And, oh, it was so simple!

20140117-185127.jpg
So here’s what you do…

(1) One – (2)Two – (3) Three Cake

1 package chocolate cake mix
1 package angel food cake mix

In a large bowl, combine dry cake mix packages; mix well. Carefully pour into an airtight container.

Attach an index card to the jar with baking instructions:

Mix, in a microwave safe cup, 3 tablespoons mix with 2 tablespoons water. Pop it in the microwave for 1 minute. 3,2,1… Enjoy!

Don’t limit yourself… Use any flavor cake mix you like. Add chocolate chips or top with whipped topping and fruit. This would be a great recipe to make with young children. I think you’ll really enjoy this…what fun!

Posted in appetizers/snacks, Baked goods, Baking, Chocolate, Desserts, Food, Gifts, holidays, lunch box

Mini Brownie Bites

20131215-060022.jpg
It’s that time of year…holiday parties, friendly gift giving, festive decorations and enjoying time with family. One of our favorite ways to spend time together seems to revolve around preparing and sharing cherished family recipes.
We have a few favorite cookie and quick bread recipes that we always bake when the holidays roll around…some are time consuming recipes while others can be whipped up in a jiffy.
This recipe for Mini Brownie Bites is a quickie. These flavorful gems are a mouthful of rich, chocolatey goodness and they only take minutes to prepare. Be warned that the recipe yields only a dozen or so bites. You can bake them along with your favorite cookie selection to be added to the holiday dessert tray. I often pack them in colorful tins to give as teacher gifts. They travel well and seem to get more moist and delicious a day or two after baking. Be sure to store them in an air-tight container until just before serving.

Mini Brownie Bites

1/2 cup semisweet chocolate chips, divided
1/4 cup butter, cubed
1 egg
1/4 cup sugar
1/4 teaspoon vanilla extract
1/4 cup flour
1/4 cup chopped walnuts, optional

In a microwave, melt 1/4 cup of chocolate chips and butter; stir until smooth.
Cool slightly. In a small bowl, beat egg and sugar. Stir in vanilla and chocolate mixture. Gradually add flour; fold in remaining chocolate chips and optional walnuts.
Use a small ice cream scoop to fill mini paper or silicone-lined muffin cups two-thirds full. Bake at 350 degrees for 8-12 minutes (depending on how dry or moist you prefer the brownie center) or until tops begin to crack. Cool completely before removing from pan to a wire rack.

Posted in Baked goods, Chocolate, Desserts, Food

Westhaven Date Cake

20131008-143156.jpg
As I was rummaging through my hand written recipes this morning, an odd shaped piece of paper brought back memories of Aunt Nance. She was Jim’s Aunt, and a very special person. She would often bake this cake and bring it along to family gatherings. The chopped dates in the recipe are undetectable after baking but they are essential as they add great flavor and moisture to the cake.
Years ago, I asked Aunt Nance to share the recipe with me and this is the piece of paper she slipped in my hand as I was leaving the gathering.
When I finally got around to baking the cake, I noticed that mine wasn’t as dark and chocolatey as hers was. After investigating further, I realized that she had forgotten to include 2 tablespoons of cocoa in the recipe. The cake was still quite delicious so I make it both ways and it’s always a crowd pleaser.

20131008-143313.jpg
Westhaven Date Cake

1 (8 oz.) package dates, chopped
1 cup boiling water
1 1/2 teaspoons baking soda
1/2 cup butter
1 cup sugar
2 eggs
1 teaspoon vanilla
1 3/4 cups flour
2 tablespoons cocoa powder
1/2 tsp. salt
chocolate chips
nuts
powdered sugar

Over chopped dates, pour 1 cup boiling water; let cool. Add baking soda and set aside. Cream together butter and sugar. Add eggs, vanilla, flour, cocoa powder, and salt. Pour date mixture into dry ingredients, mix well. Pour into a greased and floured tube pan. Sprinkle chocolate chips and nuts over batter. Bake at 350 degrees for 40-45 minutes. Sprinkle with powdered sugar, and cool cake before serving.

20131008-144156.jpg