
Tag: homemade
 I really try to keep my carb intake to a minimum. Here’s a great recipe that fits the bill when I want something flavorful, fluffy and delicious to start my day. After this casserole has slightly cooled, I slice the dish into 3” squares so that I can quickly pop a portion into my lunch bag or to have as a mid-morning snack. My family can slip a square or two between two slices of wheat toast for a tasty little sandwich.

Scrumptious Granola Clusters

We recently took a weekend visit to Northern Ohio. We wanted to spend time with family, watch our nephew play some amazing high school football, and enjoy the rolling hills and colorful treelined byways while visiting a few local Amish community shops.
When in Ohio, I try to take the opportunity to stop at Marc’s, a local discount store that can offer some amazing deals. It’s “hit or miss”, but I often stock up on coffee, staples and seasonal trinkets that are placed on entry area shelves listed at rock bottom, close-out prices.
After carefully searching the bountiful shelves, I ended up buying a few color coordinated cutting boards, silicone trivets, and pin-striped double oven mitts to give as Christmas gift sets this holiday season. I often pair kitchen items with wholesome baked goods for a more personal holiday gift. I also bought large boxes of flavored k-cups, cereal, and oatmeal.
I purchased several boxes of this low-sugar cereal with this granola recipe in mind… Kashi Original GoLean has lots of fun shapes and textures nestled within the box.
 I also use our own maple syrup to sweeten the mix and it’s sticky properties help to form the crunchy granola clusters. Pair this delicious granola with Greek yogurt and sweet crunchy apples for an awesome breakfast combination. What a way to start the day!
Scrumptious Granola Clusters
4 cups dry, sugarless breakfast cereal ( I use Kashi GoLean Original pictured above)
1 cup chopped walnuts
1/2 cup sunflower seeds
3/4 teaspoon salt
1/2 teaspoon cinnamon
1/2 cup coconut oil, melted
1/2 cup maple syrup or honey
1 teaspoon vanilla extract
2/3 cup dried fruit (optional)
Preheat oven to 325 degrees and line a large, jellyroll pan with aluminum foil or parchment, lightly sprayed with cooking spray. In a large mixing bowl, combine the cereal, nuts and seeds. Stir to blend.
In a small saucepan, combine the oil, maple syrup and/or honey, cinnamon and salt. Bring to a boil, remove from heat and stir in vanilla. Pour hot mixture into dry cereal mixture. Mix well, until every oat and nut is lightly coated. Pour the granola onto your prepared pan and use a large spoon to spread it in an even layer. Bake until golden, about 18 to 20 minutes, stirring halfway. The granola will continue to crisp up as it cools.
Let the granola cool for 10 minutes before breaking it into pieces and stirring in the (optional) dried fruit. Store the granola in an airtight container at room temperature for 1 to 2 weeks, or in a sealed freezer bag in the freezer.


Easy Chocolate Chip Banana Loaf

This week, I scheduled a community meeting that was to take place at a local library. After rechecking my calendar invite, I realized that I had arrived a bit early, so I took this opportunity to stroll through a selection of cookbooks that had been carefully selected for a main aisle display. My eyes immediately fixed on an older book showcasing recipes from quaint country inns and bed & breakfast establishments. Thumbing through the pages, so many of the recipes seems quick, easy, and scrumptious. Knowing that my meeting would be starting soon, I grabbed my library card and borrowed the book entitled Best Recipes from American Country Inns and Bed & Breakfasts by Kitty and Lucian Maynard.
Returning home, later that day, I realized that I wanted to make so many of the recipes, I simply had to purchase the book. I typed the title of the cookbook into the Amazon search bar… low and behold, they had several used copies for purchase (priced very low). I bought the first and second editions and I am waiting on their arrival.
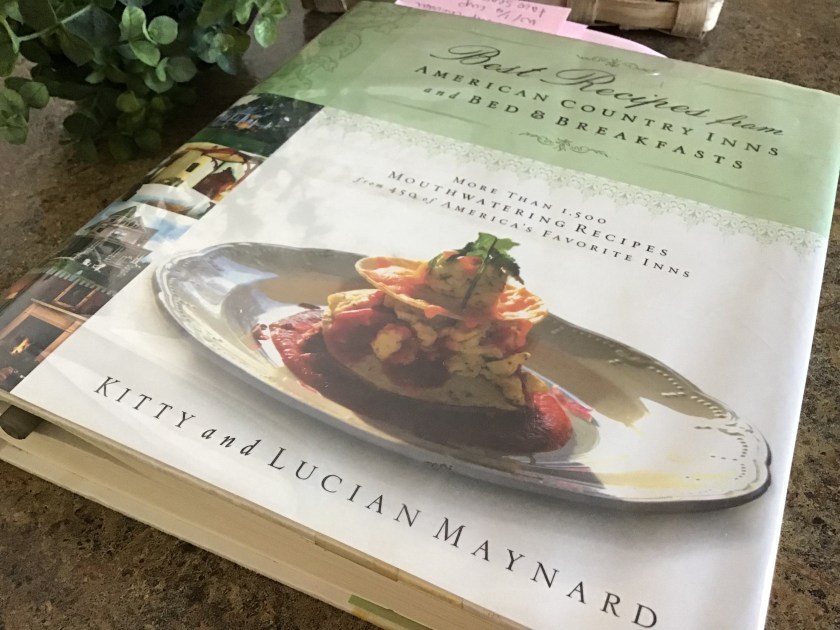
This recipe comes from the page pictured below. The only change that I made was to add a handful of chopped walnuts to the already simplistic ingredients. I am always looking for recipes that will help to use up the stash of overly ripe bananas that I have tucked in my freezer. This one fit the bill. Lots of flavor with very little fuss…

This is a great loaf to freeze or slice and package. My daughter was heading back to Chicago on the train, so I sliced her a few pieces to nibble on throughout the week.


Speckled Monkey Bars
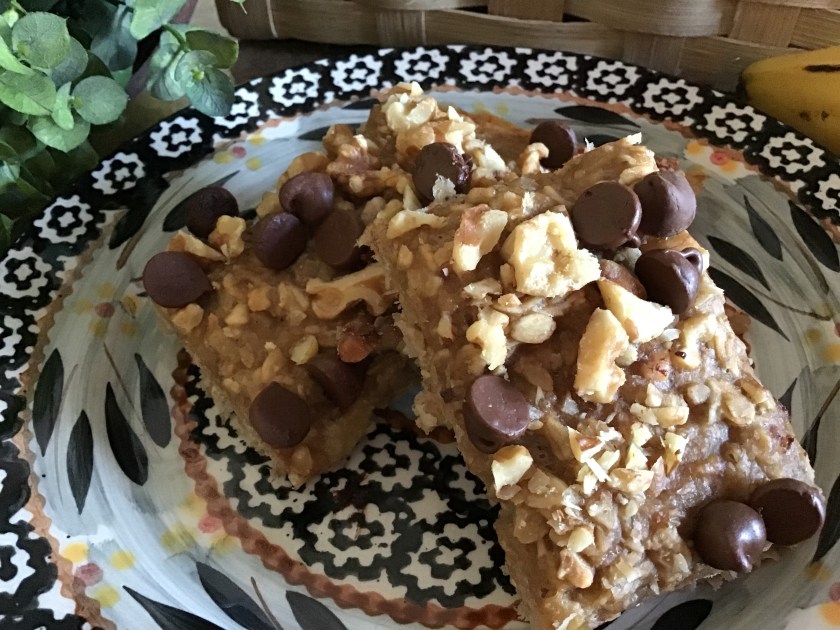
Bananas have always been a staple ingredient for lunch bags/boxes in our household. When selecting fruit to add to my weekly shopping list, bananas always take center stage. I often choose far more than needed for a week’s worth of lunches as I love having a few extra over-ripe bananas to add to tasty quick bread and snack recipes, such as this one. These delicious bars have few ingredients and highlight some of my family’s favorite flavors. My three (not so) little monkeys have enjoyed these flavors for many years.
Speckled Money Bars
4 medium (over-ripe) bananas, mashed
2 cup old fashioned oats
1/2 cup chunky peanut butter
1 teaspoon vanilla
1/2 cup chocolate chips
1/2 cup walnuts, chopped
Preheat oven to 350 degrees and grease a 13×9” baking pan.
Mix bananas with oats and peanut butter; add vanilla and continue to mix until well blended. Carefully, spread the mixture in prepared pan making sure to evenly distribute to the corners. Top with chocolate chips and walnuts. Bake for 18-20 minutes or until an inserted toothpick comes out clean. Cool before cutting into delicious squares. Wrap individually for a lunch bag treat or store in an airtight container.

Note: Lately, I’ve been using the Copper Chef brownie pan to make perfect portions while baking. Depending on your oven, you may have to reduce cooking time when using this pan. Cool completely before removing insert.

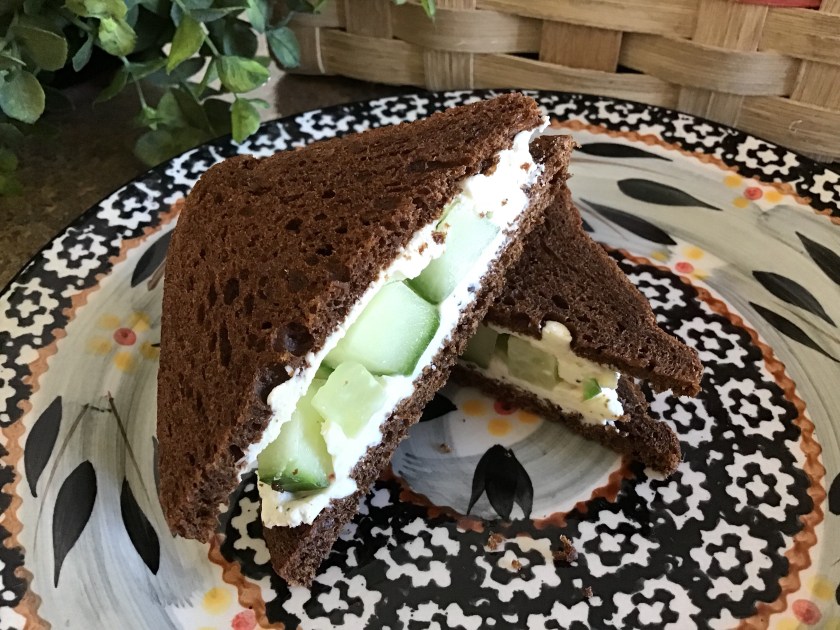
Cucumber Finger Sandwiches

My daughter recently called to ask if I could share an easy appetizer recipe as she needed to assemble a quick item for a coworker’s going-away party. She had already looked through the recipes on my blog and couldn’t find one that she could easily make ahead of time and store in the fridge. My mind quickly turned to a simple recipe that I used to make when our children were young. I made this recipe for our annual St. Patrick’s Day Party when we lived in the southwest Chicago area. The yearly parade (and party) was always a fun event for all of the Irish families living in the neighborhood. Slices of pumpernickel cocktail bread are loaded up with a spiced cream cheese mixture and a thick slice of fresh cucumber. A quick sprinkle of dill adds a layer of flavor. Drawing the tines of a fork down the side of the cucumber before slicing, adds a unique design to the appetizer.
Cucumber Finger Sandwiches
1 (8 ounce) package cream cheese, softened
1 (.7 ounce) package dry Italian-style salad dressing mix
1 (1 pound) loaf sliced pumpernickel party bread
2 English cucumbers
2 teaspoons dill weed or dill seed
Mix cream cheese and Italian salad dressing mix in a bowl until well blended. Draw the tines of a fork down the sides of the cucumber before slicing (Make sure to pierce the skin of each cucumber.) Spread cream cheese mixture atop pumpernickel party bread and top each slice with a cucumber slice. Sprinkle with a light dose of dill weed or dill seed.

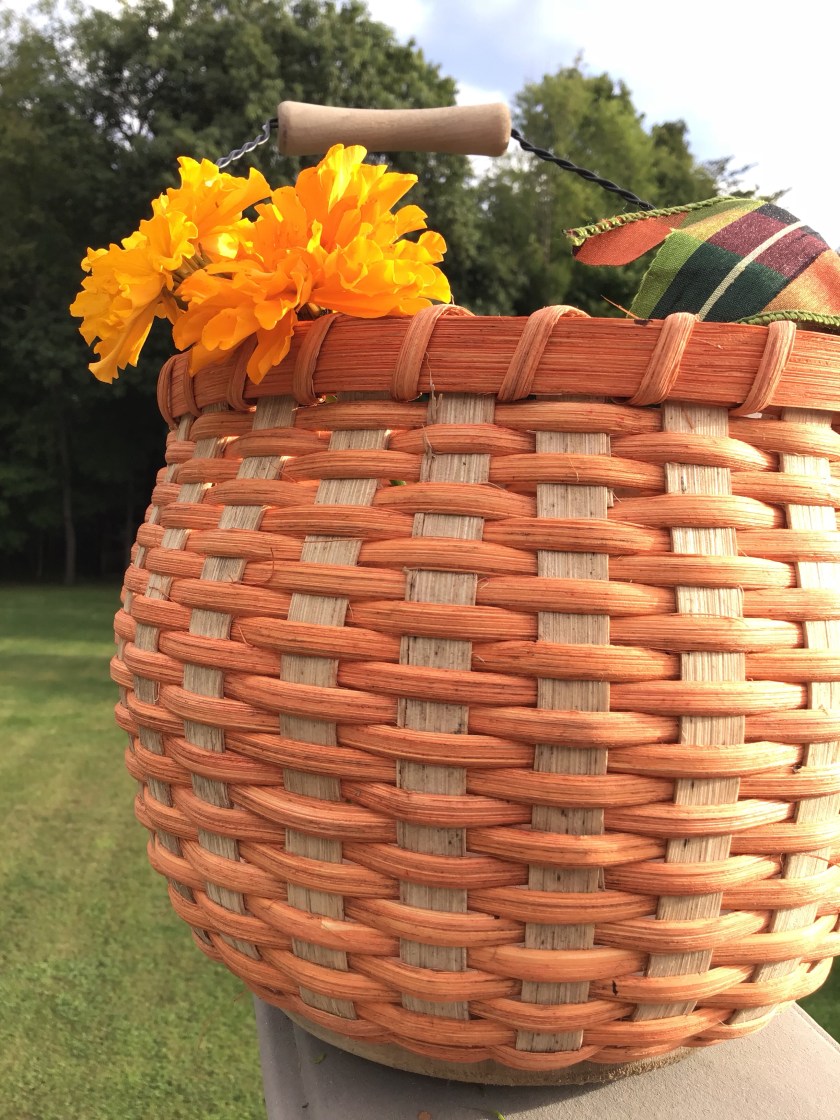
Handmade Pumpkin Basket

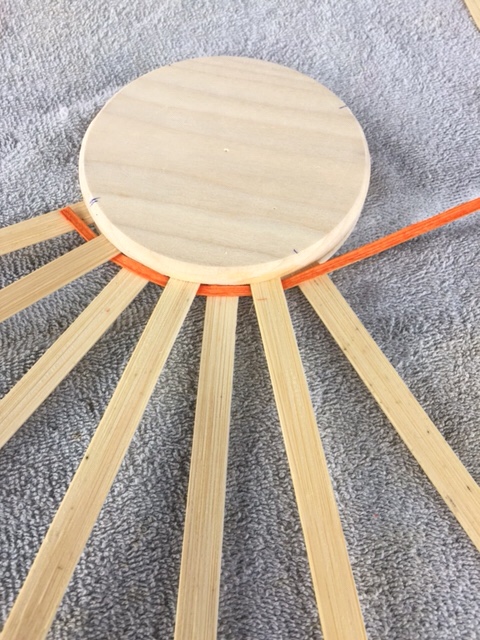
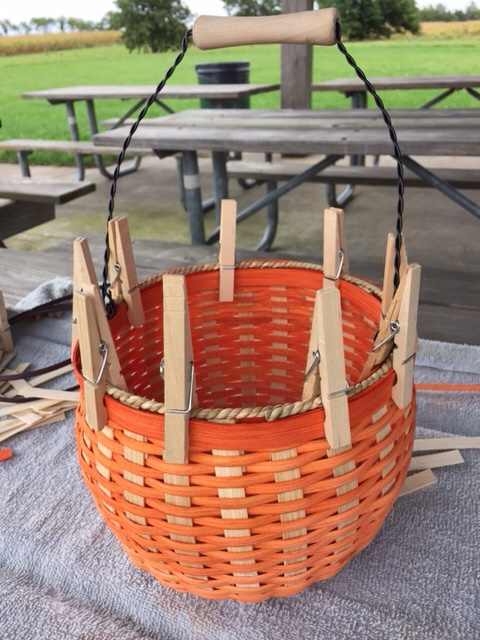
Saturday’s unseasonable temperatures made for a very chilly (end of the summer) basketmaking workshop. Wearing several long-sleeved layers didn’t do much to shield us from the brisk winds during this cool and breezy day. It was hard to imagine that the temperatures had climbed to nearly 100 degrees the weekend before. Despite the weather, we happily socialized as we worked beneath a shelter at a local county park. The item that we were to assemble was a cute round, (continuous weave structure); a pumpkin-shaped basket. Here are the steps that our incredible instructor took us through during this four-hour weekend event.
 Dividing the disk into 4 equal parts, place 23 spokes within the well of the disk; weaving while working in the spokes.
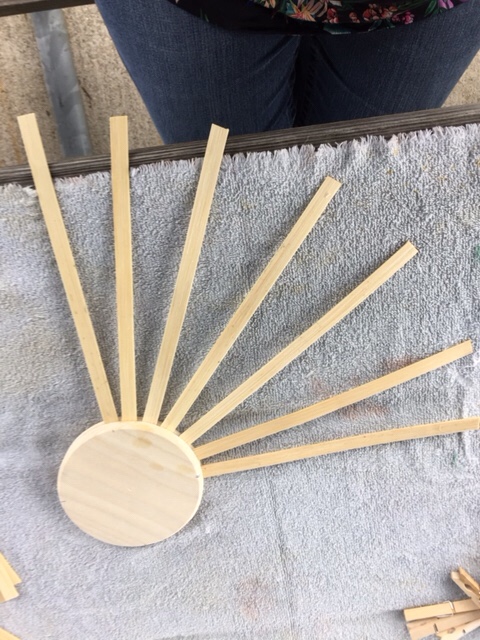

 After weaving 6 continuous rows, gently begin shaping the basket upwards. Continue weaving upward for 14 more rows; loosely weaving to shape the belly of the pumpkin.
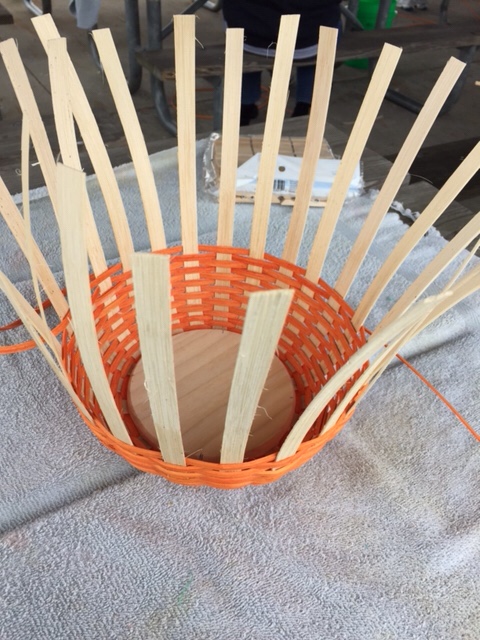

 At row 19 or 20 begin to tighten the weave to form the top of the pumpkin.
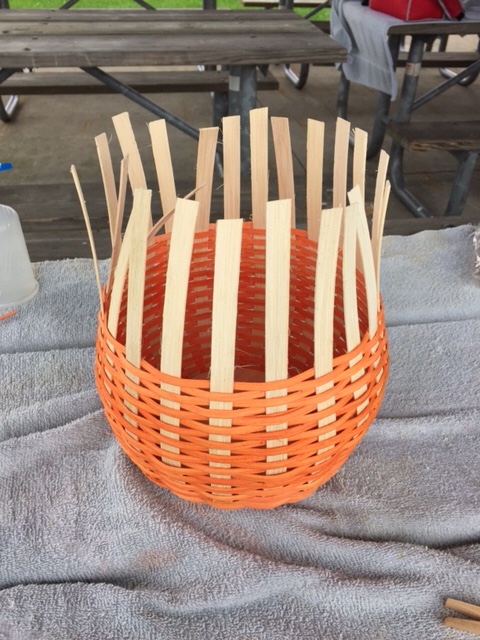
At row thirty, the weave is complete. Bend down, every other spoke. Clip; mark remaining spokes to bend under and secure under weave.
 Secure wire handle before finishing rim of the basket.
 Complete basket rim with sea grass and lashing.
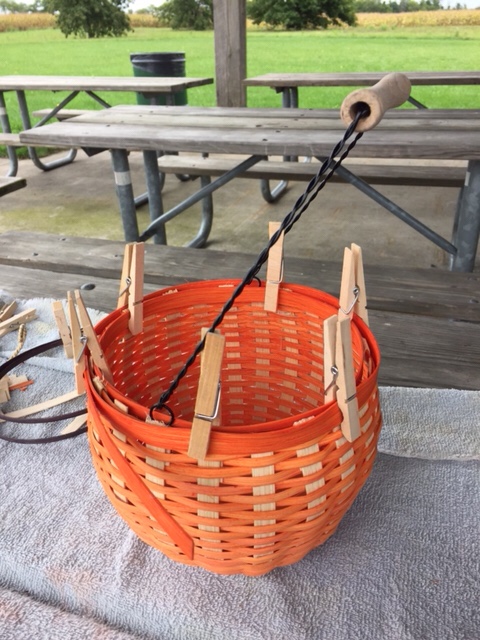
 We enjoyed a beautiful, but chilly, day at our local county park!


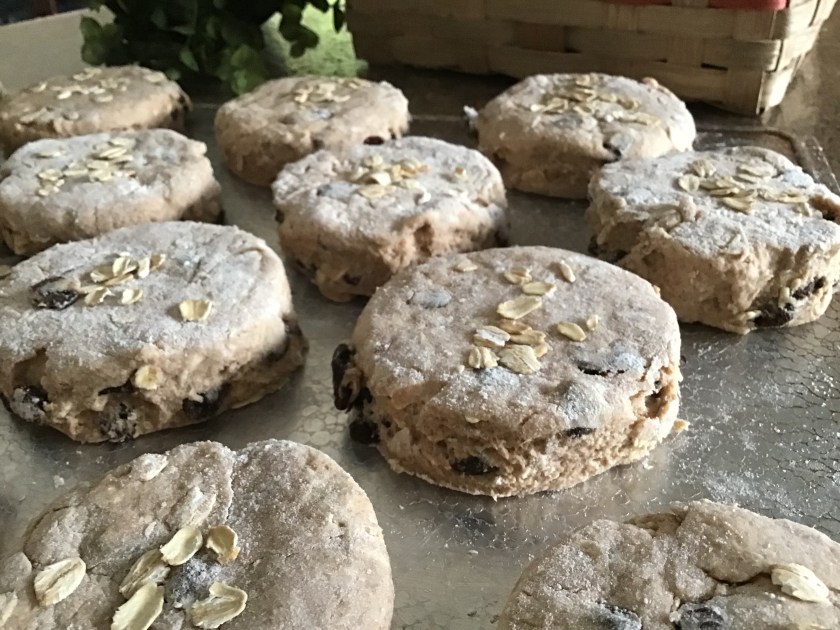
Hearty Irish Scones

I’ve been making scones since I was a little girl. My parents were born and raised in Ireland so making scones was a weekly event. During the Lenten season, scones were a definitive staple on the dining table. My father worked for Trans World Airlines so traveling back and forth to Ireland during our summer holiday was a yearly event. Watching my grandmother make bread/scones was always mesmerizing to me. She used a huge ceramic Mason Cash bowl, and mixed everything by hand. None of the ingredients were measured very carefully. She would pour leavening ingredients into the palm of her hand before throwing them into the mix. She used an old china teacup to measure flour for the mixture. The teacup would be placed back inside the bag of flour for future use. The flour that she used was of a course, whole wheat texture. The hearty aroma and flavor were like none other and can’t easily be duplicated with our traditional American flour selection. I’ve often thought of purchasing the flour from available on-line sources but I can’t justify the cost. Hence, I offer this recipe as an alternative. Is it exactly the same as the old country flavor? Well, no…. But, it’s a close second and my family enjoys the hearty flavor of these beautiful scones. Served with a heaping helping of butter and homemade jam, this recipe is a winner.
Hearty Irish Scones
2 1/2 cups whole-wheat flour
1 1/4 cup all-purpose flour
2/3 cup old fashioned oats + 1/4 cup for topping
4 teaspoons baking powder
1 teaspoon baking soda
1/4 cup brown sugar
1 teaspoon salt
10 Tablespoons (5/8 cups) butter or margarine
1 3/4 – 2 cups buttermilk
1 cup raisins
Preheat oven to 375 degrees. Sift together flours, baking powder, baking soda, brown sugar and salt. Stir in oatmeal. Cut in butter with your fingers or with a pastry blender. Add raisins and mix; then add buttermilk and mix/ kneed just until dough comes together. If dough is too wet, kneed in extra flour; just until dough becomes less sticky.
Transfer dough to a floured work surface and gently shape into a 1/2-inch thick rectangle. Cut either into 2-inch circles with a biscuit cutter. Transfer to baking sheet. Sprinkle tops with extra oatmeal; lightly pat oats into surface. Bake 15-18 minutes, until browned on the bottom. If desired, you can flip scones to bake 2 more minutes to further brown the bottoms. Let cool or serve warm.


Summer Night Pasta Salad

As I was preparing for a weekend get together with some out-of-town visitors, I picked up a tray of precut vegetables to serve with ranch dip for a poolside snack. The tray included an assortment of broccoli, cauliflower, carrots, and snow peas. While the vegetable tray was a big hit among our guests, having other sweet and delicious snacks left me with a few extra vegetables when it was time to clean up. …No worries, as I could always use the left overs for a big summer night pasta salad. In fact, using the precut veggies can really save time in the kitchen. Searching the fridge for other left over ingredients, here’s the impromptu recipe that I pulled together:
Summer Night Pasta Salad
1 pound fun-shaped pasta
2 tablespoons Italian seasoning (basil, oregano, sun dried tomato mix)
1 (16 ounce) bottle Marzetti Sweet Italian Dressing, or to taste
2 cups tomatoes, diced (sprinkled with a little salt, optional)
2 yellow bell pepper, chopped
1 cup chopped broccoli
1/2 cup chopped carrots, optional
6 ounces precooked summer sausage, chopped
1 cup mozzarella cheese
In a large pot of salted boiling water, cook pasta until al dente, rinse under cold water and drain. Whisk together the Italian seasoning and Italian dressing.
In a large salad bowl, combine the pasta, vegetables, and sausage. Pour dressing over salad; toss. Sprinkle with mozzarella and refrigerate overnight.

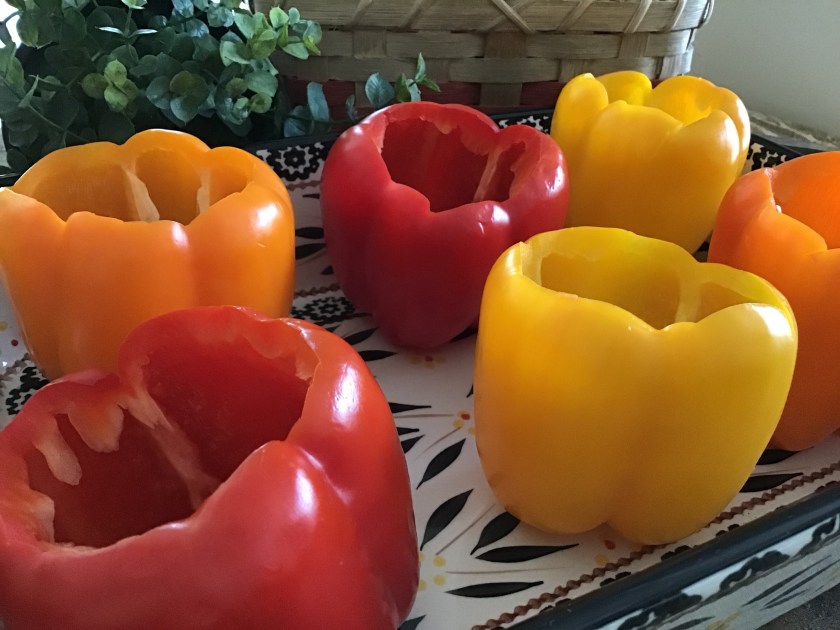
Colorful Stuffed Peppers

While gathering produce during my weekly shopping trip, I noticed an abundance of beautifully colored bell peppers piled high in the sale bin as I entered the store. I realized that it had been a very long time since I had made stuffed peppers so I went through a mental checklist of all of the ingredients I would need to make the dish for our Saturday night meal. When picking peppers for this recipe, I was careful to select large, wide, flat-bottomed peppers that would sit nicely in my baking dish. As luck would have it, ground beef was also on sale, so I purchased several pounds of the 93/7% mixture. I love to stock up on versatile meat options, bring them home and divide them into meal-sized portions for the freezer. This allows me to have plenty on-hand, when needed. Here’s how I divided things up:
2 lbs kept for the stuffed peppers
2 lbs were made into hearty hamburger patties, placed in freezer safe container
2 lbs were mixed with ingredients to make 2 meatloaf bricks and wrapped in foil
2 lbs were used to make simple chili without beans, packed into freezer safe bags
(I usually add beans to the chili meat once I reheat later.)
Carefully labeling everything, I used a permanent marker to date and identify the items enclosed. I also bought several pounds of fresh, boneless, skinless chicken for other future meals. I divided each large family pack into 4 freezer bags with 4 chicken breasts in each.
I always feel so accomplished when I have a productive day assembling meals that can be cooked with very little effort during the busy week. These delicious peppers were gobbled up quickly with a few left over for weekday lunches.
I’m ready to relax and enjoy the rest of the weekend!
Colorful Stuffed Peppers
6-8 large bell peppers
2 lbs ground beef
1 tsp Italian seasoning
1 teaspoon onion powder
1 teaspoon garlic powder
1 (28 ounce) can diced tomatoes, undrained
1 (5.6 ounce) package Knorr seasoned rice and pasta blend (chicken or beef flavor)
1 1/2 cups of water
1/2 cup sharp cheddar cheese
Preheat oven to 350 degrees. Remove and discard the tops, seeds, and membranes of the bell peppers; set aside.
In a large skillet over medium heat, cook the beef until evenly browned; drain. Mix in Italian seasoning, onion powder, garlic powder, diced tomatoes (with juice), seasoned rice package and 1 1/2 cups of water. Bring to a boil; cover and reduce heat to a simmer for 20-25 minutes to cook rice. Remove lid, turn off heat and let cool slightly. Spoon equal amounts of the mixture into each hollowed pepper.
Fill a 13X9” baking dish with about 2”of water. Arrange peppers in a baking dish with the hollowed sides facing upward. Tightly cover dish with aluminum foil. Bake 35-40 minutes in the preheated oven, or until the peppers are slightly tender. Remove from oven, uncover and sprinkle each pepper with sharp cheddar cheese before serving.

Strawberry Fruit Leather

When strawberries are in season, I usually try to make several batches of fruit leather for my family. Rolling strawberry fruit leather on wax paper strips makes for a delicious, nutritious, summer treat.
On my daily drive home from work, I pass a local strawberry farm so I usually stop by to pick up a few buckets of fresh berries. There are lots of recipes for fruit leather, many encourage the addition of sugar and lemon juice. For me, I’d rather find the sweetest, freshest berries possible, pulse them in a blender, and pour them into trays to dehydrate. Simple and sweet, a pure delight. Here’s what I do…
Start with sweet fresh berries… Mine are freshly picked

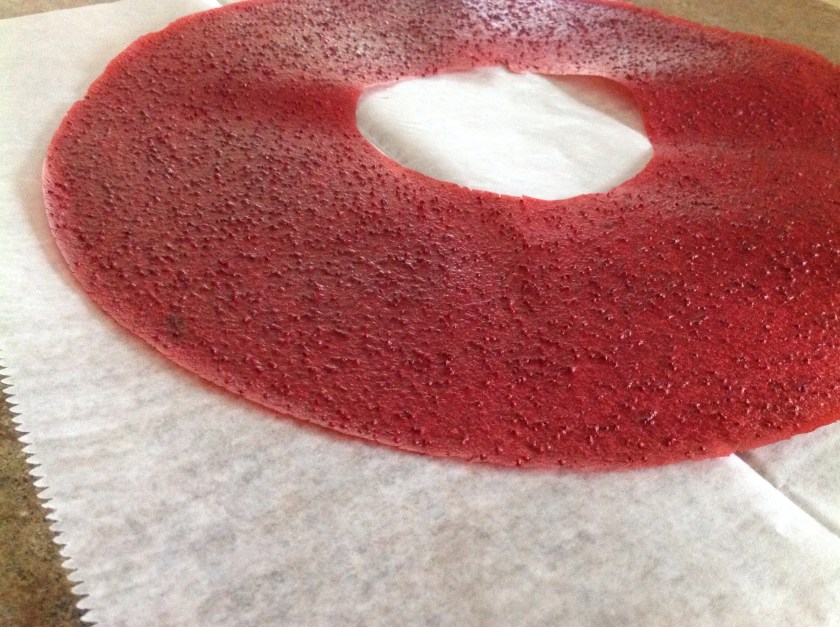
Puree 6 cups of fruit and evenly pour onto fruit leather dehydrator sheets.

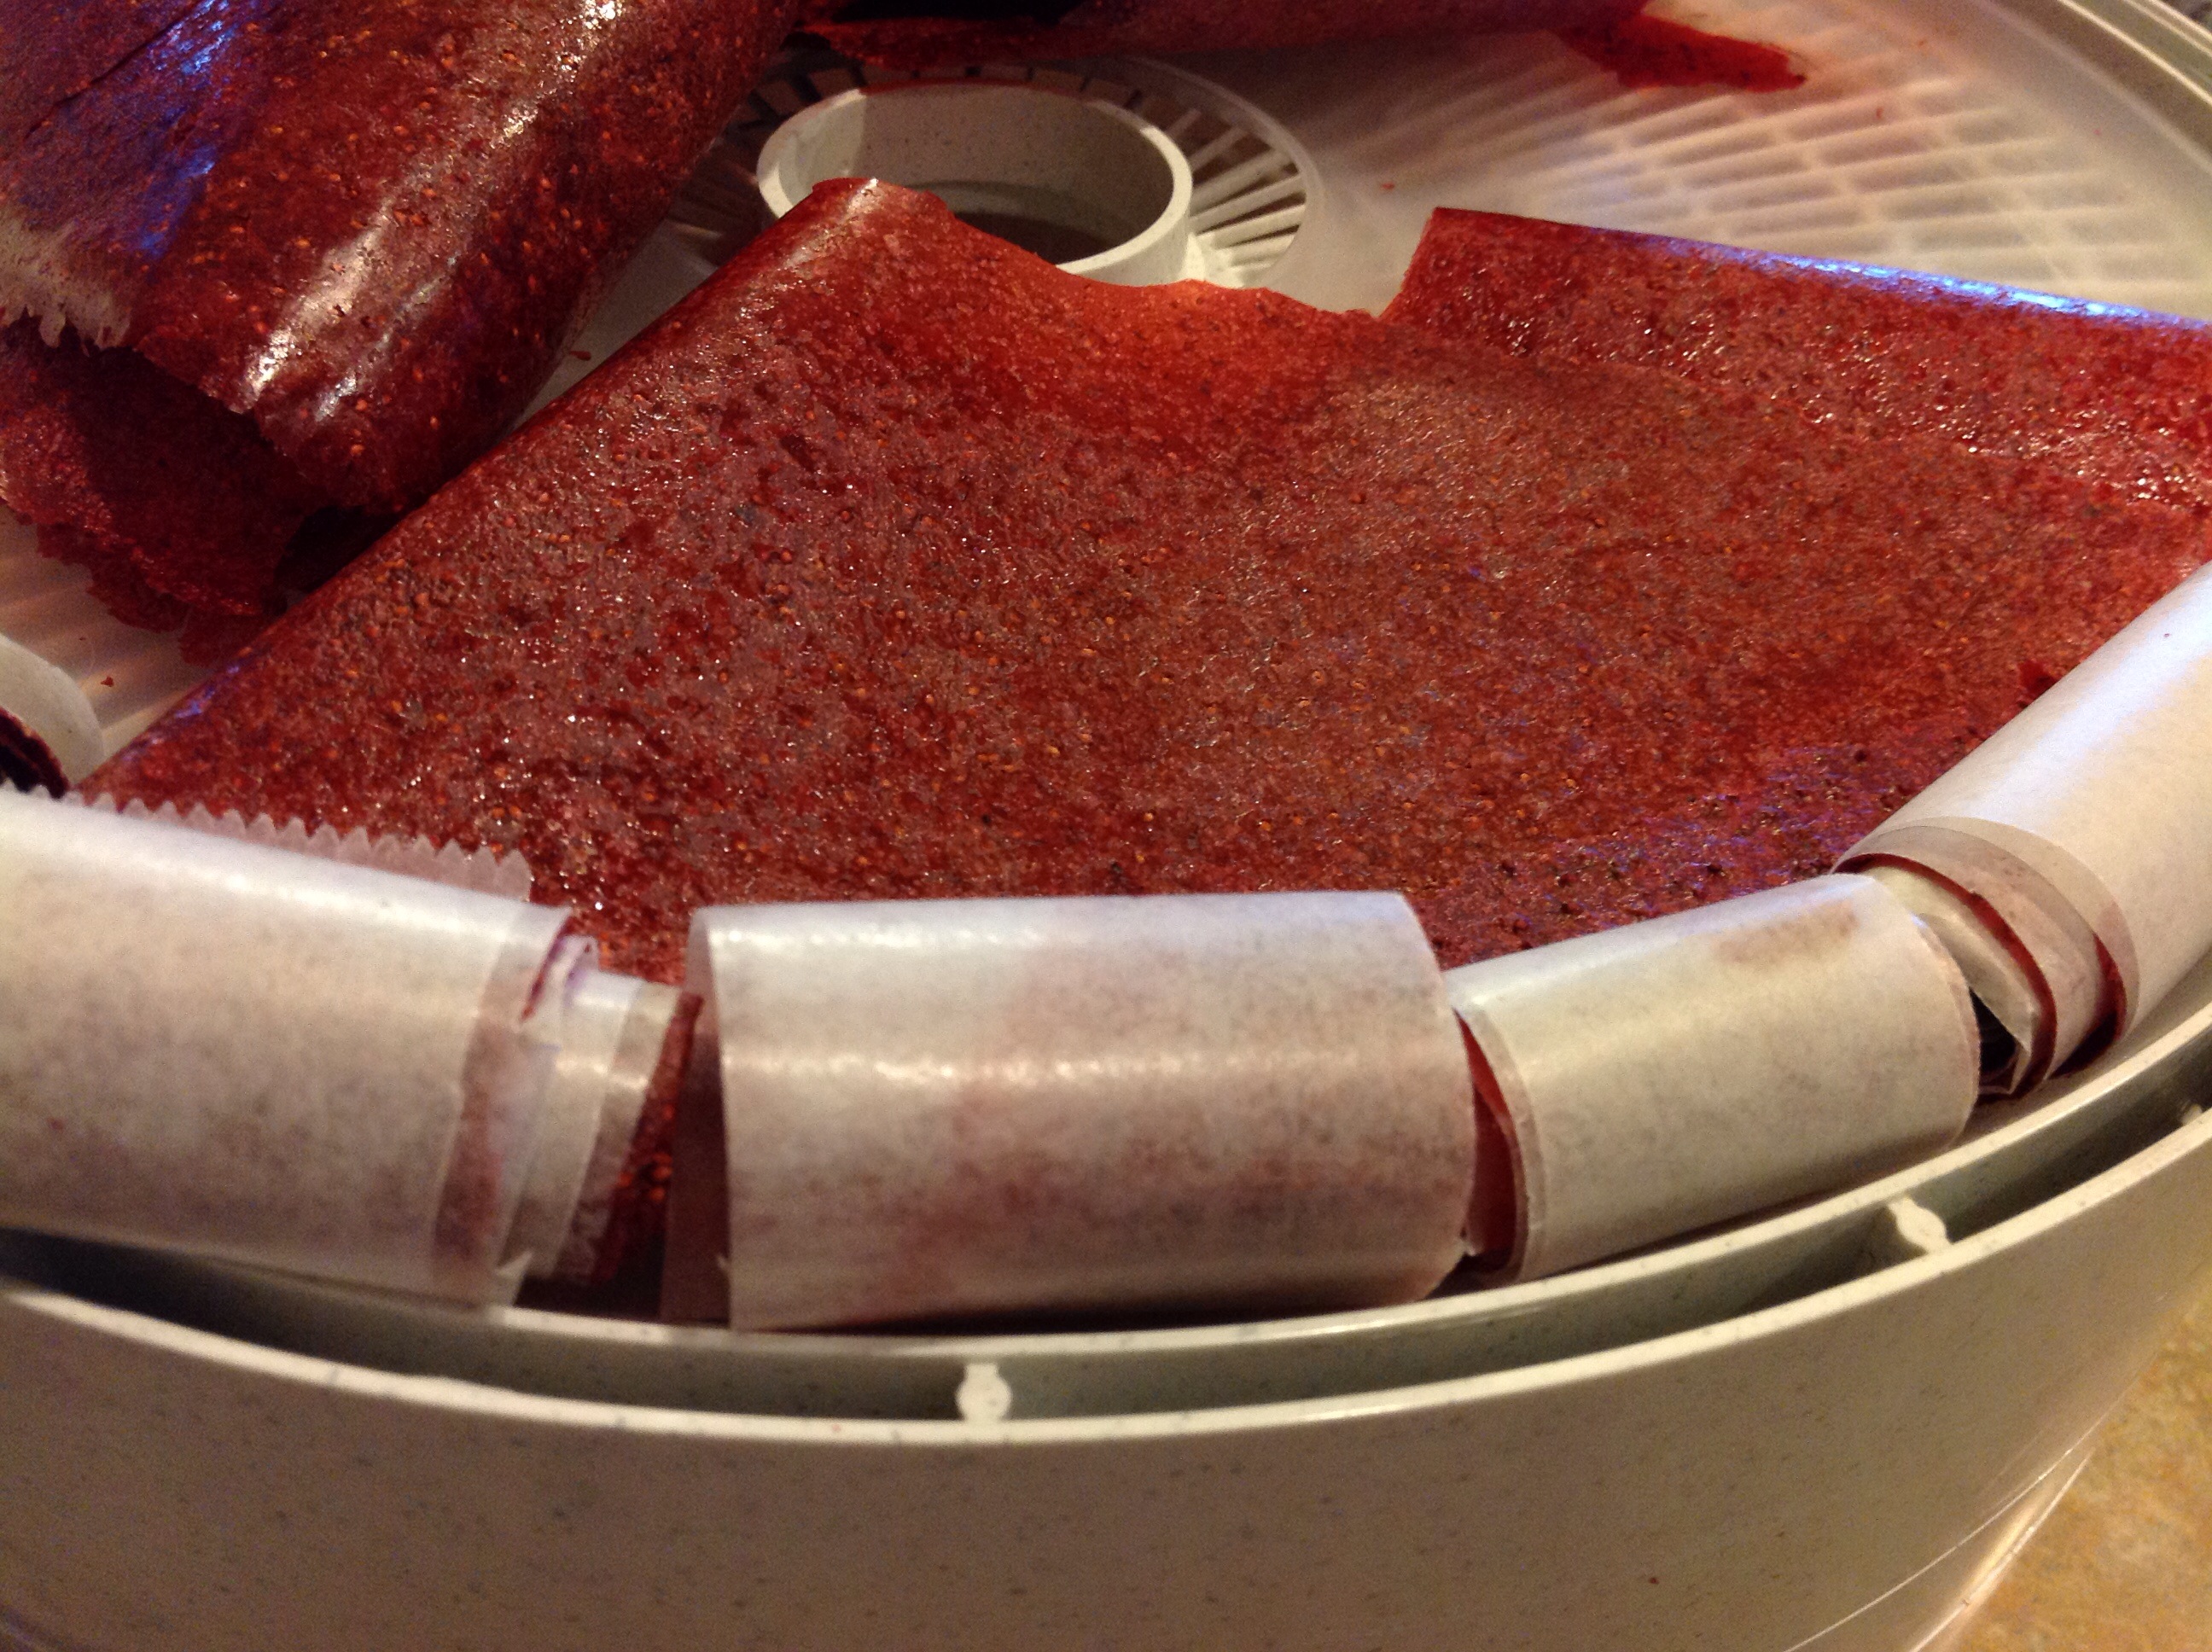
 Dry at 135 degrees for 4-8 hours. Using your finger, press to make a small indentation in the fruit leather. It should not be wet or sticky. It should be tacky. Check in a few areas around the fruit leather disk. Peel the disk off of the silicone sheet while still warm. Lay on a sheet of waxed paper.
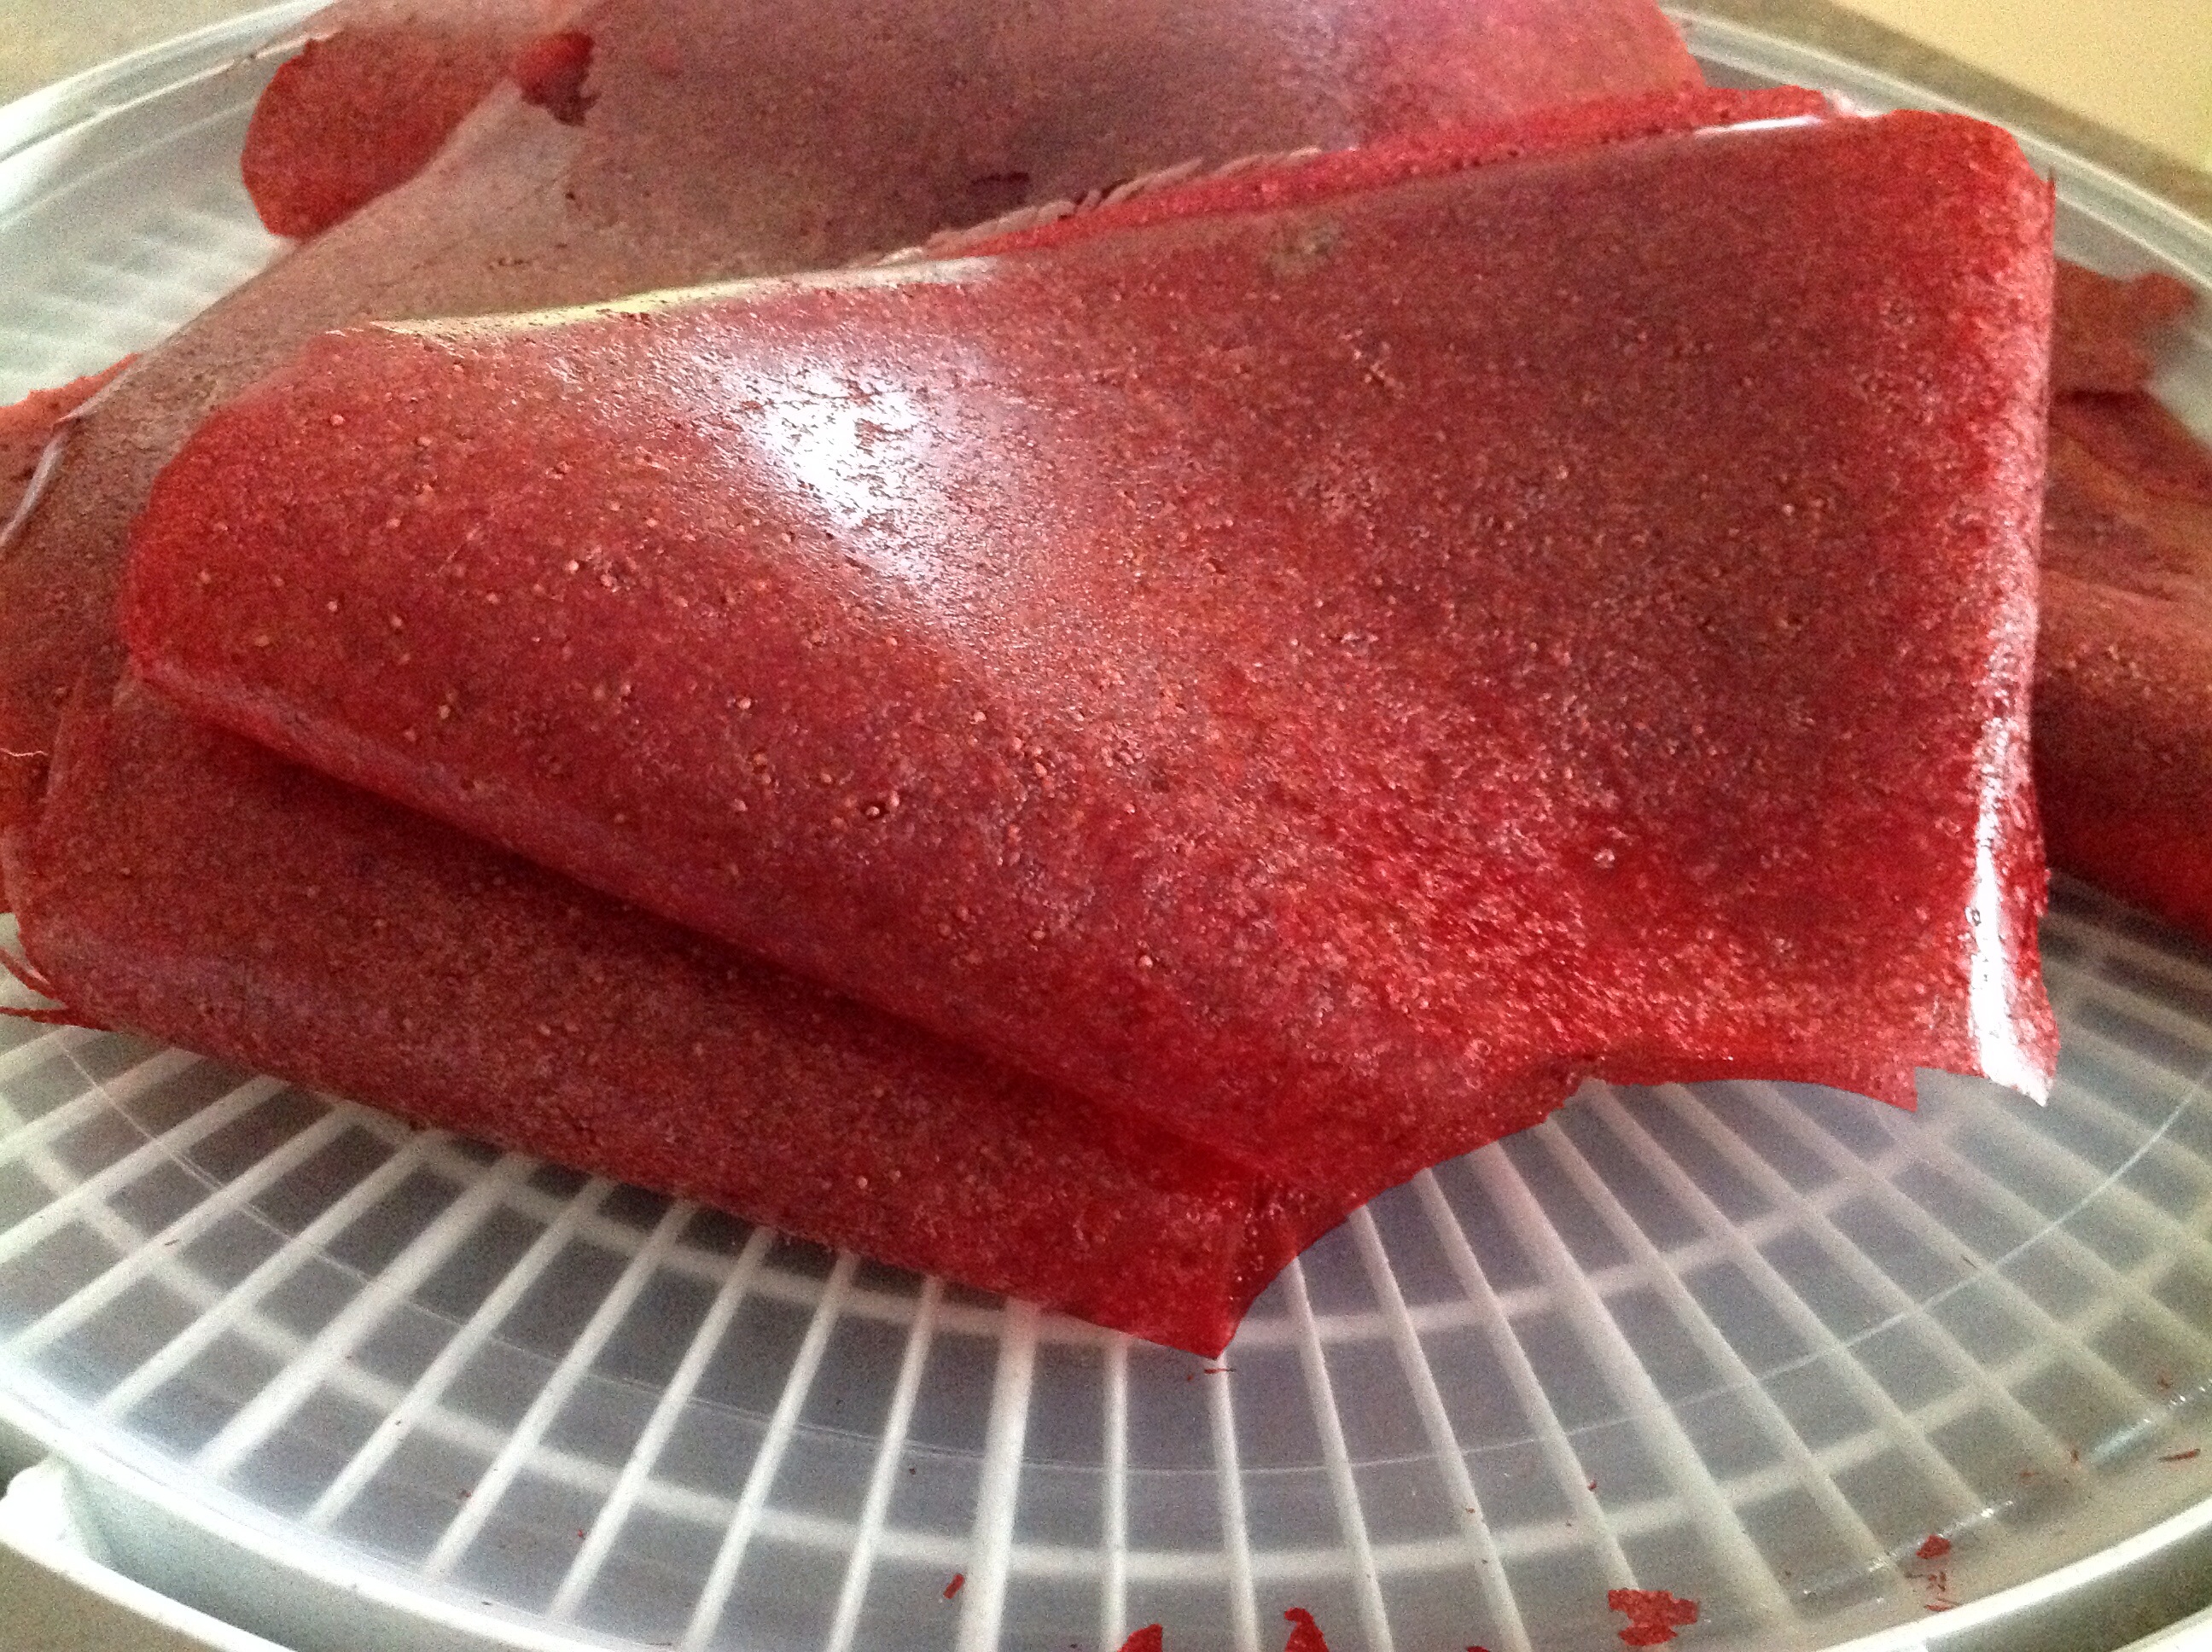

Using a scissors, cut into strips and roll up tightly. Store in a lidded container in a cool, dry place.


Make plenty because they disappear fast!
————————–
While I used 6 cups of strawberries, here are a few adapted recipes recommended by Nesco Dehydrators:
3 cups applesauce
3 cups strawberries
Or, try mixing:
2 cups applesauce
2 cups bananas
In a blender, puree all ingredients. Pour onto Solid Fruit Roll Sheets.
Place on dehydrator trays. Dry at 135º F for 4 to 8 hours, or until leathery.
Remove from sheets while still warm. Let cool, slice and wrap.
Roll and store in dark, dry, cool place or in freezer.

Of course, It’s always fun to make a very berry smoothly with the leftover purée.
