Posted in Canning, Gardening, Home Food Preservation

Fresh from the Garden Refrigerator Pickles

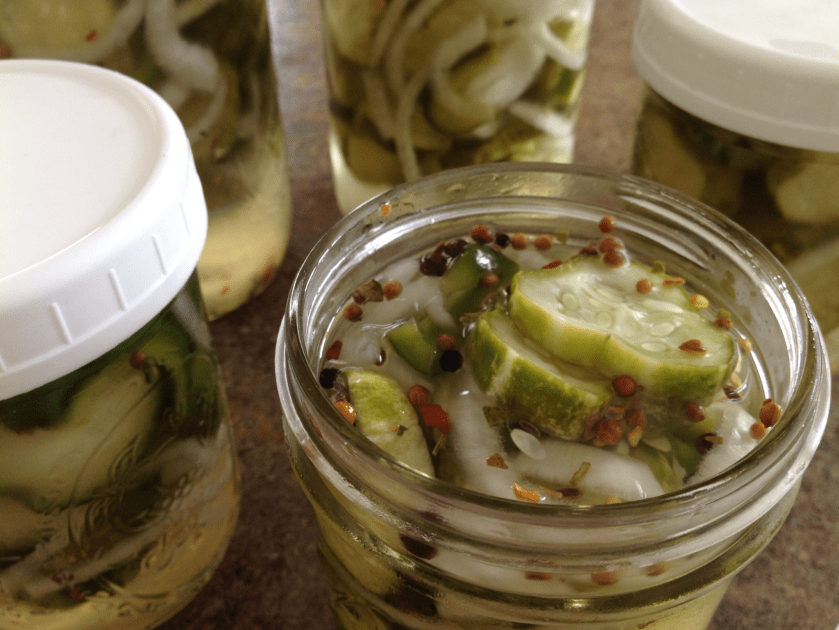
I was pleasantly surprised this week when a co-worker brought in a big bag of freshly picked pickling cucumbers and plopped them on the break room table.  She announced that the cucumbers were from her father’s garden and that anyone was welcome to take as many as they liked.  Straight away, I scooped up a good majority of the pickles and packed them away for one of my favorite summer projects.  When I returned home from work that evening, I began the task at hand, slicing the veggies for my refreshing refrigerator pickles.  

This recipe yields several jars of a delicious, crunchy, sweet condiment.  Use a variety of green, red, or yellow  peppers to add a bit of color to the mix.  You will love the ease at which this recipe comes together (ridiculously easy). More importantly, you will love the taste of these refreshingly delicious refrigerator pickles!


Fresh from the Garden Refrigerator Pickles

1 cup distilled white vinegar

1 tablespoon salt

1 1/2 cups white sugar

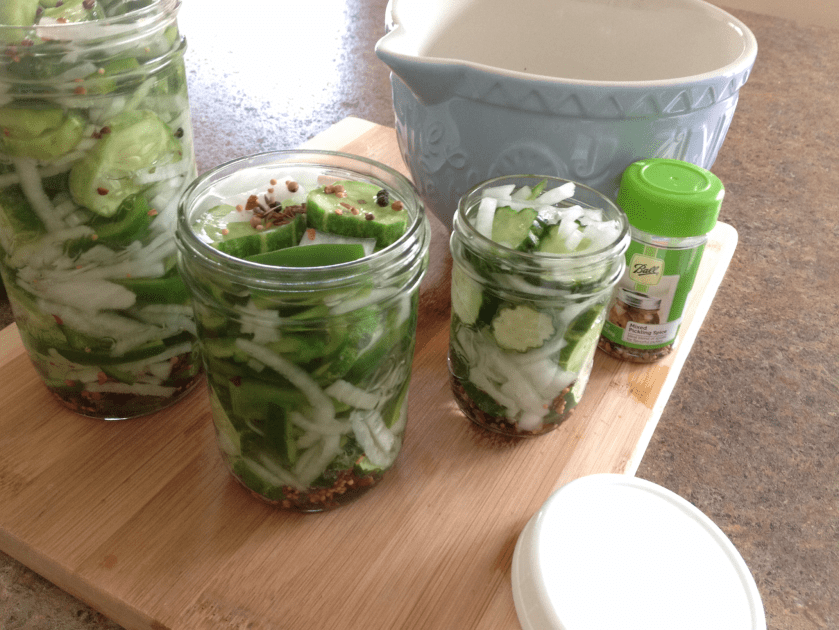
1/4 cup mixed pickling spice

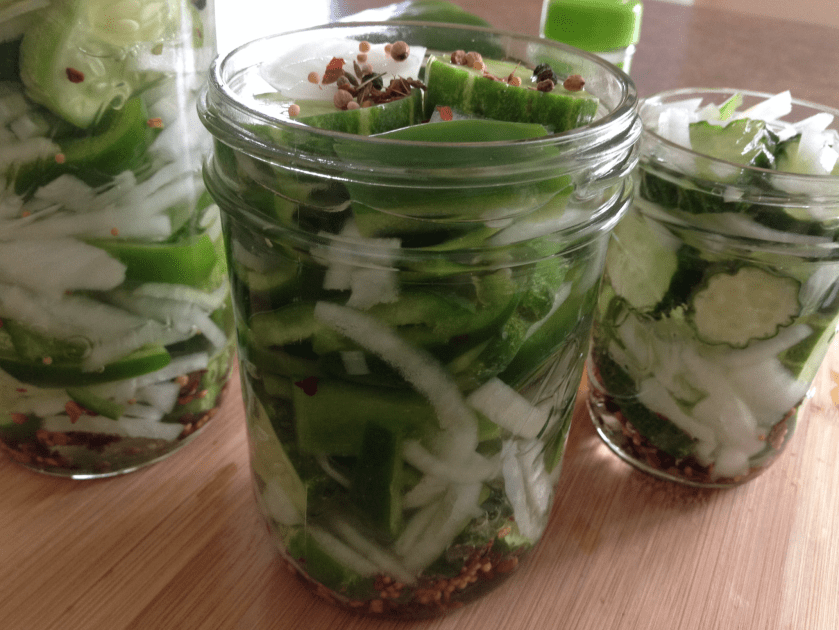
6 cups sliced pickling cucumbers

1 cup sliced onions

1 cup sliced green bell peppers

In a medium saucepan, bring vinegar, salt and sugar to a boil. Simmer until the sugar has dissolved, 5-10 minutes. Meanwhile, drop a teaspoon of pickling spices into the bottom of each sterilized canning jar.  

Tightly pack the mixture of cucumbers, onions and green bell peppers into jars. Pour the vinegar mixture over the vegetables, covering vegetables completely.  Twist on lids and store in the refrigerator for three days before serving.


Posted in Baked goods, Baking, breakfast, Brunch

Morning Glory Baked Oatmeal II


While watching a local PBS cooking show last Saturday afternoon, I was captivated by a recipe that was shared by Ellie Krieger.  After further investigation, a web search disclosed that the original recipe was actually written by an author working for the Washington Post. I quickly printed the recipe and looked forward to baking the dish this weekend.  My children would be traveling back from college for a quick visit and I was anxious to assemble the baked oatmeal for Saturday breakfast.  I doubled and adjusted the original recipe as I wanted to send back to school with my daughter a portion of the dish to be warmed up for weekday meals.  

This recipe did not disappoint.  On my goodness, it is absolutely delicious! While I changed up the recipe quite a bit, here is the link for the original recipe.  https://www.washingtonpost.com/pb/recipes/morning-glory-baked-oatmeal/15077/

My recipe is posted below…


Morning Glory Baked Oatmeal II

1 1/2 cups chopped pecans

2 teaspoons ground cinnamon

2 tablespoons light brown sugar

Pinch of salt

4 1/2 cups old-fashioned oats 

2 teaspoons baking powder

4 cups unsweetened almond milk

2/3 cup pure maple syrup

2 large egg

4 tablespoons canola oil

3 teaspoons pure vanilla extract

2 cups apples, cored and diced  

2 cups carrots, shredded 

1 cup raisins

Preheat the oven to 350 degrees. Grease a 13X9″ baking dish with cooking spray.

Mix together the pecans, cinnamon, the brown sugar and a pinch of salt in a medium bowl.

In a large bowl, stir together the oats, baking powder. Whisk together the milk, maple syrup, egg, oil and vanilla extract in a liquid measuring cup. Pour the milk mixture over the oat mixture, stirring to combine, then mix in the apple, carrots and raisins.

Pour into the prepared baking dish. Top with the pecan and brown sugar mixture.  Bake for 50-60 minutes or until golden at the edges and just set at the center. Serve warm.

Adapted from a recipe first posted by Deb Lindsey for The Washington Post

Posted in Baked goods, Baking, Dinner, Food, Grilling

Queso Blanco Chicken and Salsa

On a recent Saturday outing, my family and I stumbled upon a quaint new restaurant in the middle of our town square featuring Mexican cuisine.  As we were seated in the festive dining room, a heaping basket of freshly made chips and salsa was delivered to the table.  Looking over the extensive menu, I was excited to find a chicken dish that seemed fresh and flavorful with simple ingredients.  I immediately requested the dish and continued to munch on the crispy chips and spicy salsa while listening to the sounds of the lively Mexican music streaming through the sound system.  

As we waited for our meal to arrive, we chatted about our desire to visit a local farmer’s market to find lots of fresh produce to make our own salsa when returning home for the day.  

Alas, our meals arrived and as the waitress placed the scrumptious looking dish in front of me, I realized how simple it would be for me to replicate the flavors at home and quickly made a note of all of the items on the plate.  After a lovely meal, we headed out to the farmer’s market located a few short blocks through the town square. We enjoyed a lovely walk through the bustling scene teaming with a variety of fresh vegetables and quickly scooped up the ingredients needed to replicate my chicken dish.  This is how I assembled my own version of the delicious meal…

Queso Blanco Chicken and Salsa

6 chicken breasts

1 teaspoon salt

1/2 teaspoon pepper

1 teaspoon garlic powder

1 (15 oz.) jar Queso Blanco Dip

1 1/2 cups Fresh (or store bought) Chunky Salsa (see recipe below)

6 ears corn, shucked and cleaned

2 avocado, sliced

Season chicken breasts with salt, pepper, and garlic powder.  Bake or grill for 30-45 minutes or until internal temperature reaches 165 degrees.  In the meantime, place ears of corn on outdoor grill or indoor grilling skillet, roast until tender.  Slice corn off of the cob.  Season to taste with butter and salt, if desired.  In a microwave safe bowl, heat Queso Blanco Dip until warm and pourable.  To serve, place a chicken breast on each plate, drizzle with Queso Blanco Dip and garnish with fresh cilantro. Next,  add to the plate, a couple of heaping spoons of roasted corn, fresh salsa, and slices of avocado.  Simple and delicious!

Homemade Chunky Salsa

2 cups ripe plum tomatoes, diced 

1/4 cup white onion, chopped

3 tablespoons fresh cilantro, finely chopped

1 1/2 teaspoons lime juice, bottled or fresh

3/4 teaspoon kosher salt (or to taste)

1 small garlic clove, minced

Combine all the ingredients in a bowl.  Cover tightly and refrigerate before serving.


Posted in Baked goods, Baking, breakfast, Desserts

Oatmeal Snack Cake

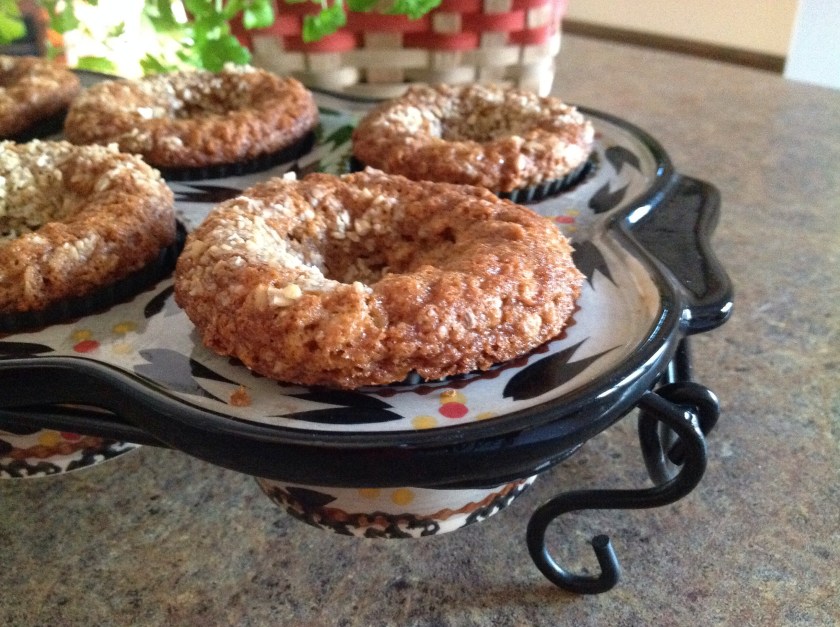
 There are very few recipes that I bake where I don’t use oatmeal as an ingredient in some form or another.  I often stir a handful of oatmeal into the batter for cakes, cookies, and muffins.  Or, I might sprinkle oats over the top of the batter just before popping pans into the oven.  I even stir oats into my ground beef when making meatloaf, hamburgers, or meatballs.  I’m a big fan of the flavor, texture, and health benefit that oats can bring to many recipes. 

This Oatmeal Snack Cake is chocked full of flavor and is great with a cup of coffee, packed in the lunchbox for a mid-day treat, or served with a scoop of ice cream after an evening meal.  The sweet glaze drizzled over the top of the cake is optional but it dresses things up a bit.  Mostly, I just bake the recipe the way it’s written, slice it after cooling, pack it into a Tupperware container,  and wait for it to disappear.  


Oatmeal Snack Cake

1 1⁄4 cups boiling water

1 cup old fashioned oats

3/4 cup sugar

3/4 cup brown sugar

1/2 cup canola oil

2 eggs, slightly beaten

1 1⁄3 cups flour

1 teaspoon  ground cinnamon

1 teaspoon  baking soda

1/2 teaspoon salt

1 teaspoon  vanilla

1/2 cup raisins

1/2 cups walnuts, chopped

Preheat oven to 350 degrees.  Grease a 13X9″ baking pan, set aside.  

Pour boiling water over dry oatmeal; set aside for 5-10 minutes. Meanwhile, in a medium bowl, mix the flour, soda, cinnamon, and salt.  In a separate mixing bowl, combine sugars and oil until well blended. Add eggs, vanilla, and cooled oatmeal, mix thoroughly.  Add dry ingredients to wet ingredients.  Stir in raisins and nuts.  Pour into prepared baking pan.  Bake for 30-40 minutes. Cool completely before slicing. Drizzle with icing or sprinkle with powdered sugar, if desired.

Posted in Beef, Dinner, Uncategorized

Beef Salami

We recently had a substantial amount of local beef delivered to our home. One of my colleagues owns a beef ranch and I decided to try the product that so many often rave about.  The delivery came with a selection of cuts including various roasts, steaks, and ground beef.  As I looked at all of the individually wrapped beef packages, I was reminded of a recipe that I first spotted in a community cookbook that I’m fond of.  It’s an ole’ time recipe for homemade beef salami and the ingredients are few and common.  I substituted Lawry’s seasoning salt for the “tender quick salt” just because I didn’t have any on hand.  The beef salami turned out just fine.


As the holiday weekend approaches, I thought this might be a fun recipe to try as I’m often assembling plates of appetizers when friends stop by and the kids open the fridge constantly looking for something to munch on.


Posted in Baked goods, Baking, Bread, breakfast, Brunch, Casserole

Pumpkin Cobbler Spiced Bread Pudding

I often visit a local discount bread store during my lunch hour.  The outlet carries nearly expired items that I use for stuffing, meatloaf, and bread pudding recipes.

Recently, I spied a few loaves of Pumpkin Cobbler bread on the “reduced shelf” and quickly loaded the loaves into my cart.  After arriving home, I promptly froze the bread to have on hand for a quick Saturday morning bread pudding bake made with scrumptious cubes of pumpkin spiced loaves.  The crunchy streusel-like topping puts this breakfast treat over the top.  I drizzle a teaspoon of our delicious homemade maple syrup over the top of a warm slice for a bit of added sweetness.


Pumpkin Cobbler Spiced Bread Pudding

5 eggs, beaten

1 1/2 cups sugar

2 cups milk

2 teaspoons vanilla extract

3 cups pumpkin cobbler or cinnamon swirl bread, cubed

1/2 cup brown sugar, packed

1/4 cup cold butter, sliced into small cubes

1 cup pecans or walnuts, chopped

Preheat oven to 350 degrees.  Grease or spray with cooking spray, a 13 X 9″ pan. 

In a medium bowl, mix together eggs, sugar, milk, and vanilla. Place cubed bread in a large bowl and pour egg mixture over the top; gently mix and let sit for 10 minutes.  Pour bread mixture into prepared pan. Sprinkle brown sugar and pecans over the top; dot with butter.   Bake for 35 to 45 minutes, or until set. 

If desired, drizzle with maple or vanilla syrup.  Serve warm.


Posted in Baked goods, Baking, Syrup

Homemade Maple Syrup Muffins

This year we decided to try our hand at tapping the maple trees on our property so that we could make our own maple syrup.  Last fall, just before the leaves fell from the trees on our wooded lot, we marked trees that we had identified as maple trees.  After a long hard winter, as the overnight temperatures dipped below 30 degrees and the daytime temperatures climbed above this mark, we tapped the trees so that a clear syrupy liquid (sap) would flow down the trunk of the trees into our collection buckets.  We were surprised to find that this process was really quite quick and our buckets were filled within the first couple of hours.  Next, we boiled down the syrup until it was golden and met the temperature standard for just the right consistency.  


This morning, I made a batch of Oat and Maple Muffins using our very own, utterly delicious maple syrup.  I’m so happy we decided to try the maple syrup making process and I look forward to doing it again next year!

Oat and Maple Muffins 

1/2 cup canola oil

1/2 cup dark brown sugar

1/2 cup real maple syrup

1 egg

1 teaspoon vanilla extract

1/2 cup milk

 1 cup flour

1 cup old fashioned oats

2 teaspoons baking powder

1 teaspoon baking soda

1 teaspoon salt

1 teaspoon ground cinnamon

1/2 cup chopped walnuts

Preheat oven to 350 degrees. Grease muffin cups or use paper muffin liners.  In a large bowl, mix together oil and brown sugar. Beat in maple syrup, egg, milk and vanilla.  In a separate bowl, stir together flour, oats, baking powder, baking soda, salt and cinnamon. Stir flour mixture into egg mixture just long enough to incorporate. Fold in chopped walnuts. Spoon batter into prepared muffin cups.  Bake for 20 – 25 minutes. Remove from pans and place on a wire rack to cool before serving.

Posted in Baked goods, Baking, Cake

Banana Streusel Swirl Cake

  The grocery store was packed with holiday shoppers yesterday.  The warm sun and mild temperatures brought people out in light jackets and cropped pants.  I’m so happy that Spring has arrived in our part of the world.  

Like many of you, I’ve been baking goodies for the Easter weekend.  The local grocer had a huge display of overly ripened bananas on hand so I picked a decent selection of fruit and carted it home with me.  I headed to my trusty file to find one of my spring-time favorites. This scrumptious Banana Streusel Swirl Cake is absolutely delicious. I hope you have a chance enjoy this crunchy, sweet, delicate cake made with pecans, cinnamon, mashed bananas, and a convenient cake mix.  Happy Easter, Everyone!

Banana Streusel Swirl Cake

Streusel:

1/2 cup chopped pecans

1/3 cup brown sugar, packed

1 teaspoon cinnamon

1/2 teaspoon nutmeg

Cake:
1 package Yellow, Spice or Banana Cake Mix 

1 package vanilla instant pudding mix

4 eggs, slightly beaten

3-4 medium ripe bananas, mashed

1/3 cup canola oil

1/4 cup water

Preheat over to 350 degrees.  Grease a 10″ bundt pan.  
For the streusel: combine all 4 ingredients and stir well.  Set aside.

For the cake:  combine all 6 ingredients and mix by hand or with a mixer for 2 minutes.  Batter should be thick and well combined.

Pour half the batter into bundt pan.  Sprinkle streusel over batter.  Spread remaining batter over streusel. Gently swirl the batter with a butter knife in a circular motion.  Bake for 50-55 minutes or until toothpick inserted in the center of the cake comes out clean.  Cool for 25 minutes.  Loosen sides of cake from pan and invert on a cake plate. If desired, frost with glaze and sprinkle with chopped pecans.


Posted in Baked goods, Baking, Casserole, Food, Low Carb

Low-Carb Taco Casserole

While most households were gobbling up lots of carb-laden snacks and appetizers this past Sunday, we watched the Super Bowl while munching on this delightful Low-Carb Taco Casserole.  I used to make this recipe without the added Doritos chips but I find the crust to be a bit more crunchy and a lot less low-carb tasting… just by added 3 little chips to the mix.  I looked up the  nutritional facts for Doritos and calculated that 11 chips equal 16 grams of carbohydrates so you can do the math to figure how many carbs exist in just 3 crumbled chips. Boy, those chips add a world of difference to the crust.  You be the judge…  It’s totally up to you if you’d like to omit the chips.  …Hope you enjoy this simple recipe that’s packed with flavor!

Low-Carb Taco Bake

For the crust:
4 ounces cream cheese, softened

3 eggs

1/3 cup half & half

1/2 package taco seasoning mix

8 ounces cheddar cheese, shredded

3 Doritos chips, crumbled

For the topping:
1 lb. ground beef
1/2 package taco seasoning

1/4 cup tomato sauce

2 tablespoons green chilies, optional

1/2 cup tomato, diced

8 ounces cheddar cheese, shredded

Preheat oven to 375 degrees.  Grease a 9×13″ baking dish; set aside. 

To make the crust:  Beat the cream cheese and eggs until smooth.  Add the half & half and taco seasoning, mix well.  Spread the cheddar cheese over the bottom of the baking dish.  Spread the egg mixture evenly over the cheese. Sprinkle crumbled Doritos over egg mixture. Bake at 375ºF, 25-30 minutes or until golden brown on the edges.  Let stand 5 minutes.

To make the topping:  Reduce oven temperature to 350 degrees.  Brown the ground beef until no longer pink; drain thoroughly.  Stir in the taco seasoning, tomato sauce and chiles.  Spread over the crust.  Top with diced tomato and shredded cheese.  Bake for 20-25 minutes or until hot and bubbly. Cool slightly before cutting into serving-sized squares.

Posted in Bread, Dinner, Food, Pizza, Skillet Meal

Easy Skillet Pizza


I keep extra loaves of frozen pizza dough on hand for this Easy Skillet Pizza.  Using an old, well seasoned cast iron skillet is the secret to a crispy flavorful crust. Be creative and add your own vegetable favorites and toppings. Give this one a try… I think you’re family will love it. 

Easy Skillet Pizza

2 tablespoons extra-virgin olive oil

1 pound Italian sausage, browned and crumbled

1 pound fresh pizza dough or frozen bread dough, thawed and at room temperature

1 cup your favorite marinara sauce (or 1 1/2 cups crushed, strained San Marzano canned tomatoes)

3 cloves garlic, minced

1 teaspoon oregano

1/2 cups sliced red or green peppers, sliced (optional)

1/2 cup sliced pepperoni rounds (optional)

2 cups mozzarella cheese, shredded

1 tablespoon dried Italian seasonings

1/2 cup grated Parmesan

Preheat the oven to 400 degrees and grease the inside of a 12-inch cast-iron skillet with 2 tablespoons of olive oil.   Place the pizza dough in the center and spread evenly across the bottom edge and 1 1/2 inches up the sides. 

Spread sauce, garlic, and oregano over crust.  Sprinkle browned sausage evenly over the sauce.  Add desired fresh, sliced vegetables and pepperoni, if desired.   Next, add the mozzarella. Sprinkle the Italian seasonings on top. Finish with the Parmesan and drizzle with the remaining 2 tablespoons olive oil.


Place the skillet pizza on the bottom rack of the oven and cook until the edge of the crust is golden brown and crusty, 30 to 40 minutes. Remove and let rest for 5 minutes before serving.


Note: If the crust and toppings start to brown too quickly, cover with a piece of foil and continue baking until cooked through.

Enjoy!