Posted in Baked goods, Baking, Bread

Rosemary and Basil Herbed Flat Bread


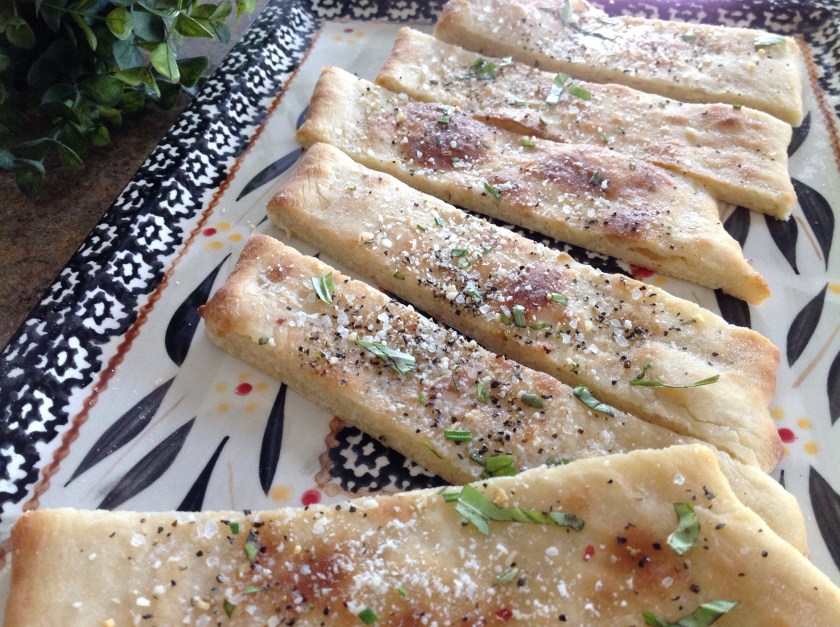
I usually make this bread during the late spring and summer months when fresh herbs are abundant and ready to be trimmed.  There’s no point in making this bread unless you have fresh herbs to incorporate into the batter and snip over the finished product.  As the bread toasts in the oven, the irresistible aroma of freshly cut basil and rosemary, garlic, and olive oil is like no other.  The combination of herbs and spices help to make this summer staple undeniably scrumptious! Often served with pasta and red sauce, cheese and grapes, or a lite summer salad… It’s crazy delicious!


Rosemary and Basil Herbed Flat Bread

1-3/4 cups all-purpose flour

1 tablespoon fresh rosemary, minced

1 tablespoon fresh basil, minced

1 teaspoon baking powder

3/4 teaspoon salt

1/2 cup water

1/2 cup olive oil

Sea salt, garlic powder, Italian seasoning mix, and fresh herbs (to sprinkle over the top of bread after baking)

Preheat oven to 450 degrees.  Lightly spray two baking sheets with cooking spray or line each sheet with parchment paper.  In a large bowl, combine the flour, herbs, baking powder and salt. Stir in water and 1/3 cup oil until mixture forms a soft dough. Turn onto a floured surface; knead for about 1 minute.

Divide dough in half; shape into two balls. Roll each ball into a thin oblong shape to fit on prepared baking sheet. Carefully transfer dough to prepared baking sheets.

Bake for 8-10 minutes or until golden brown. Remove from pan to a wire rack and  lightly brush each with remaining oil; sprinkle with salt and garlic powder, seasoning mix and fresh herbs. Slice for serving. 


Posted in Baking, Bread, breakfast

Pecan and Raisin Zucchini Quick Bread


As the end of the traditional Midwest growing season is well past it’s prime, local farmer’s markets are providing customers with an array of cool weather vegetables.  The unseasonably mild temperatures have helped zucchini, beets, and winter squash continue to grow.  

Last week a co-worker filled a basket with end-of-the-season zucchini that she had picked from her garden.  She placed the bountiful basket on the break room table to share with all.  I quickly scooped up an armful so that I could make a few batches of zucchini quick bread.  This is one of my favorite recipes.  It’s moist and flavorful with lots of texture provided by the crunchy pecans and sweet California raisins.  The recipe freezes well so I make quite a few loaves, wrap them and freeze them for gift giving or for a quick morning breakfast accompanied by a mug full of piping hot coffee.

Note: I sprinkle a tablespoon of wheat germ over each loaf before baking.  This gives the loaves a crunchy topping and a boost of fiber.

Pecan and Raisin Zucchini Quick Bread

2 cups sugar

1 1/4 cup canola oil

3 large eggs

2 teaspoons vanilla extract

3 1/2 cups all-purpose flour

1 teaspoon salt

1 teaspoon baking soda

1 teaspoon ground cinnamon

1 teaspoon pumpkin pie spice

1/4 teaspoon baking powder

2 1/2 cups shredded zucchini 

1 cup chopped pecans or walnuts

3/4 cup raisins

Optional Topping: 

2 tablespoons wheat germ

Preheat oven to 350°. Grease two 9×5″ loaf pans. In a large bowl, beat sugar, oil, eggs and vanilla until well blended. In another bowl, whisk flour, salt, baking soda, cinnamon, pumpkin pie spice and baking powder; gradually beat into sugar mixture, mixing just until moistened. Stir in zucchini, pecans and raisins.

Transfer to prepared pans. Sprinkle each loaf with 1 tablespoon of wheat germ (optional).  Bake 55-65 minutes or until a toothpick inserted in center comes out clean. Cool 10 minutes before removing from pans to wire racks to cool. 

Posted in Baked goods, Baking, Cake, Desserts

Easy Blueberry Upside Down Cake


This time of year, there are plenty of local blueberry farms lining the county roads throughout the Midwest.  In early July, rustic hand painted signs announce the arrival of a new blueberry crop at many of these farms.  Last Sunday, I stopped at one such farm to gather a supply of fresh fruits and vegetables.  To my surprise, there were “slim pickings” available for sale. The unprecedented soggy, Midwest rains and cooler summer temperatures have made a bit of a mesh of things.  When I asked if they had any blueberries for sale, the owner expressed her disappointment as she said the crop was a bit overripe and the berries seemed uncharacteristically  soft.  I usually bring home a 25 pounds box, but instead, I purchased only two pints.  Hopefully, I can visit another stand with a bit more success.

For a quick summer treat, I assembled this incredibly easy recipe that is sure to tantalize your taste buds.  It’s much like a traditional upside down cake that usually includes pineapple.  Instead, a few cups of berries are used to top the tender butter cake.  I hope you’ll give this simple recipe a try. It seems the flavor grows as the cake sits for a bit.

Easy Blueberry Upside Down Cake

1/4 cup butter, melted

1/2 cup brown sugar

2 cups fresh blueberries

1 package yellow or butter cake mix + recipe eggs, oil, and water

1 teaspoon almond extract

Coat the bottom of a 13×9″ baking dish with butter; sprinkle with brown sugar and blueberries. Prepare cake batter according to package directions.  Add almond extract, mix well.  Evenly spread the batter over the blueberries.

Bake at 350° for 40-45 minutes or until a toothpick inserted near the center comes out clean. Cool for 10 minutes on a wire rack. Invert onto a serving plate. If desired, serve warm with ice cream.  

Posted in Canning, Food, Gardening, Home Food Preservation

“Real Pickles”


This is my favorite time of year… It’s amazing to see the soft rains and bright sunshine help strong plants bare fruits and vegetables.  As I browse through the fresh produce at the farmer’s market, I spy dark red cherries, plump blueberries and lots of gorgeous fruit.  Pickling cucumbers and fresh dill are making their way to the forefront of my mind as I am a bit excited about my newest kitchen gadget.  

Several months ago, as I was reading up on preserving and fermenting, I came across a fermentation device that seemed super simple to use.  After watching the web video promoting the product, I quickly ordered it and anxiously awaited it’s arrival in the mail.  Well, it’s here, and this is my first attempt at “Real Pickles”, as Kraut Source has named them.  To find the recipe and to learn more about this amazing product, visit http://www.krautsource.com.

Here’s a sneak peek at the fermentation process for “Real Pickles”…

First, I made a brine with water and salt.  Then, I started the assembly with a clean quart canning jar. I rinsed the pickles and cut an 1/8″ slice off the blossom end of the pickles.  


Then, I added mustard seed and a bay leaf…


1/4 of a sliced onion…


5 cloves of peeled garlic…


1 tablespoon of loose tea and 2 sprigs of deliciously fresh dill…  I added 6 pickling cucumbers and filled the jar with the brine…


I topped it with the Kraut Source contraption and added a bit more water in the mote around the top of the device….


Viola’ …  The pickled will sit on my counter for 7-10 days to ferment!  Can’t wait to try them…


Posted in appetizers/snacks, Food, Home Food Preservation

Apple-Apricot Fruit Leather

This week I decided to try my hand at making fruit leather.  I’ve had a great deal of success drying fruits and vegetables so I thought it might be fun to change things up a bit. My dehydrator comes equipped with various trays and supplies for drying fruits, vegetables, herbs, and leathers.  Using puréed fresh fruit, baby food, or applesauce make for quick and easy assembly.  Plug the dehydrator in just before going to bed and (in most cases) in the morning, you’ll have a delicious homemade treat that can be stored at room temperature for a few weeks in an airtight container.  You can also pop these treats into the freezer and they’ll keep for about 1 year.  

These were a big hit with my family.  I’ve got lots of fresh strawberries parked in the fridge so I think I’ll give this a try with puréed strawberries and honey next time.

Apple-Apricot Leather

1 (8 oz) jar puréed baby food

1-2 cups sweetened or unsweetened applesauce

In a medium bowl, mix applesauce with apricot purée.  Cover with plastic wrap and microwave on high for 6-8 minutes or until the mixture reaches 160 degrees.  Stir every few minutes.  

Cool slightly.  Spread mixture evenly on dehydrator fruit leather drying trays.


Drying times very depending on equipment, humidity in the air, and thickness of fruit.  Fruit leather usually requires at least 8 hours to set completely.  Follow manufacturer’s directions for specifics about varying drying times.  


Dry fruit at 140 degrees until no indentation is left when you touch the center with your finger.

While still warm, peel fruit leather from drying tray.

Quarter fold the fruit leather for slicing.

Slice into wedges or as desired.

Wrap well in plastic wrap for storage.

Store at room temperature in airtight container.


Here’s a great resource for important guidance when drying fruit…
http://nchfp.uga.edu/how/dry/fruit_leathers.html

Posted in Canning, Food, Sauces

Sweet and Spicy Pepper Relish

While waiting in the checkout line at a local grocery store this week, I noticed a monthly cookbook tucked into the magazine rack close to the register.  The front cover and title focused on “Canning and Preserving”.  It was a “Taste of Home” publication and I’ve always been a big fan of the reader provided recipe contributions showcased in the magazine. I’m a sucker for spending extra cash in the checkout lane so I threw the book in my cart.

 As I thumbed through my newly purchased mini-cookbook, a recipe for pepper relish caught my eye.  It looked simple and straightforward so I decided to purchase the ingredients to give it a try. 

The result, a sweet and spicy mixture that’s a perfect condiment for bratwurst links,  steak or baked chicken. Great with anything cooked on the grill…   It can also be used as a flavorful appetizer paired with cream cheese and crackers.


 Here’s the link to the recipe:  

Autumn Pepper Relish

I changed the pepper ratio a bit, but not much…

Sweet and Spicy Pepper Relish

(Adapted for Taste of Home)

6 medium sweet red peppers 
2 medium green peppers

6 jalapeno peppers

4 medium Granny Smith apples (about 1-1/4 pounds)

2 medium pears (about 1 pound)

1 medium onion

3 tablespoons canning salt

2 cups white vinegar

2 cups sugar

1 cup packed brown sugar

3/4 teaspoon fennel seed

Seed and coarsely chop peppers. Peel and cut apples, pears and onion into 1-in. pieces. Pulse in batches in a food processor until finely chopped. Transfer to a large bowl; sprinkle with salt and toss. Let stand 6 hours. Rinse and drain well; blot dry with paper towels.
In a Dutch oven, combine drained pepper mixture, vinegar, sugars and fennel seed; bring to a boil. Reduce heat; simmer, uncovered, 40-45 minutes or until slightly thickened.

Carefully ladle hot mixture into eight hot half-pint jars, leaving 1/2-in. headspace. Remove air bubbles and adjust headspace, if necessary, by adding hot mixture. Wipe rims. Center lids on jars; screw on bands until fingertip tight.

Place jars into canner with simmering water, ensuring that they are completely covered with water. Bring to a boil; process for 20 minutes. Remove jars and cool for 12 to 24 hours before removing the bands and storing in a cool, dry location.

Posted in Baked goods, Baking, Bread, breakfast, Food

Zucchini Breakfast Bread

This week, I had the opportunity to visit a produce auction in a neighboring community.  It’s a bit early in the season for an abundance of produce so the aisles were stocked with plants and flowering baskets of every variety.  Farmers also displayed an array of asparagus, rhubarb stalks, and freshly baked pastries.  I so enjoyed listening to the auctioneer as he rattled on at record speed, while the prices climbed to reasonable levels.

Looking over the tables of freshly baked breads, I was inspired to bake a few loaves of my own.  I had a few zucchini in the produce drawer that were close to expiration so I popped them into the food processor.  The grated zucchini certainly lends moisture and flavor to this scrumptious recipe.  

Zucchini Breakfast Bread

1 1/2 cups flour

1 1/2 cups oat bran

1 teaspoon salt

1 teaspoon baking soda

1 teaspoon baking powder

3 teaspoons ground cinnamon

3 eggs, beaten 

1 cup vegetable oil

2 1/4 cups white sugar

3 teaspoons vanilla extract

2 cups grated zucchini

1 cup chopped pecans

1/2 cup steel cut oatmeal mix (optional for topping)

Preheat oven to 350 degrees. Spray with cooking spray, two 8×4″ loaf pans. Mix flour, salt, baking powder, soda, and cinnamon together in a bowl. In a separate bowl,  whisk eggs, oil, vanilla, and sugar together in a large bowl. Stir in zucchini.  Add dry ingredients to the zucchini mixture, and mix well. Stir in nuts just until combined. Pour batter into prepared pans.  Sprinkle with topping, if desired.  Bake for 50-60 minutes, or until tester inserted in the center comes out clean. Cool in pan on rack for 10 minutes. Remove loaves from pan, and cool completely before slicing.
Basketmaking…  I also had the pleasure of attending my first basket weaving class earlier this week.  I have shared  a few pictures at the end of this post.  I will spare you the details as I am not skilled enough yet to include a detailed tutorial.  I simply followed the instructors lead and made this adorable herb basket.


Step by step…


HAPPY MOTHER’S DAY, to all of you wonderful moms out there!

Posted in Baking, breakfast, Food, Home Food Preservation

Drying Your Own Fruit


One of my favorite ways to preserve fruits and vegetables is to thinly slice them and dry them in my dehydrator.  Drying is one of the oldest methods for preserving foods. This makes for a nutritious and convenient snack that needs little space for storage. There are two ways in which I dry fruits… I often purée fresh fruit in the blender, spread the purée on a dehydrating sheet and dry the product according to the manufacturer’s instructions. I then wrap long strands of the dried leather in cellophane and store it in a mason jar.  Other times, I simply slice ripe fruit, process it in the dehydrator overnight, condition the fruit and package for a nutritious and high-energy snack.  Drying your own fruit at home is far less expensive than purchasing packaged dried fruits and can insure that there are no extra preservatives added to the fruit.


Some fruits suitable for drying include apples, pears, peaches, plums, apricots, bananas, cantaloupe, and berries.  To process, carefully follow the directions that accompany your dehydrator or use a recipe from a reputable source.  These recipes  have been tested to reduce any food safety issues and boost nutritional impact.  If you are interested in making your own jams or jellies, pickles, salsa, fruit leather or dried fruit, here are a few sites that will provide you with an abundance of carefully tested recipes. 

The National Center for Home Food Preservation – http://nchfp.uga.edu

Drying Fruits and Vegetables Penn State Extension – http://extension.psu.edu/food/preservation/safe-methods/drying-vegetables

Ohio State Extension Food Preservation – http://extension.oregonstate.edu/fch/food-preservation


Posted in Baked goods, Baking, Food, Gardening, side dishes

Caramelized Butternut Squash Cubes

20141108-211655.jpg
I’m a fan of simplicity and this autumn recipe really couldn’t be any easier…
A few days ago, my boss arrived to the office with a box full of assorted squash that she had picked from her garden. She admitted neglecting the overgrown weeds in and around the produce and to her surprise, had found a plethora of ripe, fresh squash that she couldn’t possibly eat on her own. She placed the box on the reception desk with a note encouraging employees to take whatever we wanted. I was elated and quickly rummaged through the produce looking for the best of the bunch.
I guess the hardest part of this recipe is getting the thick skin off of the flesh. Carefully use a knife to trim away the light colored skin keeping the cut side of the squash flat against the cutting surface. Scoop out the seeds and cube the firm flesh. In a short while, get ready for a fantastic side dish!

Caramelized Butternut Squash Cubes

3 butternut squash, peeled, seeded, and cubed
2 tablespoons olive oil
Salt and pepper to taste
2 tablespoons brown sugar, optional

Preheat oven to 350 degrees. In a large bowl, toss cubed squash and olive oil until well coated. Arrange squash on an 11X17″ baking pan and sprinkle with salt and pepper. Bake for 20 minutes until golden brown and slightly caramelized.
Remove from oven and sprinkle evenly with brown sugar; return to the oven, continue baking for 5-7 minutes or until fork tender.

Posted in Baked goods, Baking, Bread, breakfast, Brunch, Gardening

Key Lime and Blueberry Muffins

20140907-134807.jpg
Well, it seems the last of the blueberries have made their way to the farmer’s market as the fall season begins and apples, peaches, and pears showcase their beauty and flavor in the weeks to come.
As I peered into the fridge this morning, I noticed a pint of blueberries and a few containers of key lime Greek yogurt on the shelf. I remembered using this combination of flavors some years ago in a blueberry yogurt muffin recipe that I had in my kitchen file. I rummaged through the worn folder to find what I was looking for and was delighted to see I hadn’t misplaced it. The combination of key lime and blueberry is quite similar to that of lemon and blueberry except for the added punch that key lime lends to the recipe. Give this one a try, I think you’ll like it.

Key Lime and Blueberry Muffins

1 cup flour
6 tablespoons sugar
1/4 teaspoon salt
1/4 teaspoon baking powder
1/4 teaspoon baking soda
1 egg
1/2 cup key lime flavored Greek yogurt
1 teaspoon vanilla extract
3 tablespoons oil
2 tablespoons milk
1/2 cup fresh blueberries

Note: This recipe makes 6 regular-sized muffins.

In a bowl, combine dry ingredients. In a separate bowl, combine the egg, yogurt, vanilla, oil and milk. Stir in the dry ingredients just until moistened; fold in the blueberries.
Fill greased or paper-lined muffin cups three-fourths full. Lightly sprinkle with crumble topping, optional. (See recipe below)

Crumble Topping
1/2 c. flour
1/2 c. sugar
3 tbsp. butter
Combine flour, sugar. Cut in butter. Sprinkle over muffins before baking. Store any leftovers in the fridge for future baking.

Bake muffins at 350° for 20-22 minutes or until a toothpick inserted near the
center comes out clean. Cool for 5 minutes before removing from pan. Continue cooling on a wired rack.