Posted in Baked goods, Baking, Kids in the Kitchen, Main Dish

Finger-Licking Pizza Roll

A sheet of Pillsbury crescent dough and a few spicy ingredients make this recipe a snap to pull together for a weekday dinner or afternoon snack. 

I’ve seen (and tasted) a version of this recipe posted elsewhere using a traditional bread dough loaf.  I found the dough to be dense and heavy… Frankly, the “dough to filling” ratio was a bit overwhelming.  

Here, I have used Pillsbury crescent roll sheets to bundle up the tasty Italian ingredients to make this undeniably delicious roll.  I just love the way the traditional filling sits within the light and flaky crust.  This Finger-Licking Pizza Roll recipe is incredibly hard to resist! 

Finger-Licking Pizza Rolls

1 can (8 oz) Pillsbury™ refrigerated Crescent Dough Sheets

1/2 6 oz. package pepperoni rounds

1 cup shredded Mozzarella cheese

1/2 cup pizza sauce 

Heat oven to 350°F. Spray cookie sheet with cooking spray. Lightly flour counter surface.  Unroll dough.  With a rolling pin, flatten dough evenly to stretch dough to 13×9″ rectangle. Spread pizza sauce over surface.  Layer on pepperoni, overlapping rows. Sprinkle evenly with mozzarella cheese. 

Starting with one short side, roll up rectangle; press edge to seal. Place cut side down on cookie sheet.

Bake 25-35 minutes or until roll is dark golden brown. Cool for 5 minutes. Slice roll into 3/4″ slices. Serve warm with leftover warm pizza sauce for dipping. 

Posted in Baked goods, Baking, Cake, Desserts

Applesauce Spice Cake

Family Day at Purdue University brought us down to campus for a weekend of fun and football.  When looking over recipes to serve on the tailgate table, this applesauce cake caught my eye.  As many of you that frequently bake might testify, I rarely follow a recipe as it’s written.  I am constantly checking my stash of leftovers to see how they can be transformed into deliciously satisfying baked goods.  
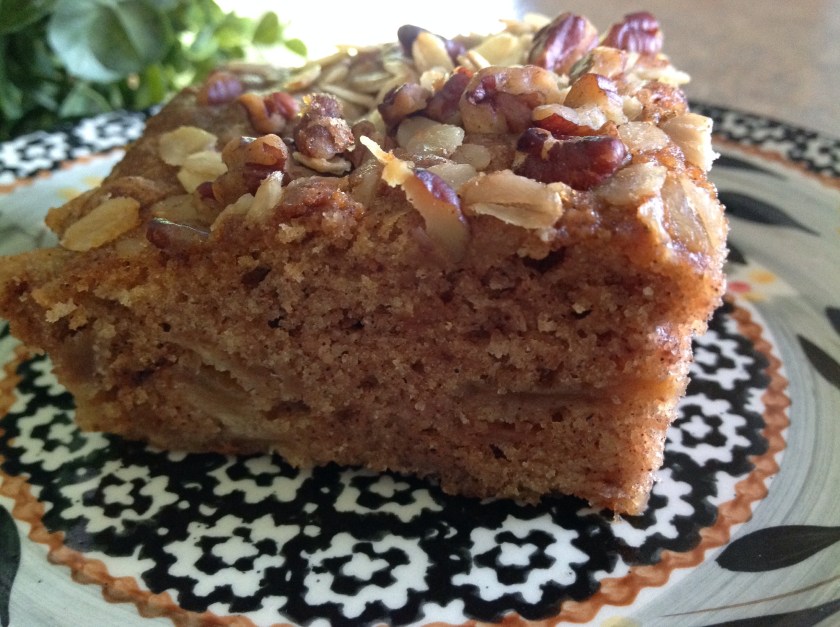
This week, I adapted an apple cake recipe that I found in an old community cookbook to create this moist, dense cake. I had made applesauce earlier in the week and I was looking for ways to use it up before having to freeze it.  This cake fit the bill and everyone enjoyed its apple and cinnamon spiced flavor.  The recipe is especially good with a cup of hot tea or coffee on a cool fall or winter day. 

Applesauce Spice Cake

3 cups flour

1 1/2 cups sugar

3 teaspoons cinnamon

1/4 teaspoon nutmeg

1 teaspoon baking soda

1 teaspoon salt

4 cups applesauce (chunky or homemade style)

1 cup canola oil

2 eggs, slightly beaten

1/2 cup whole oats

1/2 cup chopped pecans or walnuts

Preheat oven to 350 degrees.  Spray, with cooking spray, a 13×9 inch baking pan.  In a medium bowl, mix first six dry ingredients.  In a separate bowl, combine applesauce, oil, and eggs; mix well.  Pour dry ingredients into applesauce mixture and combine until well blended.   Pour into prepared pan and sprinkle batter with oats and nuts. Bake for 45-50 minutes or until toothpick inserted into the center of the cake comes out clean.

Posted in appetizers/snacks, Baked goods, Food, Homemade Mixes

Sweet and Spicy Roasted Nuts


As the cool winds blow down the length of Lake Michigan, they usher in autumn showers and chilly temperatures.  This weekend we are experiencing “lake effect rains” and the cooler temperatures have me searching through my files for all of my favorite “comfort food” recipes. 

This irresistible snack is great for a fall tailgate party or family get-together.  Roasted cashews mixed with a blend of sweet and spicy ingredients make this crunchy finger-food hard to resist.  Nearly everyone that has tried these spiced nuts find them irresistible.  Make a couple of batches because they’re usually gobbled up rather quickly.

Sweet and Spicy Roasted Nuts

1 1/2 lbs. cashew nuts

1½ tablespoons butter, melted

2 tablespoons fresh rosemary, finely chopped

2 teaspoons brown sugar 

½ teaspoons cayenne pepper

2 teaspoons sea salt

Preheat oven to 375 degrees.  Spread cashews in a single layer on a jelly roll pan.  Roast the cashews for 8 to 12 minutes, or until lightly toasted and golden brown. 

Meanwhile, in a large mixing bowl, combine fresh rosemary, brown sugar, cayenne, and salt; add melted butter, mixing well.Remove the nuts from the oven and carefully add hot cashews to the spice mixture.  With a large spoon or spatula fold in the nuts to completely coat with the spice mixture. Cool cashews in a single layer on a piece of foil or parchment. Serve warm or  transfer to an airtight container and keep at room temperature for a few days.

(adapted from the Food Network)

Posted in Crafts

Our Very Own Little Free Library


For the past several months, I’ve been working with a local literacy coalition to help promote the love of reading in our schools and regional communities.  One of the ideas that we proposed was to promote Little Free Libraries in our urban and rural environments.  I figured the best way for me to promote this idea was to create one myself.  

Throughout the campaign we’ve been stressing the use of recycled materials and simplistic design.  When I presented the idea to my husband, the creative juices began to flow and he soon constructed this adorable residential Little Free Library.  To learn more about constructing and registering your very own LFL, visit littlefreelibrary.org

This is a grass roots movement and the LFL site includes a world map where registered LFL locations are posted so that those interested in doing a tour or an afternoon bike ride to visit all of the “mini libraries” in their area can print the map and get going.

As I mentioned earlier, we promote the idea of using simplistic, recycled materials to bring to life this lovely idea to stress the importance of reading in your community.  Use old furniture, large baskets, cartons, or plastic tubs to make inexpensive, upcyled models.  My husband found scrap wood and other building materials to make this LFL for our home.  His skill level might be better than most but don’t stress about the perfect model.  Stick with your skill level and be as simplistic or as ornate as you like.  Check out all the images on the site to inspire ideas for your very own Little Free Library.


Posted in Baked goods, Baking, Cake, Chocolate, Desserts, Food

Quick Fix Brownies


We spent a beautiful day in Chicago on my brother’s boat yesterday. I volunteered to bring along some munchies so I turned to my favorite brownie recipe to add to the collection of appetizers and desserts.  These brownies hold up well when traveling and they slice into dense dark chocolatey squares, perfect for a family outing.  A regular cake mix is used for the brownie base.  This is a quick and easy recipe that is sure to please all of the chocolate lovers in your life!

Quick Fix Brownies

1 (18 1/4 oz) devil’s food or dark chocolate cake mix

1/2 cup butter or margarine, melted

1/3 cup brown sugar 

1/4 cup water

2 large eggs

1 teaspoon vanilla

3/4 cup chocolate chips

3/4 cup chopped walnuts, optional

Preheat oven to 375 degrees.  Set the oven rack to the second-lowest position.  Spray with cooking spray a 13×9″ baking pan.  In a large bowl mix all ingredients except chocolate chips (and walnuts) until smooth.  The batter will be quite thick.  Add chocolate chips and walnuts, if desired; mix to combine. Spread batter evenly into the prepared baking pan.  Bake for about 25-30 minutes (do not over bake).   Cool completely before frosting with a frosting of your choice.

Posted in Baked goods, Baking, Cake, Desserts

Easy Blueberry Upside Down Cake


This time of year, there are plenty of local blueberry farms lining the county roads throughout the Midwest.  In early July, rustic hand painted signs announce the arrival of a new blueberry crop at many of these farms.  Last Sunday, I stopped at one such farm to gather a supply of fresh fruits and vegetables.  To my surprise, there were “slim pickings” available for sale. The unprecedented soggy, Midwest rains and cooler summer temperatures have made a bit of a mesh of things.  When I asked if they had any blueberries for sale, the owner expressed her disappointment as she said the crop was a bit overripe and the berries seemed uncharacteristically  soft.  I usually bring home a 25 pounds box, but instead, I purchased only two pints.  Hopefully, I can visit another stand with a bit more success.

For a quick summer treat, I assembled this incredibly easy recipe that is sure to tantalize your taste buds.  It’s much like a traditional upside down cake that usually includes pineapple.  Instead, a few cups of berries are used to top the tender butter cake.  I hope you’ll give this simple recipe a try. It seems the flavor grows as the cake sits for a bit.

Easy Blueberry Upside Down Cake

1/4 cup butter, melted

1/2 cup brown sugar

2 cups fresh blueberries

1 package yellow or butter cake mix + recipe eggs, oil, and water

1 teaspoon almond extract

Coat the bottom of a 13×9″ baking dish with butter; sprinkle with brown sugar and blueberries. Prepare cake batter according to package directions.  Add almond extract, mix well.  Evenly spread the batter over the blueberries.

Bake at 350° for 40-45 minutes or until a toothpick inserted near the center comes out clean. Cool for 10 minutes on a wire rack. Invert onto a serving plate. If desired, serve warm with ice cream.  

Posted in Canning, Food, Gardening, Home Food Preservation

“Real Pickles”


This is my favorite time of year… It’s amazing to see the soft rains and bright sunshine help strong plants bare fruits and vegetables.  As I browse through the fresh produce at the farmer’s market, I spy dark red cherries, plump blueberries and lots of gorgeous fruit.  Pickling cucumbers and fresh dill are making their way to the forefront of my mind as I am a bit excited about my newest kitchen gadget.  

Several months ago, as I was reading up on preserving and fermenting, I came across a fermentation device that seemed super simple to use.  After watching the web video promoting the product, I quickly ordered it and anxiously awaited it’s arrival in the mail.  Well, it’s here, and this is my first attempt at “Real Pickles”, as Kraut Source has named them.  To find the recipe and to learn more about this amazing product, visit http://www.krautsource.com.

Here’s a sneak peek at the fermentation process for “Real Pickles”…

First, I made a brine with water and salt.  Then, I started the assembly with a clean quart canning jar. I rinsed the pickles and cut an 1/8″ slice off the blossom end of the pickles.  


Then, I added mustard seed and a bay leaf…


1/4 of a sliced onion…


5 cloves of peeled garlic…


1 tablespoon of loose tea and 2 sprigs of deliciously fresh dill…  I added 6 pickling cucumbers and filled the jar with the brine…


I topped it with the Kraut Source contraption and added a bit more water in the mote around the top of the device….


Viola’ …  The pickled will sit on my counter for 7-10 days to ferment!  Can’t wait to try them…


Posted in Cake, Chocolate, Desserts, Food, holiday, No-Bake

Oreo Ice Cream Cake

  
This weekend, we had the pleasure of visiting my sister and her family for the July 4th holiday. One of the activities that we enjoy most is remaking recipes that have become a tradition in our family. This no-bake cake is a winner. The July 4th weather is usually warm and breezy so the ice cream cake is a refreshing treat after a long day of grilling, baseball, and fireworks. Just pop the finished cake into the freezer at the start of the day and it will be waiting for you when you want to sit down and enjoy time with family and friends. What a great, no fuss, dessert!

Oreo Ice Cream Cake

1 package (20 oz.) Oreo cookies

1/4 cup margarine, melted

1 1/2 gallon vanilla ice cream, slightly softened

1 package (8 oz.) Cool Whip (thawed)

1 jar (16 oz.) hershey’s hot fudge or chocolate syrup

1/2 cup chopped nuts

1/2 cup mini Reese’s peanut butter cups or your favorite chocolate candy, optional

Lightly spray, with cooking spray, a 9×13″ pan. Crush cookies in the food processor or put them in a plastic bag and crush them with a rolling pin. Add melted butter and mix thoroughly. Press evenly into the bottom of the pan. Carefully spread the softened ice cream over the cookies. Evenly layer on the Cool Whip. Warm the fudge or chocolate until pourable in the microwave and drizzle over the Cool Whip. Sprinkle nuts over the entire cake. (Add the mini candies, optional.) Freeze for at least two hours or until firm. Enjoy!

Posted in Baked goods, Baking, Bread, breakfast

Easy Cake Mix Apple and Banana Nut Muffins

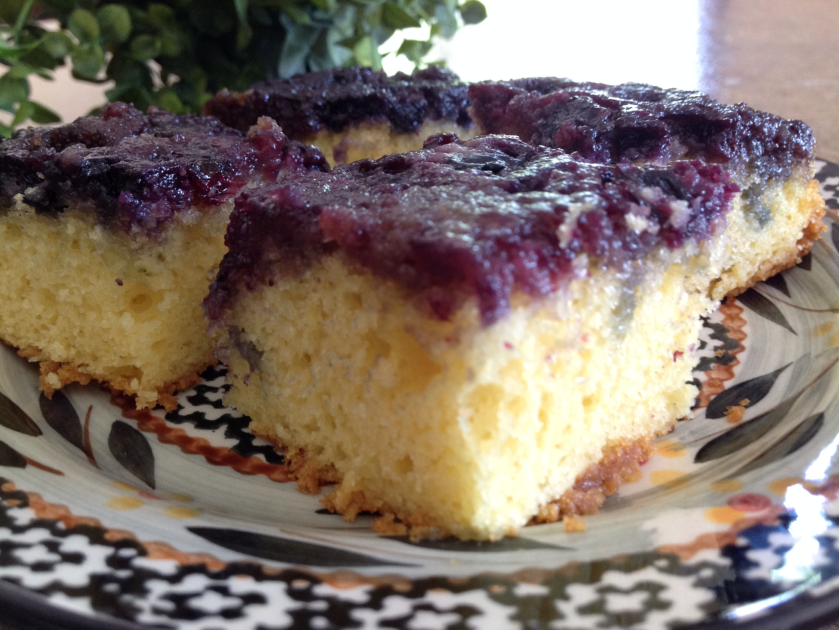
I’ve been fooling around with cake mix recipes for years.  I often have extra fruit ripening on the counter or parked in the fridge for too long so I keep a stash of cake mixes on hand to whip up a batch of breakfast muffins. The cake mix and fruit combine easily for a quick and easy twist on the classic fruit muffin.

This week I had two bananas and a bit of homemade applesauce to add to the mix. The ratio usually requires the standard mix, 1/3 cup of oil, 3 eggs and 1 1/2 cups of a overly ripe or wet fruit.  I’ve often mixed in flavored yogurt as well.  Play around with your favorite flavor combinations and see what you come up with.  I’d love for you to share any of the cake mix combos that you enjoy.  I love this quick and easy method of baking in a semi-homemade way.

Easy Cake Mix Apple and Banana Nut Muffins

1 box cake mix, white or yellow

1/3 cup oil

3 eggs, slightly beaten

1 cup mashed overly ripe bananas (2 medium)

1/2 cup chunky applesauce (I use homemade applesauce)

1/2 cup chopped pecans

Old fashioned oats or brown sugar topping, optional

Preheat the oven to 350 degrees.  Generously spray 2 muffin pans with cooking spray or line with paper liners. In large bowl, combine all ingredients and mix well.  Divide batter evenly between muffin cups.  Sprinkle with a handful of old fashioned oats or brown sugar. Bake 20-25 minutes or until toothpick inserted in center of loaves comes out clean and inside of cracks do not look wet. 


Posted in Baked goods, Baking, breakfast

Baked Oatmeal Snack Bars

Yesterday we enjoyed a mild, breezy day with low humidity.  I thought I’d do some baking before the rain and humid conditions make their way back into our lives.  

These bars are full of flavor and texture as they are chocked with delicious, sweet and crunchy goodies, sure to satisfy your mid-day cravings.  The bars are also great for an on-the-go breakfast.  If you take the train into work, forego the expensive coffee shop baked goods and pack up one of these little gems for a healthier breakfast choice.  Pull out the Keurig and brew your own cup of coffee and be on your way.  What a great way to start the day!

Baked Oatmeal Snack Bars
3 cups rolled oats
1 cup chopped walnuts or pecans

1 cup raisins (any dried fruit will do)

1/2 cup sunflower seeds

1/4 cup packed brown sugar

2 tsp cinnamon

1 1/2 tsp salt

1/4 cup canola oil

1 1/2 cups skim milk

2 eggs, lightly beaten

1 tsp vanilla     

Preheat oven to 350 degrees.  Spray with cooking spray, a 13×9″ baking dish.  In a large mixing bowl, combine dry ingredients.  In a separate bowl, combine wet ingredients, mix well.  Pour wet ingredients into dry ingredients; stir to combine. Pour into prepared baking dish.  Sprinkle a handful of old fashioned oats over the top.  Bake for 35-40 minutes. Cool and cut into squares.