Posted in Baked goods, Baking, Bread, Food, Gifts, Toppings

Homemade Triple Berry Jam


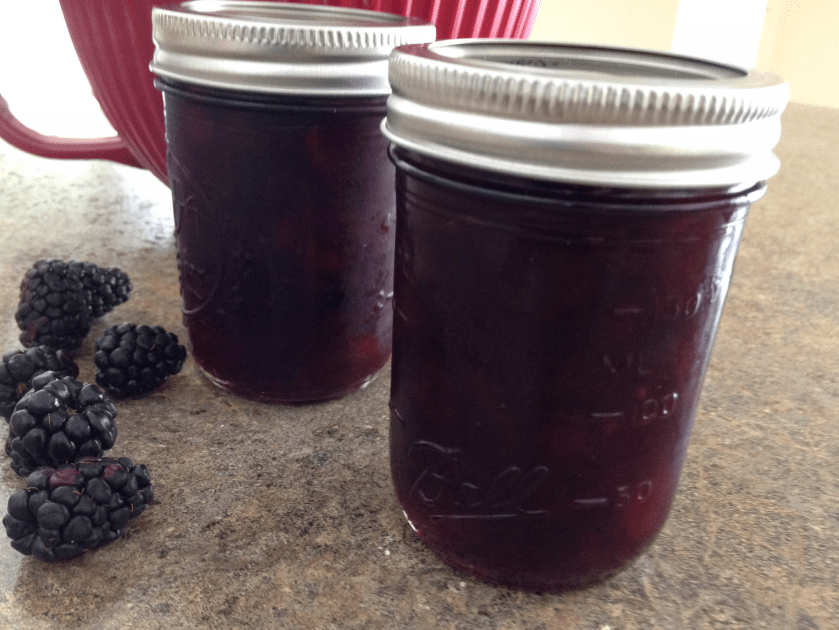
Our family loves the taste of homemade jam.  In fact, store bought jam or jelly products just don’t cut it in our household anymore.  While it might seem a chore to cook and carefully process the product, new tools and techniques have truly made canning your own food quite easy.  Making freezer jam is also a great option for those wanting to assemble their own recipe in far less time.  

While I’d love to tell you that this is a secret family recipe, home food preservation involves a careful balance of ingredients and it’s something that I never fool around with.  I always choose and carefully follow a reputable recipe when I’m canning foods for my family.  The reason…these recipes have been well tested for food safety.  Processing times, ingredient quantity, and acidity levels have all been checked and rechecked to eliminate the possibility of food borne illness in the products we hope to safely store on our shelves.


Our favorite way to enjoy this scrumptious treat would be to have the jam slathered all over a great big slice of Irish Soda Bread. While  I’m fond of butter and jam, others in the family love the peanut butter and jam combination.  You can find the recipes for my Irish Soda Bread/Scones here and here


Getting back to the homemade jam, this delicious recipe is one that was carefully tested by Sure Jell, which is a fruit pectin company that makes a product to be used to thicken jams or jellies. You can find the recipe here.

I’ve always had great success with this low sugar recipe and the large fruit pieces in the jam make for a lovely texture and add to the delicious fresh flavor of the product.  


Posted in Crafts, Gifts, holiday, holidays, Sewing

Hand Made Friendship Hearts

2015/02/img_4651.jpg
Years ago, as I was rummaging through the craft section of a local area garage sale, I stumbled upon a box of beads, sequins, golden threads, and patterns. I scooped it up and asked the owner how much was needed for the treasure. To my delight, she said $1.00 would fit the bill. I gathered up a few more crafting trinkets (some sewing and embroidery supplies) along with the box of sequined treasures, paid the kind lady, and I was on my way.
Shortly after arriving home, I took out a heart shaped cookie cutter and traced several small hearts on a light gray felt square. I carefully cut the heart shapes out and stitched on enough sequins and beads to cover the entire surface of one heart shape. On another heart shaped felt piece, I secured a pin back so that eventually, my project would become a pin. I then used a tiny blanket stitch (gray thread or monofilament) to sew the two felt heart shapes, wrong sides together, leaving a small opening to stuff in a bit of batting. After closing up the opening, I would plump up the heart shape by using my fingers to evenly distribute the batting tucked inside. Voila, the pin is complete!
I then used printable business cards to create a message, printed a sheet and punched two holes in each card to secure the pin back. I used small cellophane bags to envelope the pin/card and tied a bow for a sweet finish.
I have given these pins out at weddings, for Valentine’s Day, and for Mother’s Day. They are quick and simple and require very few supplies. Happy Valentine’s Day!

2015/02/img_4640.jpg

2015/02/img_4631.jpg

2015/02/img_4651.jpg

2015/02/img_4647.jpg

Posted in Baked goods, Baking, Bread, Food, Gifts

Moist Pumpkin and Citrus Tea Loaf

2015/01/img_4496-0.png

In our house, Saturday is baking day. The warmth of the kitchen and the sweet smell of cinnamon and nutmeg baking seem to make the cold winter months a bit more bearable. This loaf is quite easy to assemble and most of the ingredients are usually kept on hand (if your needing a quick treat that can be whipped up in no time). The addition of orange juice makes for an interesting twist. If you have an orange on hand, zest a teaspoon or two into the batter for a lovely burst of extra citrus flavor. On occasion , I’ve added a half cup of finely chopped dates to the batter for added moisture and flavor. Using smaller loaf pans, I often make several loaves to give away as gifts. Friends and family always enjoy a special homemade treat for the kitchen.

Moist Pumpkin Tea Loaf

1/2 cup margarine
1 1/2 cups white sugar
2 eggs
1 cup canned pumpkin
1/4 cup orange juice
2 1/4 cups all-purpose flour
1/2 teaspoon baking powder
2 teaspoons baking soda
1/2 teaspoon salt
1/2 teaspoon ground cinnamon
1/2 teaspoon nutmeg
1/2 teaspoon ground cloves
1 cup walnuts, coarsely chopped

Preheat the oven to 350 degrees. Spray, with cooking spray, a 9×5″ loaf pan.
In a large bowl, cream together the butter, sugar, and eggs. Mix in pumpkin and orange juice. In another bowl, mix together the flour, baking powder, baking soda, salt, cinnamon, cloves and nuts. Mix dry ingredients into wet ingredients stirring just until completely moistened. Pour into the prepared loaf pan.
Bake for 55-60 minutes in the preheated oven, or until an toothpick inserted comes out clean. Cool in pan 10 minutes. Remove loaf and cool completely on wire rack.

Posted in Crafts, Gifts

BOILER UP Bracelet

20150103-095432.jpg
Black and gold are the collegiate colors of Purdue University. In my family, the Boilermaker logo is near and dear to our hearts. Currently, we have three children attending the University. Whenever possible, we proudly wear the Boiler colors. Our closets and drawers are filled with black and gold sweatshirts, pants, jackets, and tops. Our cabinets are filled with Boilermaker plates, glasses, mugs, and platters. Over the years, we’ve purchased Purdue fleece blankets, sheets, and soft plush pillows to decorate dorm rooms.
While shopping last week, I spotted some great beads in the craft section of our local discount store and I thought it might be fun to glitz up my jewelry selection with a few black and gold bracelets for our next team event. I am certainly not a skilled jewelry maker so this project is incredibly quick and easy and you can use any combination of colors to tailor the bracelet to satisfy your needs. Elastic cord is used to assemble the bracelet so very few supplies are needed.
This is quite a simple and inexpensive project so next time you’re in the craft aisle, take a look at the bead selection. You might be quite pleased and surprised at the unique variety of colored beads you can assemble on a clear cord to recognize and celebrate your favorite team.
I’m lovin’ that black and gold… BOILER UP!

BOILER UP Bracelet

7″ clear stretch cord ( measure your wrist for a more exact measurement + 1″)
Tape
Assortment of colored beads (lots of shapes and sizes)
Clear gel Tacky Glue

20150103-100015.jpg
Measure and cut a 7″ piece of clear stretch cord. Fold a piece of tape across one end of the cord (to keep beads from falling while assembling). Arrange beads, as desired and string them onto the clear cord. Test the length around your wrist so that beads are evenly dispersed and the cord is completely filled when stretched around wrist. Carefully, tie the bracelet with a double knot, securing beads. Place a small dot of tacky glue on the knot, covering knot completely, let dry. Tuck the knot under a bead to keep it hidden.

20150103-100452.jpg

20150103-100537.jpg

20150103-111348.jpg

Posted in Baked goods, Baking, Bread, Cake, Food, Gifts, holidays

Cinnamon Swirl Loaf

20141221-121217.jpg
Over the years, it’s been a holiday tradition in my family to prepare lots of holiday loaves to be given away throughout the season. This year we chose the Cinnamon Swirl Loaf to pass on to others. It’s the perfect loaf for the busy holiday season. Most years, I spend hours in the kitchen rolling out a cinnamon yeast loaf that is delicious but a bit time consuming. This year, to save time in the kitchen, I made a semi-homemade loaf that uses a cake mix for the base. If you love fresh baked cinnamon rolls, then this loaf is for you! As a bonus, the recipe makes two loaves at once. This really speeds up the baking process helping to make more loaves to give away for the holidays!

Wishing you the very best this holiday season. Merry Christmas to you and yours.

Cinnamon Swirl Loaf

1-15 oz box yellow cake mix
3/4 cup water
3/4 cup oil
4 eggs, lightly beaten
1 teaspoon vanilla extract
1/2 cup sugar
2 tablespoons cinnamon

Preheat oven to 350 degrees. Prepare two loaf pans with cooking spray. In a large mixing bowl, combine first five ingredients. Pour half of the batter into both loaf pans. Thoroughly combine the cinnamon and sugar, sprinkle half of the dry mixture over the batter in the loaf pan. Pour the remaining batter into each pan, carefully spreading evenly into the corners. Finish by sprinkling the remaining cinnamon-sugar mixture over the batter. With a butter knife, swirl the cinnamon mixture throughout the batter making large swirls with the knife. Bake for 45-50 minutes or until toothpick inserted in the center of the loaf comes out clean. Cool completely before cutting.

20141221-121407.jpg

20141221-121538.jpg

Posted in Crafts, Gifts, holiday, holidays

Chunky Infinity Scarf

20141009-161802.jpg
Last week I posted a picture and link for a beginner infinity scarf that I found on the web. As I had mentioned in the post, I am at the very bottom of the ability scale when it comes to my yarn, needlework and craftsmanship abilities. I stick with basic techniques and have to rely heavily on video tutorials (played over and over again) to grasp basic construction concepts. I have been so pleased with my new found skill for crafting the beginner infinity scarf that I have taken to making several different scarves with yarns of various weight and color for my family and friends. Honestly, these scarves are so quick and easy to make, it literally takes about 1 1/2 hours to construct this trendy accessory.
This week, I wanted to post another of my creations crafted with a different type of yarn but crocheted with the very same stitch as the blue patterned scarf that I posted last week. I wanted you to see what a difference yarn choice can make in the look and feel of the garment or accessory. Again, you can find the video here. This is a great little scarf as we move into the cold weather months in the Midwest. Don’t forget that this would be a fantastic Christmas present for teens, moms, teachers, and co-workers. Look for yarn colors to match college, high school or professional sports teams. Or, look for chunky yarns to match the trendy look of current retail scarves found in all the stores.
Here is the yarn that I used for this project. I also used an 11 mm crochet hook.

20141009-162521.jpg

20141009-162558.jpg
… Hand made, totally inexpensive and a thoughtful gift… Happy crocheting!

Posted in appetizers/snacks, Food, Gifts, Kids in the Kitchen

Italian Nut Medley

20140716-063250.jpg
When looking for a salty snack, I usually reach for a jar of nuts on the pantry shelf. Recently, I scoured my cookbooks for a recipe that might change up the taste of my everyday snack staple. Most recipes I found included a good dose of sugar which was definitely not the direction I was headed. I stumbled on a recipe in my Best of Country Cooking Cookbook from 1999. I had all of the ingredients on hand so I whipped up the quick recipe. What a yummy, crunchy, surprise! The four ingredient recipe calls for a mixture of Italian spices, a bit of butter and soy sauce mixed in with a few cups of quality nuts. After tasting this flavorful crunchy mix, I’m sure this will become a staple recipe in my snack folder.

Italian Nut Medley

2 tablespoons butter
4 cups quality mixed nuts ( cashews, hazelnuts, walnuts, almonds)
1 tablespoon soy sauce
1 envelope Italian salad dressing mix

In a skillet, melt the butter over medium heat. Add nuts; cook and stir constantly for 2 minutes. Stir in soy sauce. Sprinkle with salad dressing mix, stir to coat. Immediately transfer to a baking sheet and spread thinly to cool. Store in an airtight container.
Adapted from The Best of Country Cooking – 1999.

20140716-063603.jpg

20140716-063744.jpg

Posted in Crafts, Gifts, Sewing

Machine Embroidery – Towels

20140223-220719.jpg
Every year, about this time, I volunteer to embroider the state towels for our boy’s and girl’s high school swim teams. Today I spent the day embroidering towels for next weekend’s state event.
Towels are often tricky to embroider so I thought I would take you through the process that I use to make sure my machine embroidery looks clean and concise. Remember that it’s very important to stabilize your work so that the stitching sits on top of the fabric instead of burying itself in the nap of the towel. The stabilizer will also ensure a solid foundation for the design.

20140223-221336.jpg
Make sure to choose a thread color that compliments the fabric color. I used maroon thread against the camel colored towel to signify our team colors…maroon and gold.

20140223-221500.jpg
Hoop a piece of tear-away stabilizer in the embroidery hoop.

20140223-221613.jpg
Carefully spray the stabilizer with a temporary adhesive made specifically for fabric projects. I really like the Sulky brand spray adhesive but my JoAnn Fabrics doesn’t seem to carry it anymore.

20140223-221716.jpg
Next, fold the towel in half, length-wise, right sides together. Center the towel over the hoop, carefully placing the fold at the center register marks.

20140223-221840.jpg
Open out the towel and smooth it in place. Secure a piece of water soluble stabilizer on top of towel, fitting inside the hoop.

20140223-222007.jpg
Slip the hoop into the embroidery module and stitch your design.

20140223-222104.jpg
After you’ve completed your design, remove from machine, trim threads and tear away the stabilizer.

20140223-222200.jpg
Remove excess soluble stabilizer, I use a burst of steam from the iron to clean up any remaining bits left behind.

20140223-222301.jpg
Here’s the finished product. I am currently working on my 12th towel and still have a few more to go. Happy Stitching!

Posted in Baked goods, Baking, Chocolate, Desserts, Food, Gifts, Homemade Mixes, Kids in the Kitchen, lunch box

Scrumptious 1,2,3 Cake

20140117-184631.jpg
This little cake is so light and sweet it’s like eating chocolate cotton candy!
It’s called the (1) One – (2) Two – (3) Three Cake and it’s really delicious. You won’t believe that there are only two ingredients involved here!

This past Christmas, my daughter arrived home from college for her holiday break. Her suitcase was filled with lots of dirty clothes, books to sell after a long semester, and a beautiful jar filled with a taupe colored, powdery mix; a recipe card attached. The jar was wrapped in a ball of crinkled holiday, tissue paper. In the rush of unpacking and catching up, the jar was put aside. A few hours later, I noticed the jar on the kitchen counter. The container was quite beautiful and I was intrigued by the contents so I carefully read the attached index card.

20140117-184806.jpg
Well, I couldn’t resist the temptation. I quickly scooped out 3 tablespoons of the mix and added 2 tablespoons of water. I swirled it around in a heat-safe mug and popped it in the microwave. As I looked through the viewing glass, the mix immediately began to rise and puff up. It was like magic, the speed at which it rose. I patiently waited the full minute as the kitchen began to smell like a baker’s wonderland. When the bell went off, I retrieved my creation and quickly ran to tell everyone what had transpired. We all grabbed a spoon and tested the sweet chocolatey mound. Ohhhh, it was so delicious! Now, I really try to stay away from sugar so I took the tiniest of bites but I was delighted that it turned out so spectacular. And, oh, it was so simple!

20140117-185127.jpg
So here’s what you do…

(1) One – (2)Two – (3) Three Cake

1 package chocolate cake mix
1 package angel food cake mix

In a large bowl, combine dry cake mix packages; mix well. Carefully pour into an airtight container.

Attach an index card to the jar with baking instructions:

Mix, in a microwave safe cup, 3 tablespoons mix with 2 tablespoons water. Pop it in the microwave for 1 minute. 3,2,1… Enjoy!

Don’t limit yourself… Use any flavor cake mix you like. Add chocolate chips or top with whipped topping and fruit. This would be a great recipe to make with young children. I think you’ll really enjoy this…what fun!

Posted in Crafts, Gifts, holidays, Homemade Mixes

Christmas Treasure Hunt in a Jar

20131221-083346.jpg
This is a great kid-friendly Christmas gift for those of you looking for a few last minute ideas. The Treasure Hunt in a Jar can be made with a theme in mind… Make them for holidays, sports fanatics, those that like to craft, sew or bake. Find trinkets at the dollar store or your local craft store to match your theme. I am always amazed at how interested guests are in finding all of the hidden trinkets in the jar. Most times, there are a few people patiently waiting for their turn at finding all the treasures.

20131221-083529.jpg
This is a also great little craft project that can easily be made for a fundraising activity. Your group can make several of them to sell at local craft fairs or community fundraisers. Weeks before the event, ask everyone to gather up items to be recycled or repurposed for the project. Collect used jars of all shapes and sizes, lots of small “treasures” to place in the jars, and a big bag of bird seed. This is an ideal project for both the young and the old. Don’t be surprised if the jars sell out quickly. Your group will be quite proud of their accomplishment!

20131221-083842.jpg

A Treasure Hunt in a Jar

Recycled jar with tight fitting lid
Bird seed
Found objects to place in the jar like a…
penny
nickel
safety pin
bobby pin
rubber band
macaroni
marble
paper clip
bead
tack
toothpick
red button
screw
bread tie

Make sure jar is thoroughly washed, clean and dry. Pour bird seed into the jar, filling only half-way. Place “treasures” into the jar. Now, continue to fill the jar with bird seed; about 3/4 full, leaving enough space for items to move while searching for treasures. Cover jar, tightly securing the lid. Print up a “treasure” item list and the following saying on colorful card stock or scrap book paper and attach to the jar with a ribbon.

20131221-084435.jpg
Attach this little note along with a list of all the treasures to be found:
Here’s a little treasure jar, with lots of hidden things.
See how many you can find, and how much fun it brings!