Posted in appetizers/snacks, breakfast, Brunch, Desserts, Kids in the Kitchen

Sweet and Creamy Fresh Fruit Dip

20140504-093321.jpg
Several weeks ago, my husband and I joined his extended family for a beautiful country club brunch. We had decided to plan the event without all of our children because their busy schedules seemed to foil all of our plans for actually getting together. Some kids were away at school, others had scheduled sporting events, and still others had obligations to employers and had to report to work. After days of shuffling schedules, we decided to have a quiet brunch, parents only.
Just before the day arrived, I headed out to the local kitchen store and picked up a few fresh new kitchen towels, wrapped them in tissue paper and popped them in gift bags to share with all of the woman attending the brunch. It seems we’ve adopted the custom of bringing little gifts to this annual event. We often bring flowers, or inexpensive jewelry, the latest gadget, etc., just to share some fun and celebrate Easter and the arrival of spring.
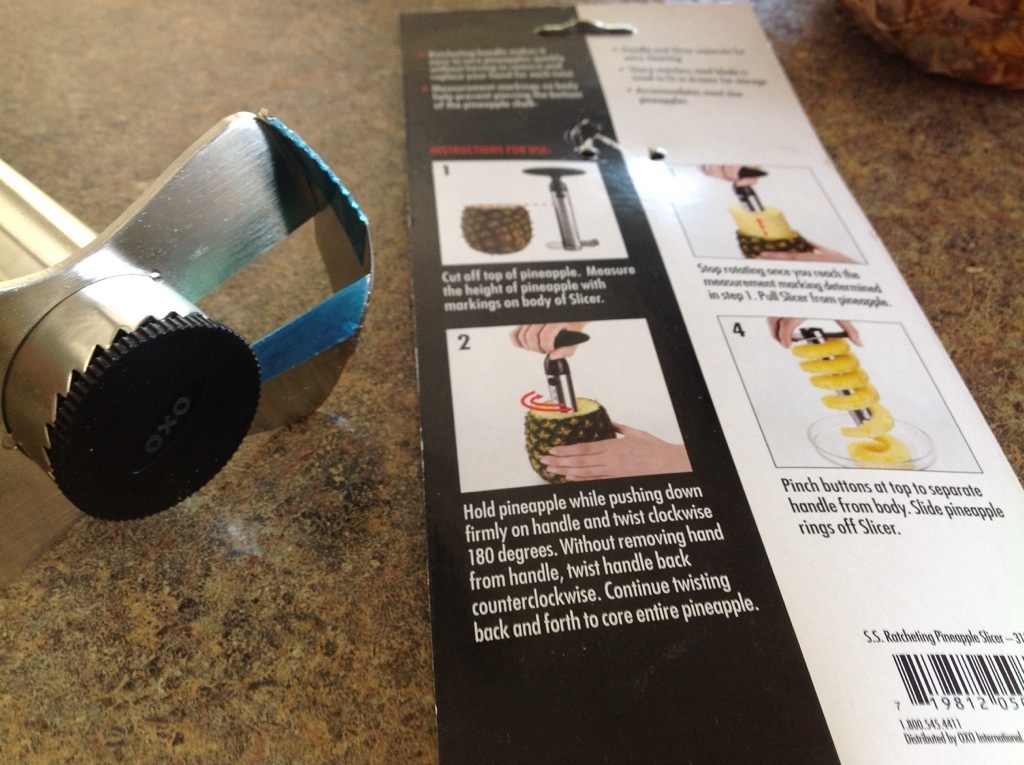
This year, one of the gifts that I received was a gadget called a Ratcheting Pineapple Slicer and I can’t tell you how wonderful this kitchen tool has turned out to be. The instructions that accompany the tool are fairly easy to follow and in no time at all, you’ve got a perfectly sliced pineapple with very little waste and cleanup is a snap.

Here’s how it works:

20140504-093429.jpg

20140504-093504.jpg

20140504-093524.jpg

20140504-093542.jpg

20140504-093558.jpg

20140504-093646.jpg

20140504-093702.jpg

20140504-093729.jpg

20140504-093748.jpg

20140504-093805.jpg
As warmer weather begins to make its way up into the Midwest, communities welcome local farmer’s market vendors as they dust off their aprons and set up their wares in the bright weekend sunshine. Sweet colorful berries of every kind brighten the booths of local farmers.
This Sweet and Creamy Fresh Fruit Dip recipe is a nice addition to a plate of freshly washed and prepared fruit. The unique mix of brown sugar and honey make for a tasty brunch treat or after school snack.

Sweet and Creamy Fresh Fruit Dip

1 cup non-fat vanilla or plain Greek yogurt
1½ teaspoons honey
1 tablespoon brown sugar
⅛ teaspoon cinnamon

Mix all ingredients together in a medium bowl. Chill until ready to serve.
Plate with assorted fresh fruit.

20140504-095018.jpg

Posted in appetizers/snacks, Food, Kids in the Kitchen, lunch box

Simply Made Veggie-Style California Roll

20140427-102020.jpg
Our local grocer has a wonderful sushi station set up in the produce section of the store. Each time I visit the store, I load up my cart with a few packages of veggie style California Roll. M loves to take it to school in her bento box. She eats it for lunch or saves it for her after-school snack, just before track practice. Lately, my long work hours have kept me from visiting the market during the sushi making hours. It seems the hours for the station are limited and once the station is closed, the remaining sushi is often removed from the refrigerator case well before I arrive.
M and I were out shopping yesterday, and once again, the sushi station was closed. As M passed by the station with a disappointed look on her face, she spied a display that included all of the supplies needed to make our own California Roll recipe. We quickly gathered up all the supplies and headed home to begin our sushi making project. On a recent visit to Disney, we had purchased a bamboo sushi rolling sheet so we were excited to finally put it to use. We carefully read the directions for making the rice, although, we eliminated the addiction of sugar and salt. We then proceeded to assemble the California roll. Wow, what a simple project…and so delicious! I hope you have a chance to try the recipe on your own. Add any combination of fresh veggies you prefer…cucumber or jicama might be nice. This is really a fun family cooking project.

Simply Made Veggie California Roll

2 cups Premium Grade Nishiki Sushi Rice, cooked according to package directions
1/2 cup seasoned rice vinegar
5 sheets nori (dry seaweed)
1 avocado, sliced thinly,
3 stalked celery, cut julianne style, about the length of the nori sheet
3 carrots, peeled and cut julianne style, about the length of the nori sheet

20140427-102433.jpg

20140427-102447.jpg

20140427-102500.jpg
Transfer cooked rice to a bowl and carefully cut in rice vinegar using a rice paddle or wooden spoon. Allow to cool to room temperature, about 30 minutes. Place a sheet of nori, on the rolling mat.

20140427-102716.jpg
Place 2 to 3 pieces of each of the avocado slices, celery, and carrots on top of the nori in one layer.

20140427-102811.jpg

20140427-102828.jpg
Using the mat as a guide, carefully roll the California roll into a tight log. Remove the rolling mat.

20140427-103006.jpg

20140427-103020.jpg
With a sharp wet knife, cut roll into 6 even pieces. Repeat with remaining sheets of nori and filling. Sprinkle with sesame seeds, if desired.

20140427-103124.jpg

20140427-103146.jpg

Posted in appetizers/snacks, breakfast, Kids in the Kitchen, lunch box, No-Bake

Everyday Granola Bars

20140125-064005.jpg
During the course of a week, I make several batches of granola bars for my family. There are a few recipes that I use quite frequently and for varying purpose. Take for instance, the Grunt Bars I make when I am looking to boost protein levels, I make Curley Power Bars when I am wanting to provide a recovery bar after a long meet or practice. This recipe for Everyday Granola Bars is one that I usually pack into lunch boxes or have waiting on the counter when kids arrive home from school hungry and looking for something to eat.
I’m a firm believer that providing the family with healthy choices will encourage children to make better food choices for life. I try to stock the fridge and pantry with lots of whole grains, fruits, vegetables, and yogurt so that when kids come home famished, they can quickly grab something healthy to tide them over until supper time.
This recipe is easy to adapt to satisfy your family’s preference. Add dried cranberries or raisins, almonds, pecans or sunflower seeds. We just adore dried apricots in this recipe as well. Change things up as you like. Enjoy!

Everyday Granola Bars

3 cups old fashioned oats
1 1/2 cups walnuts, chopped
1 cup dates, chopped
1/2 cup honey
1/2 cup natural peanut butter
1 teaspoon vanilla extract

Coat an 11X7″ baking pan with cooking spray, set aside. Place oats, almonds and dates in a medium bowl; mix thoroughly, set aside. In a small saucepan, over medium-low heat, warm honey and peanut butter; stir until smooth, creamy and pourable. Remove from heat and stir in vanilla. Pour mixture over oats, dates, and nuts, stir to coat completely.
Transfer mixture to prepared baking dish. Evenly pat down mixture to completely fill the pan. Cover and let stand until set; about 30 minutes. Cut into bars. For added freshness, wrap each bar individually in plastic wrap and store in air-tight container.

20140125-064243.jpg

Posted in appetizers/snacks, Brunch, Food, Gardening, Salad, salads, side dishes

Refreshing Strawberry Spinach Salad

20140113-193238.jpg
This is one of my favorite salads. I usually make it during the late spring months when we have loads of strawberries ripe for the picking. However, a couple of weeks ago, I went to a holiday party and brought this salad along. I knew there would be lots of rich desserts, heavy side dishes, and sweet holiday beverages so I wanted to bring along something light and flavorful. The green and red of the spinach and strawberry mix certainly made the salad look festive. Surprisingly, the strawberries were sweet and juicy. Our grocer’s winter berry selection is usually flavorless and strawberries often have a firm, rock-like texture. I expected to have to sweeten up the berries with a small sprinkle of sugar before adding them to the salad. To my surprise, they were perfect in every way. I was also pleased that I didn’t have to part with a small fortune when purchasing the berries. They were quite reasonably priced so I made sure to buy a load of them.
For a dramatic presentation, I often mix the salad in a clear, deep bowl to show off the beautiful colors within the mix. The deep green of the spinach, and rosy red of the strawberries glisten under the glaze of dressing. Flecks of black and beige (from the addition of poppy and sesame seeds) make the salad look quite appetizing.
While the winter temperatures are down-right bone chilling and the snow continues to fall, I long for the warm sunny days of spring and summer when fresh produce is abundant and flavorful summer salads are a welcome part of the everyday meal.

Strawberry and Spinach Salad

1 large bag, pre-packaged baby spinach, stems removed
4 cups fresh strawberries, sliced
1/2 cup vegetable oil
1/4 cup white vinegar
1/4 cup sugar
1/4 teaspoon paprika
2 tablespoons sesame seeds
1 tablespoon poppy seeds

In a large bowl, toss together the spinach and strawberries. In a medium bowl, whisk together the oil, vinegar, sugar, paprika, sesame seeds, and poppy seeds. Just before serving, pour over the salad and toss to coat.

A good trick when traveling with this salad:
Slice the strawberries and place them at the bottom of the bowl. Then, lightly add clean, prepped spinach and cover the bowl with clear plastic wrap. Carry the dressing in a jelly jar or lidded plastic container. After reaching your destination, give the salad a toss and add the dressing, distributing everything evenly.

Posted in appetizers/snacks, Dinner, Food, Homemade Mixes, Salad, salads, Sauces

Sweet Italian Dressing

20140103-075522.jpg
I’ll bet that you have noticed that I post loads of recipes for sweet delicious baked goods on a regular basis… What you might not know is that I don’t eat any of them. They are all lovingly made for family and friends, but I stay away from them completely. You see, several years ago, I decided to give up eating carb laden goodies with lots of sugar. Oh, I still enjoy the sweet taste of sugar but I have found some great substitutes over the years. A few of my latest favorites are monk fruit extract, stevia in the raw, or coconut palm sugar.

20140103-080559.jpg
Sure, there is quite a bit of controversy circling artificial sweeteners, but these are the few I choose that seem to work for me. When I’m looking for something sweet, I engineer things for myself so that the carbs are low and the fiber content high.
A sweet revelation…
This salad recipe idea came to me after having a similar salad at a recent Christmas party. It was a carry-in party where my co-workers and I were asked to bring beverages, salads, side dishes and desserts. One of my co-workers brought in a fabulous pre-made salad that she bought at Cosco. There were 7 different greens, sunflower seeds, pepitas, and dried cranberries. A pre-made dressing was included. Everything delivered in a sizable package. Here’s the kicker…all for just $5.00.

20140103-080808.jpg
Well, I went back for seconds…and thirds on the salad. I raved about it all afternoon. It’s called the Sweet Kale Vegetable Salad Kit. It’s made from a blend of kale, broccoli, shaved Brussels sprouts, green cabbage and chicory. Seven “super greens” are blended within the salad to provide a wide variety of textures and flavors. One drawback here…is the dressing. My taste buds are highly sensitive to the sweet taste of sugar and I tasted a lot of it in the pre-made poppyseed dressing. The other drawback…I don’t live near or have a shopping card for Costco.
So, I did the next best thing…I made my own salad. It’s a bit different because of the availability of some of the salad items in my grocery store. When I priced out the cost of purchasing all of the different “super greens” needed to make the salad, the bill really added up quickly. My next idea meant looking for salad blends that had been prepackaged to save a little “green”. I found a blend made with broccoli stalks, red cabbage, romaine lettuce, and green onion. I found another mix with mini kale and Brussels sprouts so I combined the two. Then, instead of the poppy seed dressing, I added my own sweet Italian dressing and topped the salad with 1/4 cup of finely diced lean meat and a light sprinkle of shredded mozzarella cheese. I often add sunflower seeds, walnuts, or slivered almonds.
The Sweet Italian Salad Dressing is sort of a copy cat recipe of the Olive Garden salad dressing recipe. The important thing here is to find a mix of greens that you enjoy that are packed with vitamins and nutrients, lots of texture and flavor. Chop the greens up finely, mix in a little of your favorite dressing, add a few flavorful toppings and eat more vegetables!
Here’s to the new year…here’s to your health!

Sweet Italian Salad Dressing

1/4 cup red wine vinegar
3 tablespoons water
1 (2/3 ounce) package Good Seasons Italian dressing
1/2 cup olive oil
1/2 cup sugar or 2 packets sugar substitute

Combine all ingredients. Shake vigorously. Store refrigerated in an air-tight container.

Posted in appetizers/snacks, Baked goods, Baking, breakfast, cookies, Desserts, Food

Perfect Pumpkin Cookie Bars

20131230-094031.jpg
Well, it’s been one year since I starting this blogging adventure and I am just thrilled to celebrate my first anniversary with Simply Made Kitchen and Crafts.
What I enjoy most about the WordPress experience is certainly not what I expected it would be. You see, I never realized how many wonderful people I would “meet” through the blog.
There are certain blogger posts that I so enjoy reading. Two of which are — Dani’s blog at teddyandtottie.com and Shanna’s blog, Curls and Carrots, at shannaward.com.
Shanna, mother of two adorable children, is always whipping up a batch of something wonderful (and super healthy). She is a talented writer and is incredibly supportive to fellow bloggers. I am grateful that I found her through the daily newsfeed.
I simply adore Dani’s blog (teddyandtottie.com) about family, crocheting, gardening, pets and everyday life in Australia. She, too, is a talented writer and her words seem to jump from the page to take me clear across the globe into her everyday world. Thank you both, Shanna and Dani, for your kindness and support.

And now for today’s recipe…

Last week, M asked if I had any canned goods that we might be able to donate to the food pantry. (There had been a sale on Green Giant vegetables the previous week and I purchased 12 cans for this purpose.) As I looked through the kitchen pantry for the supply of cans, I noticed that I had an abundance of pumpkin purée as well. M loves anything made with pumpkin so I searched through my folder of treasured recipes and magazine cut outs for recipes that have been given to me over the years. I quickly found the favorite that I had in mind…
When I first graduated from college, I worked in the garment/fashion industry in the city of Chicago. I was employed by a very talented clothing designer and I very much enjoyed the task of ordering fabric and notions, communicating with retail customers, following production and making sure that finished ordered were shipped to satisfied customers. We were a small staff of fifty or so and it often felt like we were a family.
One of the young pattern makers brought in a batch of these bars during the holidays some twenty or so years ago. After one bite, I asked for the recipe. She stood at her pattern-making table and wrote out (from memory) the recipe on an index card. I still have the very same recipe card, beautifully written in perfectly formed letters. Every time I make this recipe, I think of my early years, fresh out of college…boy, how time flies!

Happy New Year, Everyone!

Perfect Pumpkin Cookie Bars

3 eggs
1 1/2 cups sugar
1 cup canola oil
1 (29 ounce) can pumpkin puree
2 cups flour
1 teaspoons baking powder
1/2 teaspoon baking soda
2 teaspoons pumpkin pie spice
1 teaspoon salt

1 (3 ounce) package cream cheese,
softened
1/2 cup butter, softened
1 teaspoon vanilla extract
2 cups sifted confectioners’ sugar
1/2 cup walnuts, chopped

Preheat oven to 350 degrees. In a medium bowl, mix the eggs, sugar, oil, and pumpkin with an electric mixer until light and fluffy. Sift together the flour, baking powder, baking soda, pumpkin pie spice and salt. Stir into the pumpkin mixture until thoroughly combined. Spread the batter evenly into a lightly greased 10×15 inch jellyroll pan. Bake for 25 to 30 minutes in preheated oven. Cool before frosting.
To make the frosting, cream together the cream cheese and butter. Stir in vanilla. Add confectioners’ sugar a little at a time, beating until mixture is smooth. Drizzle or frost completely spreading evenly on top of the cooled bars. Top with chopped walnuts. Cut into squares.

Posted in appetizers/snacks, Baked goods, Baking, Chocolate, Desserts, Food, Gifts, holidays, lunch box

Mini Brownie Bites

20131215-060022.jpg
It’s that time of year…holiday parties, friendly gift giving, festive decorations and enjoying time with family. One of our favorite ways to spend time together seems to revolve around preparing and sharing cherished family recipes.
We have a few favorite cookie and quick bread recipes that we always bake when the holidays roll around…some are time consuming recipes while others can be whipped up in a jiffy.
This recipe for Mini Brownie Bites is a quickie. These flavorful gems are a mouthful of rich, chocolatey goodness and they only take minutes to prepare. Be warned that the recipe yields only a dozen or so bites. You can bake them along with your favorite cookie selection to be added to the holiday dessert tray. I often pack them in colorful tins to give as teacher gifts. They travel well and seem to get more moist and delicious a day or two after baking. Be sure to store them in an air-tight container until just before serving.

Mini Brownie Bites

1/2 cup semisweet chocolate chips, divided
1/4 cup butter, cubed
1 egg
1/4 cup sugar
1/4 teaspoon vanilla extract
1/4 cup flour
1/4 cup chopped walnuts, optional

In a microwave, melt 1/4 cup of chocolate chips and butter; stir until smooth.
Cool slightly. In a small bowl, beat egg and sugar. Stir in vanilla and chocolate mixture. Gradually add flour; fold in remaining chocolate chips and optional walnuts.
Use a small ice cream scoop to fill mini paper or silicone-lined muffin cups two-thirds full. Bake at 350 degrees for 8-12 minutes (depending on how dry or moist you prefer the brownie center) or until tops begin to crack. Cool completely before removing from pan to a wire rack.

Posted in appetizers/snacks, Baked goods, Baking, Bread, Brunch, Food, holidays, lunch box

Cranberry Orange and Almond Biscotti

20131210-070257.jpg
Boy, is it cold outside. As I bundle up my kids for their 5:30 am swim practice, I think about how dedicated they are to their sport. I know it’s my job to supply nutritious and comforting meals to provide fuel for the day and I do my best to get the job done. However, there is one indulgence that M requests for her morning snack at school… Cranberry Orange and Almond Biscotti with a cup of tea is her favorite cold weather snack.

20131210-070449.jpg
A couple of weeks ago, there was a decent coupon for Celestial Seasonings Tea. I had 5 coupons so I bought five of their holiday selection flavors for roughly 79 cents a piece. M was thrilled!

20131210-070710.jpg
During M’s Saturday morning swim practice, I whipped up a batch of her favorite biscotti and brewed her a cup of tea. When she arrived home, she was so happy!

20131210-070832.jpg

20131210-070843.jpg

20131210-070922.jpg
Recently, I purchased M a wonderful thermos to take to school with her. So every morning, I brew her a cup of tea, fill up her thermos, and pack a biscotti cookie in her lunch box so that she can enjoy her snack during an early morning break. It’s a great way to warm her tummy during the cold (freezing cold) Midwest winter days.

Cranberry Orange and Almond Biscotti

2/3 cup sugar
1/2 cup vegetable oil
1 tablespoon grated orange peel
1 teaspoons vanilla extract
1 teaspoon almond extract
2 eggs
2 1/2 cups flour
3/4 cup dried cranberries, chopped
1/2 cup slivered almonds
1 teaspoon baking powder
1/4 teaspoon baking soda
1/4 teaspoon salt

Heat oven to 350 degrees. In large bowl, stir together sugar, oil, orange peel, vanilla extract, almond extract, and eggs. Stir in remaining ingredients.
Place dough on lightly floured surface. Knead until smooth. On two cookie sheets, shape half of dough at a time into two 10×3-inch rectangles. Press a handful of almonds into the top of each dough band.
Bake 25 to 30 minutes or until toothpick inserted in center comes out clean. Cool on cookie sheets for about 15 minutes. Carefully cut rectangle crosswise into 1/2-inch slices. Turn slices cut sides down on cookie sheet.
Bake about 15 minutes longer, turning once half way through, until crisp and light brown. Immediately remove from cookie sheet to cooling rack. Cool completely, about 30 minutes.

Posted in appetizers/snacks, Baked goods, Baking, Desserts, Food, holidays, lunch box

Favorite Peanut Butter Cookies

20131207-090825.jpg
I have a son that is super picky when it comes to dessert foods. He’s quite old-fashioned and loves only the traditional recipes that we’ve all known for years. Basic chocolate chip cookies (no nuts), plain ole’ brownies (no fancy powder sugar topping) and my famous peanut butter cookies. This is probably P’s most requested cookie recipe.
What I like about this basic recipe is that it is flour-less. Mixing a few simple ingredients together produces a dense, flavorful cookie that everyone seems to enjoy. In the fall, I make these for all of our football tailgate parties because they pack so well. During the winter months, especially for holiday parties, I add a cup of chocolate chips to the mix for a heartier cookie. The combination of peanut butter and chocolate is a flavor that just can’t be beat!

Favorite Peanut Butter Cookies

2 cups sugar
2 eggs
2 cups peanut butter ( smooth or crunchy)
2 teaspoons baking soda
1 pinch salt
1 teaspoon vanilla extract

Preheat oven to 350 degrees F. Lightly spray cookie sheets with cooking spray.
In a large bowl, beat eggs and sugar together until light and fluffy. Stir in the peanut butter. Next, stir in the baking soda, salt, and vanilla. Use a small ice cream scoop to form dough into 1″ balls and place them 2 inches apart onto the prepared cookie sheets. Press a criss-cross into the top using the back of a fork. Sprinkle with a little sugar.
Bake for 8 to 10 minutes in the preheated oven. Allow cookies to cool on baking sheet for 5 minutes before removing to a wire rack to cool completely.

Posted in appetizers/snacks, Baked goods, Baking, Brunch, Desserts

Gingerbread Holiday Cookies

20131127-131212.jpg
Gosh, I love this time of year…I am especially happy this week because my K is coming home from college for the holiday weekend! We have missed seeing her smiling face around the house. She is a student athlete so she hasn’t been allowed to come home since the beginning of the school year. Her most common complaint while away at school is that she misses mom’s cooking and baking.
Well, I have been baking all morning getting ready for her arrival tomorrow. In the past two hours, I have made Mary’s Irish Scones, Grandma’s Brown Bread, a batch of Jumbo Oatmeal Cowboy Cookies and these Gingerbread Holiday Cookies. I downloaded the gingerbread cookie recipe many years ago from the Martha Stewart website after seeing her make them on her weekly television program. I have been making this recipe for the holidays ever since. (Using various cookie cutter shapes to reflect Thanksgiving and Christmas symbols…stars, leaves, turkeys, candy canes, gingerbread men, etc.)
I will be starting on some of K’s favorite savory meals this afternoon. …Can’t wait to have the family back together for the holidays!
Happy Thanksgiving to all those living in the United States…Happy Day to those living elsewhere! 😉