

Saturday’s unseasonable temperatures made for a very chilly (end of the summer) basketmaking workshop. Wearing several long-sleeved layers didn’t do much to shield us from the brisk winds during this cool and breezy day. It was hard to imagine that the temperatures had climbed to nearly 100 degrees the weekend before. Despite the weather, we happily socialized as we worked beneath a shelter at a local county park. The item that we were to assemble was a cute round, (continuous weave structure); a pumpkin-shaped basket. Here are the steps that our incredible instructor took us through during this four-hour weekend event.
 Dividing the disk into 4 equal parts, place 23 spokes within the well of the disk; weaving while working in the spokes.


 After weaving 6 continuous rows, gently begin shaping the basket upwards. Continue weaving upward for 14 more rows; loosely weaving to shape the belly of the pumpkin.


 At row 19 or 20 begin to tighten the weave to form the top of the pumpkin.
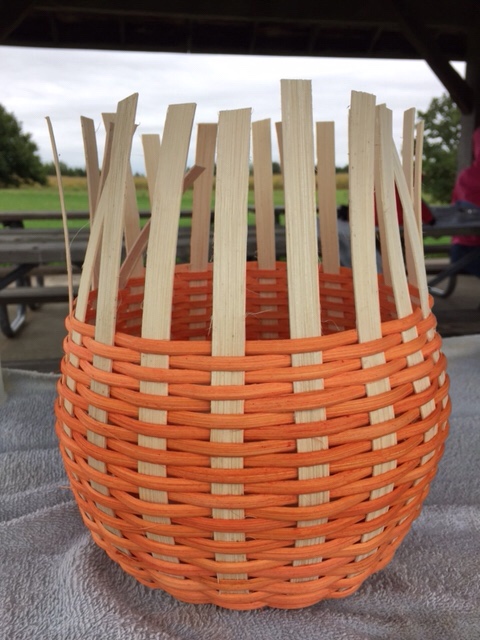
At row thirty, the weave is complete. Bend down, every other spoke. Clip; mark remaining spokes to bend under and secure under weave.
 Secure wire handle before finishing rim of the basket.
 Complete basket rim with sea grass and lashing.

 We enjoyed a beautiful, but chilly, day at our local county park!


This is soo cute!! 🙂
LikeLiked by 1 person
Thank you! I was excited to have the opportunity to attend another basketmaking class. The pumpkin shape is cute!
LikeLike
Love this basket, Linda!
LikeLiked by 1 person
Gosh, I really like to too… it’s festive for the fall season. I think I’ll try to find a plastic liner at the dollar store so that I can put pumpkin cookies or ginger snaps inside the basket.
LikeLiked by 2 people
What a fabulous basket! I love it! Well done 🙂
LikeLiked by 1 person
Super easy project and a beautiful late summer day! Thanks for your comment! Have a good weekend!
LikeLike
I’m impressed! A basket weaving baker! BTW your blog looks beautiful.
LikeLike
You are so very kind! Thank you for your valued comment. I’m not sure that I could have made this basket on my own. Our instructor was amazing! I hope to continue to learn the craft. Thanks again, have a great day!
LikeLike
That’s amazing! Great job!
LikeLike
You’re very kind… thank you!
LikeLike
ohhh this is so cute! and you made that! these photos are great and the instructions are clear.
LikeLike
Thanks for your kind words… I’m certainly no expert in basket weaving but I try to photo-log every step so I remember how to make the basket (or a similar one) again. Have a great day!
LikeLiked by 1 person
Ooooh, this is cute! I must try this, thank you for the clear instructions 😀
LikeLike
You’re welcome!
LikeLike
What was the size of the base?????
LikeLike
7” across. Hope this helps!
LikeLike
I love this basket and I want it to be my first basket to make! do you know the size of the flat reed and the round reed? and other pieces if they are different..
LikeLiked by 1 person
Chris,
I’m sorry to say, we were given all of the materials to make the basket during the workshop. I don’t have the specifics exactly but as I measure materials 1/4” orange half round reed, 3/4” flat reed band around top, 1/2” flat reed spokes. We were given the option to use a 7 or 5” wooden round for the bottom of the basket. Hope this helps! Be sure to let me know how this project turns out for you. Best-
LikeLike
Absolutely beautiful! I want to try and make one. Do you know how long the spokes were? Thanks for sharing.
LikeLike
Thanks for your kind words, Donna.
I’ve measured the spokes for you. They are approximately 12 1/2”. Hope this helps!😊
LikeLike